All posts by Vinod Gopinath

Types of Glass: A Comprehensive Guide

Types of glass play a crucial role in architecture, design, and engineering, offering diverse solutions for strength, safety, and aesthetics. Understanding the different types of glass helps professionals choose materials that balance beauty and functionality. From transparent facades to energy-efficient windows, each type serves a unique purpose. The glass types and uses vary widely—some provide insulation and noise reduction, while others enhance security or design appeal. Common types of glass used in buildings include float, laminated, tempered, and tinted glass, each engineered for specific conditions. Meanwhile, the types of glass materials used in manufacturing and construction are evolving with technology. The types of safety glass ensure protection against impact and breakage.
In this article, we will discuss the main types of glass. We will explore their characteristics and applications. The benefits of these glass types span modern architectural and industrial uses.

The flexibility of usage of glass in architectural applications like doors, windows, facades, etc. makes it one of the popularly used products in the construction sector. This article is about the manufacturing process of glass, and major glass types used in construction and architecture applications.

  1. Manufacturing process and properties
  2. Different types of glass and uses
  3. Types of glass used in buildings
    1. Annealed
      1. Applications
    2. Clear /Float glass
    3. Tinted
    4. Frosted
  4. Types of safety glass
    1. Heat Strengthened glass
    2. Toughened glass
      1. Advantages
  5. Conclusion

Manufacturing process and properties

Glass manufacturing follows the fusion process method which involves fusing sand with grounded lime, soda, and other admixtures etc., and cooled to form glass. Glasses are transparent, translucent, or brittle. Following are the basic properties of glass that make it one of the most preferred and popular architectural choices.

  • Transparency: Glass is transparent from both sides or one side.
  • Strength of glass: Enhanced to any level by adding admixtures and laminates.
  • Workability of glass: Glass is flexible and possible to mold to any shape or even blown in the molten stage.
  • Transmittance end U value: Can control temperatures and extreme climatic conditions.
  • Glass is 100% recyclable
Close-up view of a modern building facade featuring large reflective glass windows with varying designs and textures.
Modern glass facade highlighting the aesthetic and functional aspects of architectural design.

Different types of glass and uses

There are mainly three types of glass

  • Annealed glass
  • Heat-strengthened glass
  • Toughened glass.

Types of glass used in buildings

Types of glass used in buildings play a vital role in aesthetics, safety, and energy efficiency. They offer versatile options for modern architecture and sustainable construction solutions. The types of glass are as follows.

Annealed

Annealed glass is popularly known as float glass or conventional glass. Ingredients like sand, grounded lime, admixtures are mixed and cooled for manufacturing annealed glass. Float glass has a perfectly flat, brilliant surface with optical clarity.
Different types of float glasses popularly used in the construction sector are as follows.

Applications

  • Annealed glass uses include application as table-tops. They infuse your room with an elegant and spacious look.
  • Used for external facades due to crystal clear vision.  It can provide you with natural daylight and improve ventilation
  • Used for external walls and can absorb 30-45% of the sun’s heat to enable greater comfort.
  • Doors, windows and shower screens

Clear /Float glass

Clear glass is a clear and transparent annealed glass. They got a natural greenish color. Clear glass is extensively used for architectural applications involving doors, windows, solar applications, shelves, etc. Other glass types use clear glass in their manufacturing process.

Tinted

Tinted glass is manufactured by adding small amounts of metal oxide to the glass ingredients. These ingredients regulate the transmission of solar energy and modify the color without changing the basic properties of the glass.

Frosted

Frosted glass is a translucent annealed glass type manufactured using sandblasting or acid etching techniques. This gives a pitted and rough surface with foggy appearance.

Types of safety glass

Types of safety glass are essential for modern structures, providing strength, protection, and durability. These types of safety glass enhance building safety while maintaining clarity and design flexibility.

Heat Strengthened glass

Heat strengthened glass follows heating of annealed glass to a temperature of around 650-700 degree. The cooling process is much slower than the process used in the manufacturing process of tempered/toughened glass.

Heat-strengthened glass is a semi-tempered glass. It retains the normal properties of ordinary float glass. Heat strengthening adds strength to the glass by inducing surface compression and limiting the breakage chances. For heat strengthened glass the compression induced is in the range of 6000 to 9000 psi. However compression induced is around 11000 to 20000 psi in the case of fully tempered/toughened glasses.

  • Heat strengthened glass provides necessary resistance to heat build up during external applications.
  • Heat-strengthened glass differs from tempered glass in surface compression and possess mechanical strength of about 1.6-2 times that of annealed glass.
  • These glass got excellent thermal stability, whereas its flatness and light transmission is equal to that of annealed glass and much better than that of tempered glass.
  • Three times more resistant to thermal stress in comparison to normal annealed glass.
  • It can withstand temperature difference of 100°C (in range of 50°C to 150°C) when compared to ordinary annealed glass which can withstand up to 40°C.
  • Heat strengthened glass is less susceptible to spontaneous breakage.

Toughened glass

Tempered or toughened glass is a type of safety glass processed by controlled thermal or chemical treatments to increase its strength compared with normal glass. Tempering puts the outer surfaces into compression and the interior into tension. Such stresses cause the glass, when broken, to shatter into small granular chunks instead of splintering into jagged shards as ordinary annealed glass does. The granular chunks are less likely to cause injury.

Close-up of a fractured glass panel with a spiderweb pattern of cracks, indicating high impact, in a modern industrial setting.
A close-up of toughened safety glass displaying a spider web pattern due to stress and impact testing, showcasing its durability.

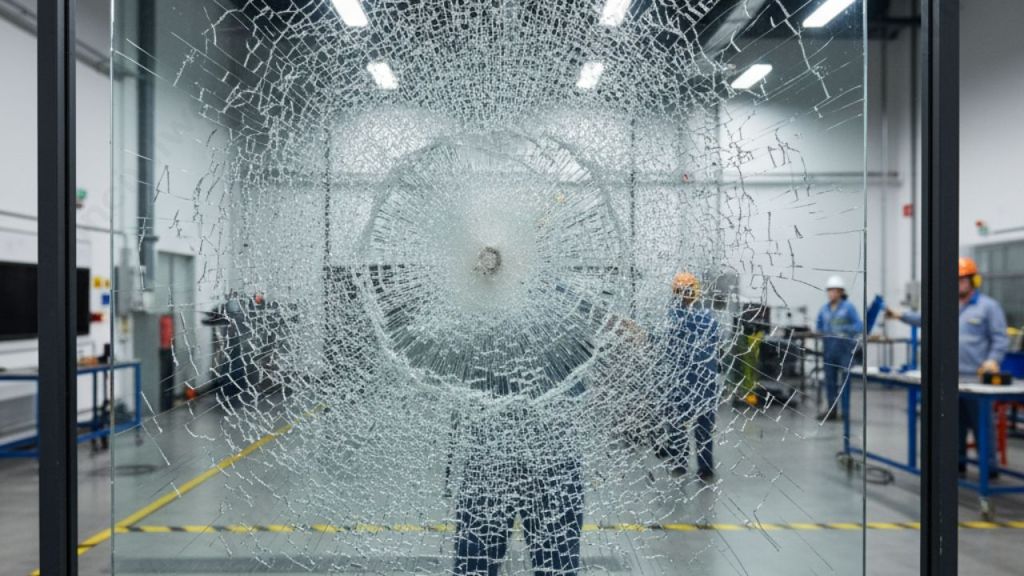
Toughening does not alter the basic characteristics of normal glass like light transmission and solar radiant heat. They possesses high thermal strength, and can withstand high temperature changes up to 250°C.

Close-up of shattered glass displaying a complex pattern of cracks.
Close-up of shattered glass illustrating the safety concerns addressed by toughened glass in construction.

Advantages

Let us have a look into the advantages of toughened glass that makes its superior to ordinary glass.

  • Strength and safety : Toughened glass is extremely strong and can counter any temperatures and climatic changes and are less likely to break.
  • Scratch proof : Toughened glass is scratch proof and capable of maintaining the sheen and elegance of structures for years.
  • Heat resistance : Normal glass may crack in high temperatures where as the toughened glass manufacturing process involves heat tempering and hence capable of resisting high temperatures.
  • Design flexibility : Toughened glass got several design options like frosted, translucent, coloured, laminated options.

Key Takeaways

  • Types of Glass significantly impact architecture and design by offering diverse solutions for strength, safety, and aesthetics.
  • The main types of glass include annealed, heat-strengthened, and toughened glass, each with unique properties.
  • Manufacturing glass involves fusing materials like sand and lime, resulting in transparent, strong, and recyclable products.
  • Annealed glass is suitable for applications like windows and facades, while toughened glass enhances safety and durability in modern structures.
  • Heat-strengthened glass provides extra thermal resistance and is less prone to spontaneous breakage compared to ordinary glass.

Conclusion

In conclusion, the various types of safety glass play a vital role in ensuring both safety and style in modern construction. Whether it’s tempered glass, laminated glass, or toughened glass, each type provides unique benefits. These include strength, impact resistance, and protection against breakage. These types of safety glass used in buildings not only enhance structural safety but also contribute to energy efficiency, sound insulation, and visual appeal. From skyscrapers and commercial spaces to homes and facades, safety glass applications continue to expand. By understanding the types of glass available and their specific properties, architects and builders can choose the most effective solutions for durability, performance, and design excellence in today’s evolving construction landscape.

Penetration Test for Bitumen – Significance and Procedure

The penetration test for bitumen is a laboratory method for grading bitumen based on its hardness. In this test, the amount of penetrating a specific needle into the bitumen is measured.

More than 85% of bitumen is used in road construction. Weather condition affects on bitumen binder. In cold weather, bitumen becomes hard, and the possibility of cracking increases. On the other hand, hot weather causes bitumen becomes soft and sticky.

Both situations are not acceptable as a result of civil engineers using penetration tests.

  1. What is the Penetration Test of Bitumen?
  2. The Bitumen Penetration Test History
  3. An overview of the Bitumen Penetration test Importance
  4. How Is the Penetration Test of Bitumen Performed?
  5.  Apparatus
    1. Procedure 
  6. Infographics – 10 Major bitumen tests

    What is the Penetration Test of Bitumen?

    The penetration test for bitumen is a laboratory method for grading bitumen based on its hardness. In this test, the amount of penetrating a specific needle into the bitumen is measured.

    This value is reported in a tenth of a millimetre or Deci-millimeter (DMM) as a penetration value. The penetration test can be used for refinery bitumen, emulsion bitumen, and oxidized bitumen. Based on this test bitumen is classified into penetration grades of 20/30, 30/40, 40/50, 50/60, 60/70, and 80/100.

    This test can measure the penetration value in the range of 20 to 300 dcmm. It can recognize the bitumen consistency and stability of bitumen.

    Let’s see this test history and application.

    The Bitumen Penetration Test History

    The first uses of the penetration test, date back to the early 19th century. Before that, the hardness of bitumen is measured based on the Chewing test. It was a completely experienced test. Through that, an engineer chews a moderate-temperature bitumen sample. Then reports the hardness of bitumen according to the difficulty of chewing. Because of the chewing test’s inaccuracy, the penetration test was introduced to the industry. 

    An overview of the Bitumen Penetration test Importance

    More than 85% of bitumen is used in road construction. Weather condition affects on bitumen binder. In cold weather, bitumen becomes hard, and the possibility of cracking increases. On the other hand, hot weather causes bitumen becomes soft and sticky. Both situations are not acceptable as a result of civil engineers using penetration tests.

    Bitumen with high penetration values is suitable for cold weather. Because it does not harden and crack when exposed to low temperatures. On other hand, bitumen with smaller penetration values is suitable for hot weather. Because high temperatures can not soften it. Most workable penetration bitumens are penetration grades 60/70 and 80/100. Penetration grade 60/70 can apply to road construction in warm weather and 80/100 is suitable for cold weather.

    Bitumen penetration grade 80/100 means that the needle penetrates into the bitumen in the range of 80 to 100 decimeters.

    How Is the Penetration Test of Bitumen Performed?

    In the following, you can familiarise yourself with the apparatus and the procedure of the test based on ASTM D5. Before that watch the below video by Infinity Galaxy which introduces the penetration test of bitumen.

     Apparatus

    • Penetrometer 
    • Container
    • Water bath
    • Stopwatch
    • Thermometer
    penetrometer

    Procedure 

    In the first step, bitumen should be heated up until it becomes liquid. Bitumen should not be heated in a temperature range above 90-100 degrees Celsius otherwise it will burn. While the temperature rises, stir the bitumen to make sure it is uniform. Bitumen should also be free of water and air bubbles.

    In the next step, pour the melted bitumen into the container and let it cool at room temperature. 

    After that put the bitumen container in the water bath with a constant temperature of 25 degrees Celsius and let the sample reach the same temperature.

    Then place the container under the penetrometer. Move down the needle just above the bitumen surface. 

    Thereafter, apply the needle which has a 100gr load just for 5 seconds. Repeat the test 3 times and write down the results each time. The needle tip in each repetition should be apart 10mm from the previous measurements.

    Report the mean value as the penetration value of the bitumen sample. The following picture is other important bitumen tests in road construction:

    Infographics – 10 Major bitumen tests

    Interior Design: 3 Key Points and 3 (Common) Mistakes to Avoid

    Interior design is the art or practice of strategizing and managing the planning, design and execution of architectural interiors and their finishes and furnishings. When we decide to build our home, a path begins. It generates proposals in a much larger spectrum than what refers to the house itself.

    We also began to pay special attention to everything related to architecture, construction, and interior design.

    We observe, in the spaces we inhabit, how this or that technical resolution works. We notice how much we like a certain colour palette and what combinations of materials we find most pleasing. This opens up a new universe.

    Read Also: Blue World City Islamabad (UPDATED) Project Details | NOC | location | map | Plot Prices   

    This is where I would like to make an aside for interior design.

    It is the stage that materializes towards the middle and end of the work once the structural part and the “gross work” are resolved.

    The interior designer ideally works as a team with the architect and the family. They focus on everything related to the well-being inside the home.

    1. What does an Interior Designer Do?
    2. Key points of Interior Design
      1. #1. Form and Function – Primary point of interior design
      2. #2. Materiality –
      3. #3. Aesthetic
    3. Common Interior Design Mistakes
      1. #1. Not Planning the Interior Design
      2. #2. Moving into the Unfinished House (or Knowing when we will Finish it)
      3. #3. Put Sustainability Aside
    4. Conclusions

    What does an Interior Designer Do?

    His task has much to do with architecture and also includes decoration, but goes beyond it:

    It attends to the habitability of the space, its healthiness, materials, and the interior climate. This includes temperature, humidity, lighting, functionality, and aesthetics of all its equipment, etc.

    It takes into account the behavioural and psychological aspects of those who will live in each space.

    Here comes the most stimulating part of designing the interior of a home: Its creative and playful aspect.

    A mood board showcasing various fabric swatches, color samples, and interior design inspiration, including photographs of styled living spaces and sketches, arranged on a cork board with a hand writing notes.
    A creative mood board filled with fabric swatches, color palettes, and inspirational images for interior design.

    The possibility of working on it as a family shapes it as a team with a professional. They finish shaping it and adjusting it to what we have already been designing.

    They can be encouraged to make group sketches or put together collages or “mood boards” with pieces. These can include materials and colours that inspire them. Cut out and save images, words, photos, and phrases to serve as a guide throughout the process.

    Let us have a walk through to the key points of Interior design

    Key points of Interior Design

    Three key points of interior design to keep in mind are as follows

    • Form and function
    • Materiality
    • Esthetic
    A visual representation outlining the key points of interior design, featuring categories such as Form & Function, Materiality, and Aesthetic, accompanied by samples of materials and a floor plan sketch.
    Visual representation of the key points of interior design: Form & Function, Materiality, and Aesthetic.

    #1. Form and Function – Primary point of interior design

    It is important that the forms we choose for the interiors are consistent with the design of the “shell”. This consistency should extend to the decisions we have been making at a functional level.

    For example, if we choose to design a dome-type home where curved shapes prevail, that same criterion will guide us. It helps when choosing the openings, the furniture, and its distribution, reinforcing the idea of ​​the organic.

    A modern living space featuring large glass doors that open to an outdoor area, with flowing white curtains and a minimalistic wooden dining table and chairs.
    A modern interior featuring large glass doors and natural light, emphasizing seamless indoor-outdoor living.

    If the construction decisions aim to generate a space with constant ventilation, the interior distribution should also collaborate with this objective. We should avoid locating large furniture or internal divisions that obstruct air circulation.

    #2. Materiality –

    Although sometimes we believe that the interior materials only influence the aesthetic aspect, like the rest of the materials we choose for the home, they also have great weight at a functional level. They influence the comfort and healthiness of the home.

    For example, if we decide to build a high-efficiency rocket stove with natural materials, we should consider its surroundings. Surrounding it with a brick or stone plinth and floor can enhance its thermal inertia. It’s better than using ceramics or wood that do not have that characteristic.

    Flat lay of various material samples including wood, marble, fabric, and metal, with the text 'Materiality: The choice of materials for a house is key' overlaying the image.
    A curated selection of materials emphasizing the importance of materiality in interior design.

    If from the design we are governed by the idea of ​​maintaining good insulation in the openings, we can collaborate with this. Choose a thick and heavy curtain on the facades most exposed to cold or wind.

    The choice of materials for a house is key and largely determines the interior design of our house. So also the functional aspects that collaborate with the design of the house at a functional level.

    #3. Aesthetic

    It is a point that we sometimes put aside when we are in the middle of work, right?

    However, aesthetics is one of the pillars of any creative act. It has a direct influence on the healthiness of the home since it relates to the appreciation of beauty.

    Living spaces where we can inhabit beauty connect us directly with enjoyment and positive emotions, confidence, and self-esteem.

    It relates to our most subtle side. It relates us to art in our daily lives. Moreover, it gives us the possibility to express the lifestyle that we seek to have and want to share.

    A cozy living room with a light-colored sofa adorned with patterned cushions, a wooden coffee table with books, a sculptural vase, and a potted plant, all bathed in natural light from large windows.
    A modern living room featuring a cozy sofa, a stylish coffee table, and a potted plant, highlighting minimalist interior design.

    Spaces that we don’t like or cause aesthetic discomfort influence us negatively. They can even make us feel incapable or affect our image of ourselves as creators.

    As in the previous points, the aesthetic line of the shell must have a clear relationship with the interior. This can be in a harmonious or totally disruptive way.

    Common Interior Design Mistakes

    Some issues arise repeatedly while designing spaces. These missteps can be avoided with a comprehensive understanding of design principles. The three most common interior design mistakes are as follows

    • Not planning the interior design
    • Moving into the unfinished house
    • Put sustainability aside

    Let us dive into the details

    #1. Not Planning the Interior Design

    Being the last stage and perhaps the least “hard” or technical, everything related to equipment and finishes is usually left out. It is often excluded from the plans of time, money, and energy within the work.

    However, it is important to remember these aspects. Ultimately, they make the quality of the home as much as the entire process that precedes it. We must consider it within the planning of the work like any other stage.

    #2. Moving into the Unfinished House (or Knowing when we will Finish it)

    An idea that is usually installed due to not having measured our money, time, and energy to finish and equip the house is “we move as it is, and then we finish it”.

    This is a decision that can lead us to live in an unhealthy space, not very functional or not suitable for the lifestyle we aimed for when we started.

    Without planning, it is a state that can last longer than we think. It can begin to affect us emotionally and functionally in our homes.

    #3. Put Sustainability Aside

    In a rush to finish as it may, we can abandon in this last stage all the considerations of ecology, sustainability, and health. These are aspects in which we invested in the rest of the construction.

    This is related, again, to not considering the interior of the house in our planning. Consequently, we arrive without time, money, or energy to finish it.

    Conclusions

    1. The fundamentals: Consider the interior design and equipment of the home as part of the construction process. From the moment of planning and initial budget

    2. Take interior design as a creative opportunity for all the people who are going to live in the house. It also encourages us to manufacture and generate the elements that are going to surround us every day.

    3. Pay attention to the spaces that we are visiting. This allows us to take the ideas and concepts we find harmonious and pleasant and translate them into the design of our home.

    4. Do not hesitate to consult a specialized professional, as in any other stage of the work

    You already know interior design is something very important to consider in the design of your home. Taking these recommendations into account, you can start thinking and imagining what the interior of your new home could be like. For more ideas on interior design, please visit https://www.skymarketing.com.pk/kingdom-valley-islamabad/

    Ecological House – How to Build with Materials that Society Throws Away

    Ecological house or Earthship House models are passive, bioclimatic, and self-sustaining designs. An architecture that promotes the reuse of waste materials and energy independence.

    Many people are now attracted to the idea of building an ecological, healthy, and low-cost house. One can find such houses in New City.

    However, a myth persists that building a greenhouse costs a lot and requires expensive, sophisticated materials.

    Nothing is further from reality!!!

    1. Types of Ecological Houses
    2. The Principles of Earthship Green Homes/ Ecological House
      1. 1. The Orientation of the House
      2. 2.  Use Waste Materials
      3. 3.  Use of Renewable Energies
      4. 4.  Installation of Rainwater Harvesting and Wastewater Treatment Systems
    3. Construction Stages of an Earthship Ecological House
      1. Earthship ecological house models do not walk with half questions.

    Types of Ecological Houses

    And while it is true that certain types of ecological houses use expensive materials, there are other options (there always are) that go the opposite way.

    Today, I want to present a model of houses that Architect Michael Raynolds developed in 1978.

    This model of ecological houses is called Earthship, which literally means “Earth Ship.”

    Raynolds has been building their houses for more than 30 years in different parts of the world. They have adapted to different climates and cultures.

    Reynolds is the founder of the  Earthship Biotecture initiative, an organization dedicated to fostering and promoting the development of the Earthships model of homes throughout the world.

    The Principles of Earthship Green Homes/ Ecological House

    The principles that guide the design of Earthships ecological houses are simple and functional.

    Their purpose is to generate a healthy, sustainable house with a decentralized energy supply system.

    There are 4 principles that guide this type of design:

    • The orientation of the House
    • Use waste materials
    • Use of Renewable energy
    • Installation of Rainwater Harvesting and Wastewater Treatment Systems

    1. The Orientation of the House

    The basic principle of Passive Design. It is about orienting the openings of the house (especially windows) towards the direction of the solar path.

    A principle that should guide every design of a house. 

    Builders create large windows in this direction and place a greenhouse (in the form of a longitudinal corridor) between the exterior and the house’s rooms.

    Interior view of a greenhouse corridor in an ecological house, featuring lush plants and a wall made of glass bottles.
    Interior of an Earthship greenhouse corridor, featuring lush plants and walls made from repurposed materials, designed for solar energy collection.

    This greenhouse corridor efficiently collects solar energy, and residents manually regulate the house’s temperature there.

    It also serves as an interior garden where to grow food for self-consumption. It can also build filters for the gray water of the house.

    2.  Use Waste Materials

    Earthship eco-homes use car tires, glass bottles, and cans in their construction.

    Builders use car tires to construct the foundations and retaining walls of the house. They incorporate bottles and cans into the walls. Typically, they build dense and wide walls from earth or adobe.

    This achieves great energy efficiency.

    A modern Earthship ecological house with a unique facade featuring recycled glass bottles, surrounded by used car tires and small shrubs, set against a sunset landscape.
    An Earthship ecological house showcasing sustainable design with walls made from waste materials, featuring glass bottle skylights and tires as a foundation.

    The use of bottles works as skylights, allowing light to enter and generating a very particular aesthetic that many people like more and more.

    3.  Use of Renewable Energies

    One of the characteristics of the Earthships Houses is their independence from supply networks. Therefore, it is possible to build them anywhere.

    An Earthship ecological house featuring a unique design built with sustainable materials, solar panels on the roof, and a wind turbine in the background, set in a desert landscape.
    An Earthship ecological house featuring solar panels and a wind turbine, designed for self-sustainability and energy independence.

    To generate energy for domestic consumption, the house uses the energy of the sun and the wind. Solar panels and Aeolic blades serve as two sources of permanent and renewable energy.


    4.  Installation of Rainwater Harvesting and Wastewater Treatment Systems

    The house achieves its water supply by collecting rainwater, which it gathers in a dedicated tank. Then, some filters purify this water into drinking water, and the house uses it for all purposes. The system separates gray water from black water (from the toilet). A gray water filter in the “greenhouse” part treats the gray water.

    Illustration of an Earthship water harvesting and treatment system, showing components like rainwater collection tank, filtration system, gray water management, septic tank, and a greenhouse bio-filter for sustainable living.
    Diagram illustrating the Earthship water harvesting and treatment system, showcasing how rainwater is collected, filtered, and utilized within the ecological house.

    The water from the toilet goes to a septic tank, to be later purified in a biological filter.

    The following diagram shows how the water in the house is collected and treated.

    Construction Stages of an Earthship Ecological House

    The simple construction system of an Earthship Ecological House allows people to build it collaboratively and communally.

    It is very labour intensive, and the first stage is physically hard work.

    Let us look into the stages of construction.

    1. It begins by building a perimeter wall (in the form of a «C») of used car tires

    This wall covers the three orientations except that of the solar path. North for the Southern hemisphere and South for the Northern hemisphere.

    Once the wall is finished, a perimeter beam is placed on the wall. Some “screen wall” type pillars reinforce the perimeter wall of used tires.

    On the opposite side of the solar path are the rainwater collection tanks and the tubes. These tubes manually regulate the interior temperature of the house (ventilation).

    2. Then, you start with the wooden structure. The roof structure and the entire roof are built. Also, the part that looks towards the solar path where doors and windows are located

    3. Also, with a wooden structure, the part of the greenhouse is built in the same direction as the solar path

    4. Solar panel installations are made

    5. Interior work begins: interior floor and walls

    Earthship ecological house models do not walk with half questions.

    It is a 100% self-sustaining design, uses waste materials, and promotes energy independence.

    It is a radical design that is committed to a relationship with an environment of respect and harmony.

    If you really dare to have a design like this, the best advice is to get to know the Earthship Biotecture website in depth

    It will probably be very difficult for you to find a construction company that knows and knows how to build an Earthship house.

    Therefore you will have to train and seek help from people who know and work promoting this type of construction.

    Types of Admixture in Concrete – Functions, Types and Uses Explained

    The types and uses of admixtures in concrete depend on the structure’s purpose, design strength, placement conditions, and performance requirements. Concrete, the most used construction material, combines cement, sand, water, and aggregates. An admixture is added to this mix to improve or alter specific properties, making it more adaptable to environmental and structural demands. Concrete used in modern infrastructure faces challenges like extreme temperatures, moisture, and chemical exposure. Hence, concrete admixtures are essential for creating high-performance, durable, and long-lasting concrete. Generally, admixtures are divided into chemical admixtures and mineral admixtures. This article explains their types, functions, and applications in detail.

    1. Definition of Admixture and its types
    2. Uses of different types of admixtures in concrete
    3. Types of Admixture used in concrete
      1. Types of Mineral Admixture
      2. Types of Chemical Admixture
    4. Types of concrete admixture based on applications
      1. Water-reducing admixtures
      2. Retarding admixtures/Retarders
      3. Accelerating admixture/Accelerators
      4. Air entraining admixtures
      5. Pozzolanic admixtures
      6. Damp proofing admixtures
      7. Gas forming admixtures
      8. Air detraining admixture
      9. Anti-washout admixture
      10. Corrosion inhibiting admixture
      11. Bonding admixture
    5. Key Takeaways
    6. Conclusion

    Definition of Admixture and its types

    An admixture is a natural or manufactured chemical or additive blended into concrete during mixing. Their primary role is to alter the properties of either the fresh (plastic) or hardened concrete, making it more desirable for a certain condition. An admixture is a material added to concrete, before or during mixing, to modify its properties. Admixtures enhance workability, durability, strength, and setting time, making concrete suitable for specific construction needs. By using the right types of admixture in concrete, builders can achieve higher performance and reduce construction costs.

    🔗 Related Read: Slump Test for Workability of Concrete

    Uses of different types of admixtures in concrete

    Each admixture type performs distinct functions that improve concrete performance. The benefits of using admixtures are numerous, improving both the concrete’s performance and the efficiency of construction:

    • Improved Workability: Increases the ease of handling, placing, and compacting the concrete.
    • Enhanced Durability & Strength: Increases resistance to environmental factors and boosts long-term strength.
    • Water Reduction: Allows for a lower water-cement ratio while maintaining workability, which significantly increases strength.
    • Setting Time Control: Accelerates or retards the concrete’s setting time to suit different temperatures or construction schedules.
    • Reduced Defects: Limits problems like shrinkage cracking, bleeding, and segregation of concrete.
    • Corrosion Protection: Reduces the corrosion rate of reinforcement steel.
    • Economic Savings: Can reduce construction costs by optimizing material use or speeding up construction.
    • Decreases Heat of Hydration.

    Types of Admixture used in concrete

    Admixtures are primarily classified into two broad categories: Mineral Admixtures and Chemical Admixtures.

    1. Mineral admixtures
    2. Chemical admixtures

    Types of Mineral Admixture

    Mineral admixtures are siliceous and insoluble materials other than cement and aggregate that are added to concrete in concentrations ranging from 20 to 70% by mass of cement. These are fine materials that have an impact on concrete via hydraulic and pozzolanic activity. They affect the concrete through hydraulic (reacting with water) or pozzolanic (reacting with calcium hydroxide) activity. Natural materials, processed natural materials, and artificial materials are all examples of mineral admixtures. The following are some types of mineral admixture commonly used in concrete.

    Common types of mineral admixture include:

    • Fly Ash (Flash): A byproduct of coal-fired power plants. It significantly improves long-term strength, reduces permeability, and helps decrease the heat of hydration.
    • Silica Fume: An extremely fine byproduct of silicon and ferrosilicon alloy production. It creates ultra-high-strength concrete with exceptional density and low permeability.
    • Ground Granulated Blast-Furnace Slag (GGBFS): A byproduct of steel manufacturing. It improves workability and provides strong sulfate resistance, excellent for marine environments.
    • Metakaolin: A material produced by calcining purified kaolinite clay. It offers similar performance to silica fume but with a lighter color.
    • Rice Husk Ash: A highly pozzolanic agricultural waste product.
    Two bulldozers working on a large pile of aggregate material at a construction site, with a dump truck in the foreground.
    Heavy machinery working at a construction site, moving piles of aggregate material for concrete production.

    These admixtures enhance resistance to sulphate attack, reduce permeability, and improve workability in both hot and cold climates.

    Types of Chemical Admixture

    Chemical admixtures for concrete are compounds that alter its physical and chemical behavior to achieve specific results such as delayed setting, rapid hardening, or water reduction. Chemical admixtures are organic or inorganic chemicals added to concrete in very small amounts (usually less than 5% by mass of cement). They are designed to modify the fresh or hardened properties of concrete immediately.

    Different types of admixtures used in concrete
    Different types of admixtures used in concrete

    The most common types of chemical admixture include:

    • Plasticizers (Water Reducers): These decrease the water requirement for a given slump (workability) by about 5% to 15%.
    • Superplasticizers (High-Range Water Reducers): Highly effective chemicals that can reduce the water content by over 12%. They are essential for producing high-strength concrete or “flowing concrete” that can be placed easily in densely reinforced sections.
    • Accelerators (Accelerating Admixtures): Decrease the initial setting time of concrete. Used in cold weather or when rapid formwork removal is necessary. The most common example is calcium chloride.
    • Set Retarders (Retarding Admixtures): Increase the setting time of concrete. Ideal for hot weather or for complex pours that require a long transportation or placing time.

    Types of concrete admixture based on applications

    Admixture is classified into various types based on various applications

    • Water-reducing admixture
    • Retarding admixture
    • Accelerating admixture
    • Air entraining admixture
    • Pozzolanic admixture
    • Damp-proofing admixture
    • Gas forming admixture
    • Air detraining admixture
    • Anti-washout admixture
    • Corrosion inhibiting admixture
    • Bonding admixture

    Water-reducing admixtures

    Plasticizers are another name for water-reducing admixtures. Basically, by lowering the water-cement ratio, they assist in reducing the water content of the concrete mix by 5 to 20%, resulting in high-strength concrete. Workability is increased by water-reducing admixtures because they can even maintain a high slump without adding more water. Examples include polycarboxylates, multicarbovyl ethers, and acrylic polymers. etc.

    Retarding admixtures/Retarders

    Retarding admixtures or retarders decreases the setting rate of concrete. They are suitable in hot weather conditions where the high temperature drastically increases the setting rate of concrete. However, the fast setting rate of concrete affects its strength and durability. Generally, retarding admixtures are widely used to overcome this problem. Some examples of retarders are Starch, cellulose products, common sugar, acid salts, etc.

    Accelerating admixture/Accelerators

    Accelerating admixture decreases the initial hardening time of concrete. As a result the rate of hydration of cement increases. There are two types of accelerating admixtures.

    • Set accelerating admixture
    • Hardening accelerators

    Accelerating admixture improves the concrete strength by increasing the rate of hydration. This type of admixture is suitable for early formwork removal, emergency repairs, buildings in low-temperature regions, etc. Some examples of accelerators are triethanolamine, calcium formate, active silica, calcium chloride, finely divided silica gel, etc.

    Air entraining admixtures

    During concrete mixing, these admixtures introduce and stabilize microscopic air voids while forming air bubbles in the mix.

    Similarly, these admixtures impart air entrainment that results in:

    • Increased resistance to deterioration from cyclic freezing and thawing 
    • Improved workability and cohesiveness of concrete placement
    • Reduced segregation and bleeding

    🔗 Learn More:

    Pozzolanic admixtures

    These admixtures are suitable for hydraulic structures such as dams, reservoirs, etc. Pozzolana is a cementitious material that helps in preparing high-dense concrete mixes. Accordingly, It increases the strength, and reduces the cost of concrete and thermal shrinkage. Some examples of pozzolanic admixtures are fly ash, silica fume, rice husk ash, metakaolin, etc.

    Damp proofing admixtures

    Dampproofing admixtures make the concrete impervious and durable. It also helps in attaining the early stage of concrete hardening. Some examples of dam-proofing admixtures are hot bitumen, mastic asphalt, bituminous felt, etc.

    Gas forming admixtures

    During the hydration process of cement, we get hydroxide. The gas-forming admixture reacts with the hydroxides and forms hydrogen gas bubbles. This bubble helps in avoiding settlement and bleeding of concrete. Some examples of gas-forming admixtures are Aluminum powder, activated carbon, hydrogen peroxide, etc. 

    Air detraining admixture

    During the mixing of concrete, the air gets entrapped in the concrete. Furthermore, this air reduces the strength of the concrete. So to avoid this air content we use air-detraining admixtures. Some examples of this type of admixture are tributyl phosphate, silicones, water-insoluble alcohols, etc.

    Anti-washout admixture

    Generally, the main application of anti-wash-out admixtures is in underwater construction. Some examples are natural or synthetic rubbers, thickeners based on cellulose, etc. Similarly, It makes the concrete more cohesive and avoids washing out of concrete mixes underwater. 

    Corrosion inhibiting admixture

    Corrosion of reinforcement is one of the common problems in construction. So to decrease the corrosion this type of admixture is used. Basically, corrosion-inhibiting admixtures help in decreasing the corrosion rate and delaying the corrosion. Some examples of corrosion-inhibiting admixtures are sodium benzoate, sodium nitrate, sodium nitrite, etc.

    Bonding admixture

    This type of admixture helps to the bond between the new and old concrete surface. Basically, It is commonly used in floor overlays, screed over roofing, repair work, etc. Some examples of bonding admixtures are natural rubber, synthetic rubbers, and polymers such as polyvinyl chloride, polyvinyl acetate, etc.

    Key Takeaways

    Here are the essential points regarding the types of admixture used in concrete:

    • Classification: Admixtures primarily divide into Mineral Admixtures and Chemical Admixtures.
    • Mineral Admixtures: These are pozzolanic materials (e.g., Fly Ash, Silica Fume, Slag) that improve long-term strength, reduce permeability, and lower the heat of hydration.
    • Chemical Admixtures: These organic/inorganic chemicals modify properties of fresh concrete.
    • Plasticizers/Superplasticizers: Water-reducing admixtures that allow a lower water-cement ratio, resulting in higher strength concrete.
    • Accelerators/Retarders: Used to precisely control the setting time—accelerators for cold weather or quick turnaround, retarders for hot weather or long hauls.
    • Air-Entraining Agents: Crucial for improving freeze-thaw resistance and enhancing the durability of concrete in cold climates.
    • Specialized Types: Other types include anti-washout, corrosion-inhibiting, and bonding agents, each serving a unique functional requirement.

    Conclusion

    Admixtures are indispensable ingredients in modern construction, acting as performance enhancers to tailor concrete for specific demands. They broadly categorize admixtures into chemical admixtures and mineral admixtures (Supplementary Cementitious Materials). Chemical types, like plasticizers and accelerators, modify fresh properties such as workability and setting time immediately, requiring small doses. Mineral types, such as fly ash and silica fume, enhance long-term durability, strength, and impermeably using larger volumes. The proper selection of admixture, based on project requirements like climate, structural strength, and exposure conditions, is paramount. Utilizing these specialized materials is essential for producing the high-performance, cost-effective, and long-lasting concrete required for today’s sophisticated infrastructure.

    Tests on bitumen – 9 lab tests for flexible pavements.

    Tests on bitumen are essential for ensuring the quality and durability of flexible pavements and other civil engineering structures. Bitumen is a viscous, binding material used in construction. Various lab tests confirm its properties. This article delves into the comprehensive set of tests on bitumen that civil engineers and researchers perform to ensure the material’s suitability. We will explore key assessments. These include the softening point test, the penetration test, the ductility test, and the viscosity test on bitumen, among others. Understanding these bitumen tests is crucial for guaranteeing high-quality construction and prolonging the life of road surfaces.

    Bitumen is a binding material extensively used in the construction of flexible pavements, damp-proofing of the basement, floors, waterproofing of roofs, corrosion protection of reinforcement structures, etc. The bitumen is viscous black or brown mixture of hydrocarbons obtained as a byproduct on refining crude petroleum.Bitumen is responsible for imparting quality and durability for flexible pavements and is necessary to confirm its quality before applications. This article is about the various lab tests and procedures performed on bitumen for ensuring the quality.

    Properties of bitumen

    The properties of bitumen are fundamental to its use in construction, determining its quality and performance. To ensure a durable material, these characteristics are confirmed through rigorous testing.

    Construction workers paving a road using heavy machinery during sunset.
    Workers are laying asphalt for a road construction project. This work highlights the practical application of bitumen in civil engineering.

    Key Properties of Bitumen

    • Consistency: Bitumen must maintain its physical state across a wide temperature range. It should stay firm in heat. It should also avoid brittleness in cold.
    • Viscosity: Its resistance to flow is crucial for proper mixing with aggregates and effective compaction during the paving process.
    • Adhesiveness: The material must possess strong binding properties. It should create a lasting bond with aggregates. This ensures the structural integrity of the pavement.
    • Durability: Bitumen should be resistant to aging and weathering to retain its properties and prolong the lifespan of the finished structure.

    Tests on bitumen

    To ensure the quality and durability of bitumen for construction, technicians perform a series of standardized laboratory tests on bitumen. These tests evaluate its key properties and characteristics.

    • Softening point test
    • Flash and fire point test
    • Solubility test
    • Viscosity test
    • Distillation test
    • Water content test
    • Ductility test
    • Penetration test
    • Specific gravity test

    Softening Point Test on bitumen

    Softening point test indicates the point at which bitumen attains a particular degree of softening under standard test conditions. The test helps in determining the consistency of bitumen and done using ring and ball test apparatus.

    Ring and ball test apparatus include a brass ring, steel ball, water bath, and thermometer as shown in the figure.

    Apparatus for conducting the softening point test on bitumen, featuring a temperature-controlled water bath and brass ring setup.
    Viscometer apparatus used for conducting viscosity tests on bitumen, assessing its resistance to flow.

    Test procedure

    • Firstly, heat the sample at a temperature of around 75 to 100-degree wherein the bitumen transforms to a liquid state.
    • The brass ring is heated before placing inside the mercury-coated metal plate. Glycerine is applied over the ring to prevent sticking.
    • Then fill the brass ring with molten bitumen and cool it for 30 minutes. Trim the excess material using a knife.
    • After filling assemble the apparatus and place the balls over the top of the specimen sample.
    • Then fill the apparatus with boiled distilled water. However, the height of filling should be 50mm above the topmost surface of the ring.
    • After that heat the water bath at a rate of 5-degree Celsius per minute.
    • On heating, the bitumen softens and the ball slowly sinks and touches the bottom plate.
    • Finally, note down the temperature at which the specimen touches the lower plate and this temperature is the softening point of the bitumen specimen.

    Normally the softening temperature varies from 35 degrees to 70 degree Celsius. 

    Flash and fire point test

    Flash-point test refers to the temperature at which the specimen becomes volatile and catches fire under test conditions. The apparatus for the flash and fire point test is Pensky – Morten’s closed cup apparatus.

    Cleveland open cup flash point tester used for measuring the flash point of bitumen in laboratory tests.
    Cleveland Open Cup Flash Point Tester used for determining the flash and fire points of bitumen.

    Procedure

    • Initially , fill the bitumen sample up to the filling mark and close the apparatus.
    • Then, fix the thermometer in a proper position as shown in the figure.
    • Heat the specimen at a rate of 5-degree Celsius per minute.
    • Then, constantly keep stirring the specimen and apply the test flames at regular intervals.
    • The temperature at which the flame produces a light flash inside the cup is the flash point.
    • On further heating, the bitumen specimen inflames and catches fire and this temperature is the fire point.
    A laboratory setup showing fire erupting from a Pensky-Marten closed cup apparatus used for the flash and fire point test on bitumen.
    Illustration of the flash and fire point test being conducted on bitumen, showcasing the moment it ignites under test conditions.

    Solubility Test

    The solubility test determines the purity of bitumen. Lot of impurities like carbon, salts, etc gets entrapped in bitumen and hamper the quality . Hence this test is necessary for calculating the impurity percentage.

    Laboratory setup for conducting bitumen tests, featuring a filter flask, stopper, filter tube, and rubber tubing.
    Apparatus for the solubility test of bitumen, featuring essential components like rubber tubing, filter tube, stopper, and filter flasks.
    • Firstly, dissolve the sample in carbon disulfide.
    • Then filter the solution using a porosity filter.
    • Finally, calculate the percentage of impurity from the residue left.

    Penetration test on bitumen

    The penetration test measures the hardness or softness of the bitumen. A penetrometer is an apparatus used for computing penetration tests which consist of a needle that weighs 100 gms. Similarly, penetration readings are measured in terms of mm/10.

    Procedure

    • Firstly, heat the specimen into pouring consistency and immerse the specimen in the water bath. However, make sure the temperature is around 25-degree Celsius.
    • After half an hour, take-out the specimen and place it below the apparatus.
    • Meanwhile, adjust and set the dial to zero reading and allow the needle to fall on the specimen.
    • Immediately, measure the penetration depth.
    • Then repeat this process a minimum of three times and note down the values. The average values

    The penetration value ranges from 20 to 225. Low penetration values represent good quality bitumen.

    Viscosity test on bitumen

    The viscosity of bitumen is the measure of the resistance of the fluid to flow. The unit of viscosity is seconds. Too High or low viscosity impacts the compaction, penetration, lubrication, and coating capacity over aggregates. A viscometer apparatus is for finding the viscosity.

    A laboratory apparatus for conducting viscosity tests on bitumen, featuring a large, cylindrical container with a heating element and a control unit beside it.
    Viscometer used for measuring the viscosity of bitumen in laboratory tests.

    Procedure

    • Prepare the specimen under standard temperature. 
    • Further, Level the cup with the help of the bubble level.
    • Then heat the water bath at a constant temperature.
    • Next, clean the receiver and pour the specimen up to 20ml.
    • Allow the bitumen to pass through the orifice. Open the valve.
    • Start the stopwatch and note down the time at which it reaches 25ml.
    • Then repeat the test three times and calculate the mean value of viscosity.

    Distillation test or loss of heating test

    The distillation test determines the quantity and nature of volatile elements in bitumen. Through this test, volatile and non-volatile components are separated.

    A laboratory technician in a white coat conducting an experiment with a bitumen testing apparatus on a lab bench.
    A technician conducting the distillation test on bitumen in a laboratory, essential for analyzing its quality and properties.
    • Initially, take 200 grams of bitumen and Note down the weight of the sample.
    • Next, continuously heat the sample at 360-degree Celsius for 15 minutes.
    • After that, carefully distil the sample in a 500ml distillation flask.
    • Measure the residue left. This is the actual quantity of bitumen.

    Water content test on bitumen

    In a good quality bitumen, the water content should be minimum. Because excess water content produces foam when heated above the melting point.

    • Initially,the bitumen sample is weighed using a weighing machine.
    • Next step is to immerse the sample in pure petroleum which is free from water.
    • After immersing, immediately start heating the specimen and distill the water.
    • Then condense the distillate and collect the condensed water at the bottom.
    • Record the weight of residue
    A blue laboratory apparatus used for conducting distillation tests, featuring a heating element and glassware for measuring and separating volatile elements in bitumen.
    Apparatus for the water content test on bitumen, used to determine the amount of water in the sample to ensure quality in construction.

    The water content is the weight of condensed water to the weight of the sample. However, for good quality bitumen water content should not exceed 0.2 percent by weight.

    Ductility test on bitumen

    The ductility is the ability to undergo deformation or elongation under load. Ductility is measured as the distance in centimeters to which a standard specimen of bitumen will elongate without breaking. The ductility value ranges from 5 to 100 cm. However, the minimum ductility value should be 73 mm as per BIS.

    Diagram illustrating the ductility test on bitumen, showing the initial stage, end stage, and rupture point of the material.
    Illustration of the ductility test on bitumen, showing the initial and end stages of the specimen’s elongation.
    • Initially, heat the specimen into pouring consistency.
    • Then, allow them to cool for 30 minutes and remove the excess specimen using a knife.
    • After that, take the sample specimen in the form of a standard briquette.
    • Continue to keep the specimen assembly in a water bath for 90 minutes, however maintaining the temperature to 27- degrees Celsius.
    • After hooking the clips in the ductility machine, start applying the load and allow them to stretch.
    • Finally, record the reading on the scale at which the bitumen breaks.

    Specific gravity test on bitumen

    Specific gravity is the ratio of the weight/mass of the bitumen specimen with equal mass of water at 27-degree Celsius. Normally the specific gravity of bitumen ranges between 0.97 to 1.02. The apparatus to determine specific gravity is a pycnometer.

    The formula for specific gravity is 

    Specific gravity = (W3-W1)/[(W3-W1)-(W4-W3)]

    Where, W1 – Weight of empty pycnometer

    W2 – Weight of pycnometer with distilled water

    W3 – Weight of pycnometer with half-filled bitumen

    W4 – Weight of pycnometer with half-filled bitumen and distilled water

    Illustration depicting the specific gravity computation of bituminous material, featuring three flasks labeled A, B, and C, with a formula for calculating specific gravity.
    Illustration of specific gravity computation for bituminous materials, detailing the relationships among three distinct samples.

    The test procedure is as follows.

    • Firstly, clean and dry the pycnometer. Make sure it contains no water.
    • Then weigh the empty pycnometer and mark it as W1.
    • Then ,empty the apparatus and again fill it with fresh distilled water.
    • Similarly, weigh the pycnometer and record it as W2.
    • Again empty and fill half of the apparatus with melted bitumen. Avoid the inclusion of air in the sample.
    • Then allow the sample bottle to stand for 30 minutes. Similarly weigh the sample and mark it as W3.
    • Now fill the rest with distilled water. Again, weigh the specimen. This is W4.
    • Finally, determine the specific gravity using the formula.

    Key Takeaways from Bitumen Tests

    • Quality Control is Key: Standardized laboratory tests on bitumen are essential for quality control in civil engineering. They ensure that the material used in flexible pavements and other structures meets specific performance criteria, which is critical for long-term durability.
    • Properties and Performance: Tests directly evaluate key properties of bitumen. These include its consistency, like softening point and penetration. They also assess resistance to flow, such as viscosity, and check purity, like solubility. These characteristics dictate how bitumen will behave during mixing, paving, and over its service life.
    • Critical Assessments: Each test provides a unique insight. The softening point determines temperature stability, while the penetration test measures its hardness. The ductility test assesses its ability to stretch without breaking. This is a vital property for resisting cracking. The solubility test ensures it’s free from harmful impurities.
    • Safety and Suitability: Tests like the flash and fire point are crucial for safety during handling and processing. The specific gravity test is used to accurately classify the bitumen. It also determines its correct proportion in asphalt mixes. Together, these tests guarantee the material’s suitability for construction.

    Conclusion

    The comprehensive suite of tests on bitumen is a fundamental practice in civil engineering. It serves as the backbone for ensuring the quality and durability of flexible pavements. It also supports other essential structures. Each assessment—from the softening point and penetration tests that characterize its physical state to the ductility and viscosity tests that measure its performance under stress—provides critical data points. This rigorous laboratory testing regimen is not merely about meeting standards. It guarantees that bitumen can withstand environmental extremes. It ensures bitumen can handle heavy traffic loads and the inevitable effects of aging. By confirming the material’s consistency, adhesiveness, and purity before it is ever used in a project, civil engineers can significantly prolong the lifespan of road surfaces and infrastructural assets, thereby building safer and more sustainable public works. Ultimately, these tests are indispensable for effective quality assurance in modern construction.