All posts by Vinod Gopinath

Tunnel Engineering- Definition,Study Modules Guide

Tunnel Engineering plays a vital role in modern infrastructure by enabling safe and efficient passage through mountains, urban areas, and underwater regions. This field focuses on planning, designing, and constructing tunnels using advanced methods and technologies. A clear Tunnel Engineering Definition helps students and professionals understand its scope. Structured Tunnel Engineering Study Modules guide learners through essential topics like geology, excavation methods, support systems, and safety practices. Understanding the Basics of Tunnel Engineering is essential. It helps build a strong foundation for exploring innovative Tunnel Construction Techniques used in today’s complex projects. This article serves as an Introduction to Tunnel Engineering. It offers an easy-to-follow study path. This is for anyone interested in mastering this specialized branch of civil engineering.

There is much more to know about the amazing sector. Needless to say, no tiny virus can be a reason to prevent us from transporting for essential purposes. Therefore, the career opportunities are always out there for you.

In this blog, I will walk you through the basics of tunnel engineering. I will explain the works done by a tunnel engineer. I will also cover fundamental details about tunnels. And finally the advantages and disadvantages of tunnels. 

Let’s jump into it right away!

  1. What are tunnels in tunnel engineering? 
  2. Tunnel engineering basics and Definition
    1. Definition/Introduction of Tunnel Engineering
    2. Basics of Tunnel Engineering
    3. Modules
  3. What does a Tunnelling Engineer do?
  4. Tunnel Construction Techniques
  5. Advantages of Tunneling
  6. Tunneling Disadvantages
  7. Conclusion

What are tunnels in tunnel engineering? 

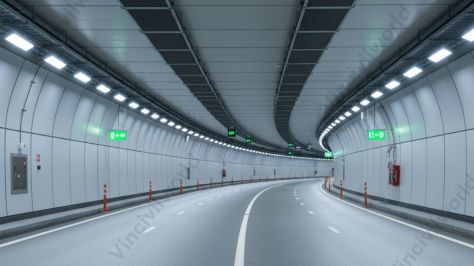
  • A tunnel is an underground corridor built through the surrounding soil/earth/rock and completely enclosed except for the entrance and exit points, which are usually at each end. 
  • Some contemporary tunnels have used immersed tube construction techniques. These techniques differ from classic tunnel boring methods. However, a pipeline is not a tunnel.
  • A tunnel can be used for pedestrian or vehicular traffic, rail traffic, or a canal.
  • The tunnel is usually where the key parts of a rapid transit network are located. 
  • Some tunnels are aqueducts that transport water for human consumption or hydroelectric power plants, while others are sewers. 
  • Utility tunnels are used to transport steam, chilled water, electrical power, and communications cables. They also connect buildings to allow people and equipment to move about more easily. 
  • Military tunnels are constructed to smuggle weapons, contraband, and people. In contrast, civilian tunnels are built for the same purpose, smuggling weapons, contraband, and people. 
  • Wildlife crossing tunnels, for example, are created to assist wildlife to safely cross human-made barriers.
Interior view of a modern tunnel featuring curved walls, bright lighting, and a smooth asphalt road surface.
Interior view of a modern tunnel showcasing advanced design and lighting features.

Cool. Time to know about the basics of tunnel engineering.

Tunnel engineering basics and Definition

Tunnel Engineering involves the planning, design, and construction of underground passages. This section introduces its definition and covers the fundamental basics that shape safe and efficient tunnel development.

A dark tunnel leading to a bright exit with stairs at the end, illuminated by lights along the walls.
A dimly lit underground tunnel leading to bright stairs, exemplifying essential elements of tunnel engineering.

Definition/Introduction of Tunnel Engineering

Tunnel engineering is a truly interdisciplinary field. It requires knowledge and abilities from civil, geological, and mining engineering. It also involves mechanical and electrical engineering, geophysics, geology, and other disciplines. Tunnel Engineering is a specialized branch of civil engineering. It focuses on designing and planning underground passages. It also involves constructing these passages for transportation, utilities, and water conveyance. It involves understanding geology, selecting excavation methods, ensuring structural stability, and applying safety measures. The goal of tunnel engineering is to create durable, efficient, and safe tunnels that meet functional demands while minimizing environmental and construction risks.

Basics of Tunnel Engineering

Basics of Tunnel Engineering cover the fundamental principles needed to design and build safe underground structures. These basics include understanding geology, selecting suitable excavation methods, choosing support systems, and applying modern Tunnel Construction Techniques. Together with a clear Tunnel Engineering Definition, learners can follow structured Tunnel Engineering Study Modules to build strong technical knowledge. These essentials form the core of any Introduction to Tunnel Engineering, ensuring reliable and efficient tunnel development.

Modules

The main modules involved in the course are,

  • General Tunneling Aspects
  • Engineering Geology (stresses, strains, and anisotropy)
  • Engineering Rock Mechanics
  • Soil Mechanics & Geotechnical Engineering, Investigations
  • Using Rock and Soil Mechanics
  • Analytical and Numerical Methods for Diagnosis Phase; Therapy Phase for Preliminary Confinement
  • Type A tunnels: Analytical
  • Methods of Analysis and Design
  • Type A Tunnels: Excavation in Rock
  • Therapy Phase and Construction Phase for Preconfinement (Type B & C Tunnels) and Final Lining
  • Mechanized Tunneling with Face Control for Type B and C Tunnels
  • Monitoring and Surveying
  • Risk Assessment & Management

Now you might be thinking about what exactly you will be doing after being an engineer. Here we go.

What does a Tunnelling Engineer do?

Tunnel engineers are highly qualified civil engineers who are in charge of designing and managing tunnelling projects. From the original design stages through the day the first automobile or train travels through, they are involved in every step of the tunnel construction process. 

Aerial view of a tunnel construction site, showing excavation work and heavy machinery around a partially completed tunnel entrance.
An aerial view of a tunnel construction site, showcasing heavy machinery and excavated earth, illustrating the complexities of tunnel engineering.

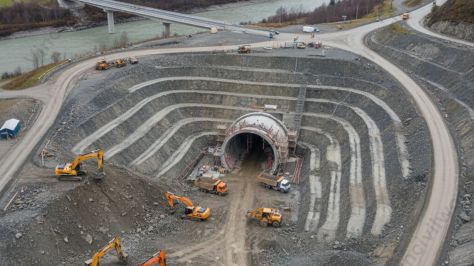
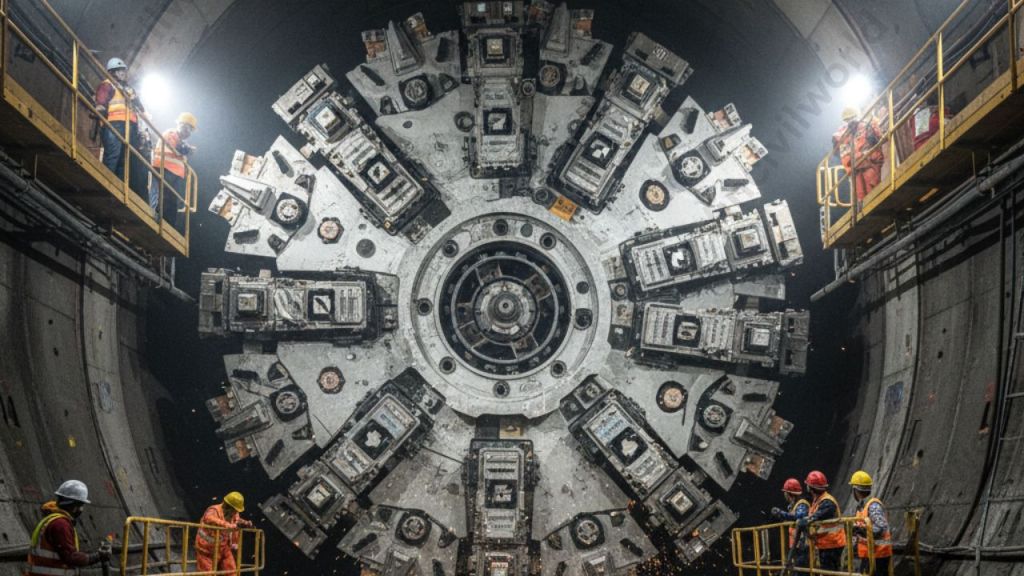
Tunnel building can be done in a variety of ways, each needing specialised expertise and equipment. Bored tunnels with Tunnel Boring Machines (TBMs), sprayed concrete lined tunnels, tunnels built with explosives, and tunnels built by pipejacking, piperamming, or thrustboring are examples of these procedures.

Tunnel Construction Techniques

Tunnel Construction Techniques involve methods used to excavate and support tunnels safely and efficiently. These techniques are selected based on geology, tunnel size, and project requirements. They ensure stability, speed, and cost-effectiveness during construction while minimizing risks. Cut and Cover Method

  • Drill and Blast Method
  • Cut and Cover Method
  • Bored Tunnelling (TBM Method)
  • New Austrian Tunneling Method (NATM)
  • Immersed Tube Method
  • Sequential Excavation Method (SEM)
A tunnel boring machine operating in a large underground tunnel, with engineers overseeing the process from various platforms.
A tunnel boring machine (TBM) in action, showcasing advanced technology used in tunnel construction.

Advantages of Tunneling

When compared to other approaches, the tunnelling method has a few advantages, which are listed below: 

  • When the depth exceeds a certain limit, the tunnelling approach is more cost effective than the open cut trench method. 
  • When tunnelling takes place, there is no disruption to surface life or ground activities such as transportation. 
  • The approach provides high-speed building while consuming minimal power. 
  • Noise Pollution is Reduced 
  • In high-altitude settings, these approaches are devoid of snow and iceberg risks. 
  • Tunnels are subject to restrictions on surface and air interference. 
  • The provision of tunnels with gentle gradients aids in the reduction of hauling costs.
  • When it comes to public utility transit, tunnelling offers a significant advantage over bridges. 
  • When a dangerous open cut to a nearby structure is required, the tunnelling approach is used to solve the problem. 
  • In aerial warfare and bombing situations, the tunnelling provides more protection.
A perspective view of a long, dark tunnel with a bright light at the end, illustrating the concept of tunnel engineering.
A dimly lit tunnel leading towards a bright exit, symbolizing the journey through tunnel engineering from darkness to clarity.

How about the disadvantages? It’s waiting for you in the next section.

Tunneling Disadvantages

Because of its complexity and difficulty, the tunnelling approach has some drawbacks. Here are a few examples: 

  • When compared to the open cut method, the initial investment cost for starting the tunnel is significant. 
  • Only a team of highly competent and experienced designers and engineers will be able to complete this procedure. 
  • You need to maintain higher and continuous supervision from the beginning to the finish of the tunnelling project, with no compromises. 
  • Tunneling activities necessitate the use of very sophisticated and specialised equipment.

That’s it about tunnel engineering and the basics of tunneling. Do you have any more doubts regarding the topic? Let us know in the comments. 

Key Takeaways

  • Tunnel engineering is crucial for modern infrastructure, facilitating safe passage through various terrains.
  • The field combines aspects of civil, geological, and mining engineering and includes study modules on geology, excavation, and safety practices.
  • Tunnel engineers oversee the design and construction process, utilising various methods such as TBMs and explosives.
  • While tunneling is cost-effective for deep projects and reduces disruption, it also requires high initial investment and skilled supervision.
  • Understanding both the advantages and disadvantages of tunneling helps in making informed engineering decisions in tunnel engineering.

Conclusion

Tunnel Engineering plays a crucial role in shaping modern transportation and utility networks by enabling construction beneath mountains, cities, and waterways. Understanding the Tunnel Engineering Definition helps readers appreciate how this field blends geology, structural design, and safety planning. The Basics of Tunnel Engineering further highlight the importance of ground behavior, support systems, and proper excavation choices. Through well-organized Tunnel Engineering Study Modules, learners can explore each concept step by step and build strong technical competence. Additionally, familiarizing themselves with various Tunnel Construction Techniques allows engineers to select the most suitable method for each project. This Introduction to Tunnel Engineering concludes by emphasizing that mastering these core principles ensures the creation of durable, economical, and safe tunnels for future infrastructure needs.

Segregation and bleeding in concrete – Types, Causes and remedies

Segregation is the separation of concrete ingredients from one another. Concrete is one of the most used construction materials. It consists of coarse aggregate, fine aggregate, cement and water. There are many reasons for the cause of segregation. This article is about segregation and bleeding and their types, causes and remedies.

Segregation and bleeding in concrete are common issues that affect its quality and durability. Segregation of concrete occurs when its components separate, leading to uneven distribution of materials. Bleeding in concrete happens when water rises to the surface, causing weak spots. Both segregation and bleeding of concrete can compromise the strength and finish of a structure. Understanding the causes and effects of segregation and bleeding in concrete is essential for ensuring high-quality construction. This blog will explore these problems, their causes, preventive measures, and solutions to maintain concrete integrity.

  1. What is Segregation in Concrete?
  2. What is segregation in concrete ?
    1. Causes of Segregation in Concrete
    2. Types of Segregation in concrete
  3. Effects of Segregation on Concrete
  4. Bleeding of Concrete
  5. What is bleeding in concrete?
    1. Causes of bleeding in concrete
    2. How to reduce bleeding in concrete?
  6. Methods for Detecting Segregation
  7. Methods for Identifying Bleeding
  8. Standard Testing Procedures
  9. Key Takeaway
  10. Conclusion

What is Segregation in Concrete?

Workability is an important property of concrete that reflects how easily we can place a particular concrete mix . Good concrete should be uniformly mixed and easily placeable without segregation or bleeding.

What is segregation in concrete ?

Segregation of concrete is the separation of ingredients in concrete. Since concrete is a non-homogeneous material, improper mixing is the main reason for the segregation. It occurs during transporting, handling and placing of concrete. Also, it affects the concrete properties. The strength of concrete decreases and leads to cracking. Therefore it should be properly mixed before use in construction. 

Segregation in concrete is the separation of its different components, leading to uneven distribution. This means that the coarse aggregates, fine aggregates, and cement paste do not stay uniformly mixed. As a result, heavier particles settle at the bottom, and lighter ones rise to the top. Segregation of concrete can lead to weak spots, reducing the overall strength and durability of the structure. Segregation and bleeding in concrete are common issues that affect its quality. Proper handling and mix design are crucial to prevent segregation and bleeding of concrete. We will describe the causes of segregation in concrete in the coming paragraph.

Close-up view of concrete with visible aggregates, showcasing uneven distribution of materials, indicating potential segregation.
Close-up view of concrete showing uneven distribution of aggregates, indicative of segregation.
segregation

Causes of Segregation in Concrete

A good quality concrete mix is prepared by considering factors like the size of aggregate, water-cement ratio, compaction, etc. They are many reasons for the causes of segregation in concrete. They are

Prevention of concrete segregation is very important as it adversely affects the properties of concrete. 

Types of Segregation in concrete

Segregation of Concrete occurs in three types such as

Separation of water and cement from other ingredients : Fine particles separate from the mix, often floating to the surface or forming distinct layers.

  1. Segregation of coarse aggregate : This occurs when heavy aggregates settle at the bottom, leaving a weak, paste-heavy layer at the top.
  2. Separation of water content : Excess water rises to the surface, leading to a watery top layer and a dry, aggregate-heavy bottom.

Segregation is hard to measure since there is no particular test for determining it. However, the Flow table test measures the segregation. Also, the slump test of concrete can give an idea about segregation. Coarse aggregate in concrete tends to settle down from other ingredients. Usually, It occurs when the concrete mix is dry. While segregation by separation of water content occurs due to an insufficient amount of fine aggregates or due to the use of an excess amount of water content.

Effects of Segregation on Concrete

Segregation in concrete negatively impacts its strength and durability. When aggregates settle unevenly, it creates weak zones prone to cracking. This uneven distribution leads to poor load-bearing capacity, reducing the structure’s overall stability. Segregation also causes surface defects, such as honeycombing and voids, which can affect the concrete’s appearance and longevity. Moreover, it increases the risk of permeability, making the concrete susceptible to water infiltration and chemical attacks, further compromising its integrity.

Related posts from vincivilworld

Bleeding of Concrete

Bleeding of concrete occurs when excess water rises to the surface during setting. This weakens the mix and can lead to cracks, affecting the quality of concrete. Let’s dive deep into these details in the coming section.

What is bleeding in concrete?

Segregation occurs when the principal ingredients in a concrete mix – in other words, gravel aggregate, cement, and water – separate prior to and during the curing process. Moreover, Segregation causes excessive amounts of water to rise to the surface. This process is know as bleeding. Bleeding is also similar to segregation in which the water in the concrete rises to the surface of the concrete. As a result, the concrete becomes porous and weak.

Bleeding in concrete is the upward movement of excess water to the surface during the setting process. This occurs when the heavier solid particles settle, displacing the lighter water. Concrete bleeding can weaken the surface layer, creating weak spots and leading to cracks. Bleeding affects its strength and its durability of concrete . Likewise, It breaks the bond between the concrete and steel reinforcement. Segregation and bleeding in concrete often occur together, compromising the quality.

However, a proper proportion of concrete ingredients and controlled vibration can reduce bleeding. Moreover, air entraining admixtures can also be used for reduce bleeding. Proper mix design, adequate water-cement ratio, and good compaction practices are essential to minimize segregation and bleeding of concrete. Understanding and preventing these issues is crucial for maintaining the integrity and longevity of concrete structures. We will describe the main causes and remedies in the next sections.

Surface of freshly poured concrete showing water accumulation due to bleeding.
Surface of freshly poured concrete exhibiting signs of bleeding, where excess water has risen to the top.
Bleeding of concrete

Causes of bleeding in concrete

The main causes of bleeding in concrete mix is as follows

  • Segregation is the main cause of bleeding in concrete
  • Improper Mix Design : Improper proportions of cement, sand and aggregate can lead to concrete bleeding
  • Inadequate Mixing : Poor mixing results in uneven distribution of materials,causing bleeding of concrete.
  • High water cement ratio causes bleeding.
  • Type of cement used and quantity of fine aggregate
  • High temperature causing rapid evaporation of water accelerates bleeding
  • Low cement content in the mix fails to bind water effectively leading to bleeding
  • Over vibration during compaction can cause water to rise to the surface, increasing bleeding.

Segregation and bleeding of concrete are interconnected issues that need careful handling and design to prevent.

How to reduce bleeding in concrete?

By adapting the following methods bleeding can be reduced

  • Minimum water cement ratio necessary for workability should be maintained to reduce bleeding in concrete.
  • A proper design mix : Ensure correct proportions of cement, sand, and aggregates to create a balanced mix that minimizes concrete bleeding.
  • Incorporate water-reducing admixtures or superplasticizers to maintain workability without adding extra water.
  • Adequate Mixing : Mix the concrete thoroughly to ensure even distribution of materials, reducing the chances of bleeding of concrete.
  • Control Temperature : Avoid high temperatures during mixing and curing to prevent rapid evaporation and bleeding.
  • Increase Fines Content: Use mineral admixtures like fly ash or silica fume, to improve the mix’s cohesiveness and reduce bleeding.
  • Proper compaction : Use appropriate vibration techniques to compact the concrete without causing excess water to rise.
  • Use air entrapping admixtures
  • Maintain fine aggregate ratio

By following these steps, you can effectively minimize segregation and bleeding in concrete, ensuring a stronger and more durable structure

Methods for Detecting Segregation

Detecting segregation involves visual inspection and sampling. Look for uneven distribution of aggregates and a water-rich layer on the surface. Concrete cores or test cylinders can reveal segregation by examining the uniformity of material distribution. Additionally, a slump test can indicate segregation if the mix shows excessive water separation.

Methods for Identifying Bleeding

Identifying bleeding involves observing the surface for excess water accumulation. This can be seen as a watery film forming on the surface during setting. A simple test involves tapping the surface to check for a thin, water-rich layer. Surface inspection and core samples can also reveal internal bleeding patterns.

Standard Testing Procedures

Standard testing procedures for segregation and bleeding include the slump test to assess workability and consistency, and the bleed water test to measure the amount of water rising to the surface. Additionally, laboratory analysis of concrete cores and cylinders can identify segregation and bleeding by examining the material distribution and surface conditions.

Key Takeaway

Segregation and bleeding in concrete are critical issues affecting construction quality. Segregation involves the separation of concrete ingredients, leading to weak spots and poor durability. Bleeding is the rise of excess water to the surface, weakening the concrete and causing cracks. Key causes include improper mix design, excessive water content, and poor compaction. Prevention measures involve optimizing mix design, controlling the water-cement ratio, and using appropriate admixtures. Regular testing and proper handling are essential to detect and address these problems.

Conclusion

Segregation and bleeding in concrete undermine structural integrity and durability. Addressing these issues involves understanding their causes, implementing preventive measures, and employing standard testing procedures. By maintaining proper mix proportions, controlling environmental factors, and ensuring adequate mixing and compaction, one can significantly reduce the risks associated with segregation and bleeding. Proper attention to these aspects ensures high-quality concrete, enhancing the longevity and performance of construction projects.

Types of Glass: A Comprehensive Guide

Types of glass play a crucial role in architecture, design, and engineering, offering diverse solutions for strength, safety, and aesthetics. Understanding the different types of glass helps professionals choose materials that balance beauty and functionality. From transparent facades to energy-efficient windows, each type serves a unique purpose. The glass types and uses vary widely—some provide insulation and noise reduction, while others enhance security or design appeal. Common types of glass used in buildings include float, laminated, tempered, and tinted glass, each engineered for specific conditions. Meanwhile, the types of glass materials used in manufacturing and construction are evolving with technology. The types of safety glass ensure protection against impact and breakage.
In this article, we will discuss the main types of glass. We will explore their characteristics and applications. The benefits of these glass types span modern architectural and industrial uses.

The flexibility of usage of glass in architectural applications like doors, windows, facades, etc. makes it one of the popularly used products in the construction sector. This article is about the manufacturing process of glass, and major glass types used in construction and architecture applications.

  1. Manufacturing process and properties
  2. Different types of glass and uses
  3. Types of glass used in buildings
    1. Annealed
      1. Applications
    2. Clear /Float glass
    3. Tinted
    4. Frosted
  4. Types of safety glass
    1. Heat Strengthened glass
    2. Toughened glass
      1. Advantages
  5. Conclusion

Manufacturing process and properties

Glass manufacturing follows the fusion process method which involves fusing sand with grounded lime, soda, and other admixtures etc., and cooled to form glass. Glasses are transparent, translucent, or brittle. Following are the basic properties of glass that make it one of the most preferred and popular architectural choices.

  • Transparency: Glass is transparent from both sides or one side.
  • Strength of glass: Enhanced to any level by adding admixtures and laminates.
  • Workability of glass: Glass is flexible and possible to mold to any shape or even blown in the molten stage.
  • Transmittance end U value: Can control temperatures and extreme climatic conditions.
  • Glass is 100% recyclable
Close-up view of a modern building facade featuring large reflective glass windows with varying designs and textures.
Modern glass facade highlighting the aesthetic and functional aspects of architectural design.

Different types of glass and uses

There are mainly three types of glass

  • Annealed glass
  • Heat-strengthened glass
  • Toughened glass.

Types of glass used in buildings

Types of glass used in buildings play a vital role in aesthetics, safety, and energy efficiency. They offer versatile options for modern architecture and sustainable construction solutions. The types of glass are as follows.

Annealed

Annealed glass is popularly known as float glass or conventional glass. Ingredients like sand, grounded lime, admixtures are mixed and cooled for manufacturing annealed glass. Float glass has a perfectly flat, brilliant surface with optical clarity.
Different types of float glasses popularly used in the construction sector are as follows.

Applications

  • Annealed glass uses include application as table-tops. They infuse your room with an elegant and spacious look.
  • Used for external facades due to crystal clear vision.  It can provide you with natural daylight and improve ventilation
  • Used for external walls and can absorb 30-45% of the sun’s heat to enable greater comfort.
  • Doors, windows and shower screens

Clear /Float glass

Clear glass is a clear and transparent annealed glass. They got a natural greenish color. Clear glass is extensively used for architectural applications involving doors, windows, solar applications, shelves, etc. Other glass types use clear glass in their manufacturing process.

Tinted

Tinted glass is manufactured by adding small amounts of metal oxide to the glass ingredients. These ingredients regulate the transmission of solar energy and modify the color without changing the basic properties of the glass.

Frosted

Frosted glass is a translucent annealed glass type manufactured using sandblasting or acid etching techniques. This gives a pitted and rough surface with foggy appearance.

Types of safety glass

Types of safety glass are essential for modern structures, providing strength, protection, and durability. These types of safety glass enhance building safety while maintaining clarity and design flexibility.

Heat Strengthened glass

Heat strengthened glass follows heating of annealed glass to a temperature of around 650-700 degree. The cooling process is much slower than the process used in the manufacturing process of tempered/toughened glass.

Heat-strengthened glass is a semi-tempered glass. It retains the normal properties of ordinary float glass. Heat strengthening adds strength to the glass by inducing surface compression and limiting the breakage chances. For heat strengthened glass the compression induced is in the range of 6000 to 9000 psi. However compression induced is around 11000 to 20000 psi in the case of fully tempered/toughened glasses.

  • Heat strengthened glass provides necessary resistance to heat build up during external applications.
  • Heat-strengthened glass differs from tempered glass in surface compression and possess mechanical strength of about 1.6-2 times that of annealed glass.
  • These glass got excellent thermal stability, whereas its flatness and light transmission is equal to that of annealed glass and much better than that of tempered glass.
  • Three times more resistant to thermal stress in comparison to normal annealed glass.
  • It can withstand temperature difference of 100°C (in range of 50°C to 150°C) when compared to ordinary annealed glass which can withstand up to 40°C.
  • Heat strengthened glass is less susceptible to spontaneous breakage.

Toughened glass

Tempered or toughened glass is a type of safety glass processed by controlled thermal or chemical treatments to increase its strength compared with normal glass. Tempering puts the outer surfaces into compression and the interior into tension. Such stresses cause the glass, when broken, to shatter into small granular chunks instead of splintering into jagged shards as ordinary annealed glass does. The granular chunks are less likely to cause injury.

Close-up of a fractured glass panel with a spiderweb pattern of cracks, indicating high impact, in a modern industrial setting.
A close-up of toughened safety glass displaying a spider web pattern due to stress and impact testing, showcasing its durability.

Toughening does not alter the basic characteristics of normal glass like light transmission and solar radiant heat. They possesses high thermal strength, and can withstand high temperature changes up to 250°C.

Close-up of shattered glass displaying a complex pattern of cracks.
Close-up of shattered glass illustrating the safety concerns addressed by toughened glass in construction.

Advantages

Let us have a look into the advantages of toughened glass that makes its superior to ordinary glass.

  • Strength and safety : Toughened glass is extremely strong and can counter any temperatures and climatic changes and are less likely to break.
  • Scratch proof : Toughened glass is scratch proof and capable of maintaining the sheen and elegance of structures for years.
  • Heat resistance : Normal glass may crack in high temperatures where as the toughened glass manufacturing process involves heat tempering and hence capable of resisting high temperatures.
  • Design flexibility : Toughened glass got several design options like frosted, translucent, coloured, laminated options.

Key Takeaways

  • Types of Glass significantly impact architecture and design by offering diverse solutions for strength, safety, and aesthetics.
  • The main types of glass include annealed, heat-strengthened, and toughened glass, each with unique properties.
  • Manufacturing glass involves fusing materials like sand and lime, resulting in transparent, strong, and recyclable products.
  • Annealed glass is suitable for applications like windows and facades, while toughened glass enhances safety and durability in modern structures.
  • Heat-strengthened glass provides extra thermal resistance and is less prone to spontaneous breakage compared to ordinary glass.

Conclusion

In conclusion, the various types of safety glass play a vital role in ensuring both safety and style in modern construction. Whether it’s tempered glass, laminated glass, or toughened glass, each type provides unique benefits. These include strength, impact resistance, and protection against breakage. These types of safety glass used in buildings not only enhance structural safety but also contribute to energy efficiency, sound insulation, and visual appeal. From skyscrapers and commercial spaces to homes and facades, safety glass applications continue to expand. By understanding the types of glass available and their specific properties, architects and builders can choose the most effective solutions for durability, performance, and design excellence in today’s evolving construction landscape.

Penetration Test for Bitumen – Significance and Procedure

The penetration test for bitumen is a laboratory method for grading bitumen based on its hardness. In this test, the amount of penetrating a specific needle into the bitumen is measured.

More than 85% of bitumen is used in road construction. Weather condition affects on bitumen binder. In cold weather, bitumen becomes hard, and the possibility of cracking increases. On the other hand, hot weather causes bitumen becomes soft and sticky.

Both situations are not acceptable as a result of civil engineers using penetration tests.

  1. What is the Penetration Test of Bitumen?
  2. The Bitumen Penetration Test History
  3. An overview of the Bitumen Penetration test Importance
  4. How Is the Penetration Test of Bitumen Performed?
  5.  Apparatus
    1. Procedure 
  6. Infographics – 10 Major bitumen tests

    What is the Penetration Test of Bitumen?

    The penetration test for bitumen is a laboratory method for grading bitumen based on its hardness. In this test, the amount of penetrating a specific needle into the bitumen is measured.

    This value is reported in a tenth of a millimetre or Deci-millimeter (DMM) as a penetration value. The penetration test can be used for refinery bitumen, emulsion bitumen, and oxidized bitumen. Based on this test bitumen is classified into penetration grades of 20/30, 30/40, 40/50, 50/60, 60/70, and 80/100.

    This test can measure the penetration value in the range of 20 to 300 dcmm. It can recognize the bitumen consistency and stability of bitumen.

    Let’s see this test history and application.

    The Bitumen Penetration Test History

    The first uses of the penetration test, date back to the early 19th century. Before that, the hardness of bitumen is measured based on the Chewing test. It was a completely experienced test. Through that, an engineer chews a moderate-temperature bitumen sample. Then reports the hardness of bitumen according to the difficulty of chewing. Because of the chewing test’s inaccuracy, the penetration test was introduced to the industry. 

    An overview of the Bitumen Penetration test Importance

    More than 85% of bitumen is used in road construction. Weather condition affects on bitumen binder. In cold weather, bitumen becomes hard, and the possibility of cracking increases. On the other hand, hot weather causes bitumen becomes soft and sticky. Both situations are not acceptable as a result of civil engineers using penetration tests.

    Bitumen with high penetration values is suitable for cold weather. Because it does not harden and crack when exposed to low temperatures. On other hand, bitumen with smaller penetration values is suitable for hot weather. Because high temperatures can not soften it. Most workable penetration bitumens are penetration grades 60/70 and 80/100. Penetration grade 60/70 can apply to road construction in warm weather and 80/100 is suitable for cold weather.

    Bitumen penetration grade 80/100 means that the needle penetrates into the bitumen in the range of 80 to 100 decimeters.

    How Is the Penetration Test of Bitumen Performed?

    In the following, you can familiarise yourself with the apparatus and the procedure of the test based on ASTM D5. Before that watch the below video by Infinity Galaxy which introduces the penetration test of bitumen.

     Apparatus

    • Penetrometer 
    • Container
    • Water bath
    • Stopwatch
    • Thermometer
    penetrometer

    Procedure 

    In the first step, bitumen should be heated up until it becomes liquid. Bitumen should not be heated in a temperature range above 90-100 degrees Celsius otherwise it will burn. While the temperature rises, stir the bitumen to make sure it is uniform. Bitumen should also be free of water and air bubbles.

    In the next step, pour the melted bitumen into the container and let it cool at room temperature. 

    After that put the bitumen container in the water bath with a constant temperature of 25 degrees Celsius and let the sample reach the same temperature.

    Then place the container under the penetrometer. Move down the needle just above the bitumen surface. 

    Thereafter, apply the needle which has a 100gr load just for 5 seconds. Repeat the test 3 times and write down the results each time. The needle tip in each repetition should be apart 10mm from the previous measurements.

    Report the mean value as the penetration value of the bitumen sample. The following picture is other important bitumen tests in road construction:

    Infographics – 10 Major bitumen tests

    Interior Design: 3 Key Points and 3 (Common) Mistakes to Avoid

    Interior design is the art or practice of strategizing and managing the planning, design and execution of architectural interiors and their finishes and furnishings. When we decide to build our home, a path begins. It generates proposals in a much larger spectrum than what refers to the house itself.

    We also began to pay special attention to everything related to architecture, construction, and interior design.

    We observe, in the spaces we inhabit, how this or that technical resolution works. We notice how much we like a certain colour palette and what combinations of materials we find most pleasing. This opens up a new universe.

    Read Also: Blue World City Islamabad (UPDATED) Project Details | NOC | location | map | Plot Prices   

    This is where I would like to make an aside for interior design.

    It is the stage that materializes towards the middle and end of the work once the structural part and the “gross work” are resolved.

    The interior designer ideally works as a team with the architect and the family. They focus on everything related to the well-being inside the home.

    1. What does an Interior Designer Do?
    2. Key points of Interior Design
      1. #1. Form and Function – Primary point of interior design
      2. #2. Materiality –
      3. #3. Aesthetic
    3. Common Interior Design Mistakes
      1. #1. Not Planning the Interior Design
      2. #2. Moving into the Unfinished House (or Knowing when we will Finish it)
      3. #3. Put Sustainability Aside
    4. Conclusions

    What does an Interior Designer Do?

    His task has much to do with architecture and also includes decoration, but goes beyond it:

    It attends to the habitability of the space, its healthiness, materials, and the interior climate. This includes temperature, humidity, lighting, functionality, and aesthetics of all its equipment, etc.

    It takes into account the behavioural and psychological aspects of those who will live in each space.

    Here comes the most stimulating part of designing the interior of a home: Its creative and playful aspect.

    A mood board showcasing various fabric swatches, color samples, and interior design inspiration, including photographs of styled living spaces and sketches, arranged on a cork board with a hand writing notes.
    A creative mood board filled with fabric swatches, color palettes, and inspirational images for interior design.

    The possibility of working on it as a family shapes it as a team with a professional. They finish shaping it and adjusting it to what we have already been designing.

    They can be encouraged to make group sketches or put together collages or “mood boards” with pieces. These can include materials and colours that inspire them. Cut out and save images, words, photos, and phrases to serve as a guide throughout the process.

    Let us have a walk through to the key points of Interior design

    Key points of Interior Design

    Three key points of interior design to keep in mind are as follows

    • Form and function
    • Materiality
    • Esthetic
    A visual representation outlining the key points of interior design, featuring categories such as Form & Function, Materiality, and Aesthetic, accompanied by samples of materials and a floor plan sketch.
    Visual representation of the key points of interior design: Form & Function, Materiality, and Aesthetic.

    #1. Form and Function – Primary point of interior design

    It is important that the forms we choose for the interiors are consistent with the design of the “shell”. This consistency should extend to the decisions we have been making at a functional level.

    For example, if we choose to design a dome-type home where curved shapes prevail, that same criterion will guide us. It helps when choosing the openings, the furniture, and its distribution, reinforcing the idea of ​​the organic.

    A modern living space featuring large glass doors that open to an outdoor area, with flowing white curtains and a minimalistic wooden dining table and chairs.
    A modern interior featuring large glass doors and natural light, emphasizing seamless indoor-outdoor living.

    If the construction decisions aim to generate a space with constant ventilation, the interior distribution should also collaborate with this objective. We should avoid locating large furniture or internal divisions that obstruct air circulation.

    #2. Materiality –

    Although sometimes we believe that the interior materials only influence the aesthetic aspect, like the rest of the materials we choose for the home, they also have great weight at a functional level. They influence the comfort and healthiness of the home.

    For example, if we decide to build a high-efficiency rocket stove with natural materials, we should consider its surroundings. Surrounding it with a brick or stone plinth and floor can enhance its thermal inertia. It’s better than using ceramics or wood that do not have that characteristic.

    Flat lay of various material samples including wood, marble, fabric, and metal, with the text 'Materiality: The choice of materials for a house is key' overlaying the image.
    A curated selection of materials emphasizing the importance of materiality in interior design.

    If from the design we are governed by the idea of ​​maintaining good insulation in the openings, we can collaborate with this. Choose a thick and heavy curtain on the facades most exposed to cold or wind.

    The choice of materials for a house is key and largely determines the interior design of our house. So also the functional aspects that collaborate with the design of the house at a functional level.

    #3. Aesthetic

    It is a point that we sometimes put aside when we are in the middle of work, right?

    However, aesthetics is one of the pillars of any creative act. It has a direct influence on the healthiness of the home since it relates to the appreciation of beauty.

    Living spaces where we can inhabit beauty connect us directly with enjoyment and positive emotions, confidence, and self-esteem.

    It relates to our most subtle side. It relates us to art in our daily lives. Moreover, it gives us the possibility to express the lifestyle that we seek to have and want to share.

    A cozy living room with a light-colored sofa adorned with patterned cushions, a wooden coffee table with books, a sculptural vase, and a potted plant, all bathed in natural light from large windows.
    A modern living room featuring a cozy sofa, a stylish coffee table, and a potted plant, highlighting minimalist interior design.

    Spaces that we don’t like or cause aesthetic discomfort influence us negatively. They can even make us feel incapable or affect our image of ourselves as creators.

    As in the previous points, the aesthetic line of the shell must have a clear relationship with the interior. This can be in a harmonious or totally disruptive way.

    Common Interior Design Mistakes

    Some issues arise repeatedly while designing spaces. These missteps can be avoided with a comprehensive understanding of design principles. The three most common interior design mistakes are as follows

    • Not planning the interior design
    • Moving into the unfinished house
    • Put sustainability aside

    Let us dive into the details

    #1. Not Planning the Interior Design

    Being the last stage and perhaps the least “hard” or technical, everything related to equipment and finishes is usually left out. It is often excluded from the plans of time, money, and energy within the work.

    However, it is important to remember these aspects. Ultimately, they make the quality of the home as much as the entire process that precedes it. We must consider it within the planning of the work like any other stage.

    #2. Moving into the Unfinished House (or Knowing when we will Finish it)

    An idea that is usually installed due to not having measured our money, time, and energy to finish and equip the house is “we move as it is, and then we finish it”.

    This is a decision that can lead us to live in an unhealthy space, not very functional or not suitable for the lifestyle we aimed for when we started.

    Without planning, it is a state that can last longer than we think. It can begin to affect us emotionally and functionally in our homes.

    #3. Put Sustainability Aside

    In a rush to finish as it may, we can abandon in this last stage all the considerations of ecology, sustainability, and health. These are aspects in which we invested in the rest of the construction.

    This is related, again, to not considering the interior of the house in our planning. Consequently, we arrive without time, money, or energy to finish it.

    Conclusions

    1. The fundamentals: Consider the interior design and equipment of the home as part of the construction process. From the moment of planning and initial budget

    2. Take interior design as a creative opportunity for all the people who are going to live in the house. It also encourages us to manufacture and generate the elements that are going to surround us every day.

    3. Pay attention to the spaces that we are visiting. This allows us to take the ideas and concepts we find harmonious and pleasant and translate them into the design of our home.

    4. Do not hesitate to consult a specialized professional, as in any other stage of the work

    You already know interior design is something very important to consider in the design of your home. Taking these recommendations into account, you can start thinking and imagining what the interior of your new home could be like. For more ideas on interior design, please visit https://www.skymarketing.com.pk/kingdom-valley-islamabad/

    Ecological House – How to Build with Materials that Society Throws Away

    Ecological house or Earthship House models are passive, bioclimatic, and self-sustaining designs. An architecture that promotes the reuse of waste materials and energy independence.

    Many people are now attracted to the idea of building an ecological, healthy, and low-cost house. One can find such houses in New City.

    However, a myth persists that building a greenhouse costs a lot and requires expensive, sophisticated materials.

    Nothing is further from reality!!!

    1. Types of Ecological Houses
    2. The Principles of Earthship Green Homes/ Ecological House
      1. 1. The Orientation of the House
      2. 2.  Use Waste Materials
      3. 3.  Use of Renewable Energies
      4. 4.  Installation of Rainwater Harvesting and Wastewater Treatment Systems
    3. Construction Stages of an Earthship Ecological House
      1. Earthship ecological house models do not walk with half questions.

    Types of Ecological Houses

    And while it is true that certain types of ecological houses use expensive materials, there are other options (there always are) that go the opposite way.

    Today, I want to present a model of houses that Architect Michael Raynolds developed in 1978.

    This model of ecological houses is called Earthship, which literally means “Earth Ship.”

    Raynolds has been building their houses for more than 30 years in different parts of the world. They have adapted to different climates and cultures.

    Reynolds is the founder of the  Earthship Biotecture initiative, an organization dedicated to fostering and promoting the development of the Earthships model of homes throughout the world.

    The Principles of Earthship Green Homes/ Ecological House

    The principles that guide the design of Earthships ecological houses are simple and functional.

    Their purpose is to generate a healthy, sustainable house with a decentralized energy supply system.

    There are 4 principles that guide this type of design:

    • The orientation of the House
    • Use waste materials
    • Use of Renewable energy
    • Installation of Rainwater Harvesting and Wastewater Treatment Systems

    1. The Orientation of the House

    The basic principle of Passive Design. It is about orienting the openings of the house (especially windows) towards the direction of the solar path.

    A principle that should guide every design of a house. 

    Builders create large windows in this direction and place a greenhouse (in the form of a longitudinal corridor) between the exterior and the house’s rooms.

    Interior view of a greenhouse corridor in an ecological house, featuring lush plants and a wall made of glass bottles.
    Interior of an Earthship greenhouse corridor, featuring lush plants and walls made from repurposed materials, designed for solar energy collection.

    This greenhouse corridor efficiently collects solar energy, and residents manually regulate the house’s temperature there.

    It also serves as an interior garden where to grow food for self-consumption. It can also build filters for the gray water of the house.

    2.  Use Waste Materials

    Earthship eco-homes use car tires, glass bottles, and cans in their construction.

    Builders use car tires to construct the foundations and retaining walls of the house. They incorporate bottles and cans into the walls. Typically, they build dense and wide walls from earth or adobe.

    This achieves great energy efficiency.

    A modern Earthship ecological house with a unique facade featuring recycled glass bottles, surrounded by used car tires and small shrubs, set against a sunset landscape.
    An Earthship ecological house showcasing sustainable design with walls made from waste materials, featuring glass bottle skylights and tires as a foundation.

    The use of bottles works as skylights, allowing light to enter and generating a very particular aesthetic that many people like more and more.

    3.  Use of Renewable Energies

    One of the characteristics of the Earthships Houses is their independence from supply networks. Therefore, it is possible to build them anywhere.

    An Earthship ecological house featuring a unique design built with sustainable materials, solar panels on the roof, and a wind turbine in the background, set in a desert landscape.
    An Earthship ecological house featuring solar panels and a wind turbine, designed for self-sustainability and energy independence.

    To generate energy for domestic consumption, the house uses the energy of the sun and the wind. Solar panels and Aeolic blades serve as two sources of permanent and renewable energy.


    4.  Installation of Rainwater Harvesting and Wastewater Treatment Systems

    The house achieves its water supply by collecting rainwater, which it gathers in a dedicated tank. Then, some filters purify this water into drinking water, and the house uses it for all purposes. The system separates gray water from black water (from the toilet). A gray water filter in the “greenhouse” part treats the gray water.

    Illustration of an Earthship water harvesting and treatment system, showing components like rainwater collection tank, filtration system, gray water management, septic tank, and a greenhouse bio-filter for sustainable living.
    Diagram illustrating the Earthship water harvesting and treatment system, showcasing how rainwater is collected, filtered, and utilized within the ecological house.

    The water from the toilet goes to a septic tank, to be later purified in a biological filter.

    The following diagram shows how the water in the house is collected and treated.

    Construction Stages of an Earthship Ecological House

    The simple construction system of an Earthship Ecological House allows people to build it collaboratively and communally.

    It is very labour intensive, and the first stage is physically hard work.

    Let us look into the stages of construction.

    1. It begins by building a perimeter wall (in the form of a «C») of used car tires

    This wall covers the three orientations except that of the solar path. North for the Southern hemisphere and South for the Northern hemisphere.

    Once the wall is finished, a perimeter beam is placed on the wall. Some “screen wall” type pillars reinforce the perimeter wall of used tires.

    On the opposite side of the solar path are the rainwater collection tanks and the tubes. These tubes manually regulate the interior temperature of the house (ventilation).

    2. Then, you start with the wooden structure. The roof structure and the entire roof are built. Also, the part that looks towards the solar path where doors and windows are located

    3. Also, with a wooden structure, the part of the greenhouse is built in the same direction as the solar path

    4. Solar panel installations are made

    5. Interior work begins: interior floor and walls

    Earthship ecological house models do not walk with half questions.

    It is a 100% self-sustaining design, uses waste materials, and promotes energy independence.

    It is a radical design that is committed to a relationship with an environment of respect and harmony.

    If you really dare to have a design like this, the best advice is to get to know the Earthship Biotecture website in depth

    It will probably be very difficult for you to find a construction company that knows and knows how to build an Earthship house.

    Therefore you will have to train and seek help from people who know and work promoting this type of construction.