3 d Printing buildings |Concrete Printing & Contour Crafting Methods Full Guide

3 d Printing buildings are one of the greatest advancements of technology. The rapidity and accuracy with which the work can be completed is the attraction. We will find out all the details about the important methods of 3 d printing which are concrete printing and contour crafting.

What is 3 D Printing?

The 3D printing process builds a three-dimensional object from a computer-aided design (CAD) model, by successively adding material layer by layer.

Unlike conventional machining, casting and forging processes, where material is removed from a stock item or poured into a mold and shaped by means of dies, presses and hammers.

Time to ask the question. Why is it a big deal?

Why 3 D Printing for construction?

  • To avoid construction formwork which accounts for 40% of the total budget for concrete
  • It allows for flexibility and freedom of architectural design
  • To reduce construction and facilities management costs
  • To build a future of sustainable construction

Now, let’s move on to the next section which introduces the 2 printing methods.

3 d printing buildings methods

There are mainly 2 methods for 3 d printing buildings.

  1. Contour crafting
  2. Concrete printing

Let’s dive in deep into each of them.

Contour crafting for 3 d printing buildings

Contour crafting- Schematic of CC extrusion and filling process
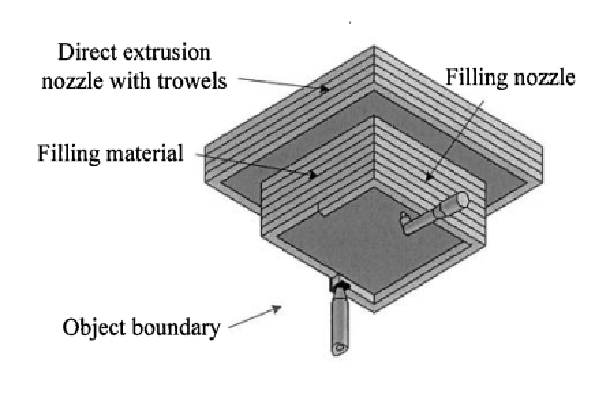
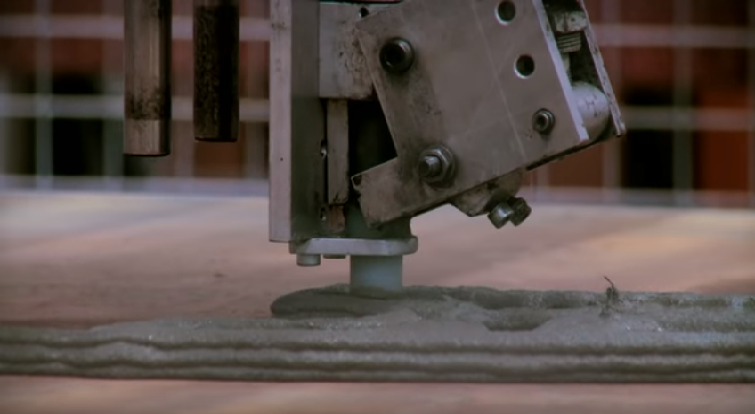
  • Contour crafting is based on an extrusion and filling process
  • The extrusion process forms the smooth object surface by constraining the extruded flow in the vertical and horizontal directions by the use of trowels.
  • The orientation of the side-trowel is dynamically changed for better surface fit for each decomposed layer.
  • The side-trowel allows thicker material deposition while maintaining the high surface finish.
  • Thicker material deposition cuts down manufacturing time, which is essential for building large-scale parts using the material additive process.
  • Maximum deposition layer thickness is limited by the trowel height.
  • As the extrusion nozzle moves according to the predefined material deposition path of each layer, the rims (smooth outer and the top surface of outside edges) are first created.
  • The towelled outer surface of each layer determines the surface finish quality of the object.
  • The smooth top surface of each layer is also important for building a strong bond with the next layer above.
  • Once the boundaries of each layer are created, the filling process begins and material is poured or injected to fill the internal volume.

Now, let’s find out the details of concrete printing.

Concrete printing for 3 d printing buildings

Concrete printing
Concrete printing
  • Concrete printing is similar to contour crafting in the ejection phase of concrete
  • It is able to achieve better 3D printing, because of its resolution of deposition
  •  Concrete printing provides larger freedom printing internally and externally.
  • The method not only enables the production of both high compressive compressive_strength and_tensile_strength concrete mixture, 110 MPa and 10 MPa respectively but improves the overall workability, extrusion and onsite construction methods.

Next, let me show you the advantages of 3 d printing in construction industry.

Advantages of 3 d printing in the construction sector

  • Cost Efficiency
  • Labour efficiency
  • Time and costs savings
  • Environmental/ economic aspects
  • Any complex design can be built

Now, let me quickly show you some examples of 3 d printing buildings.

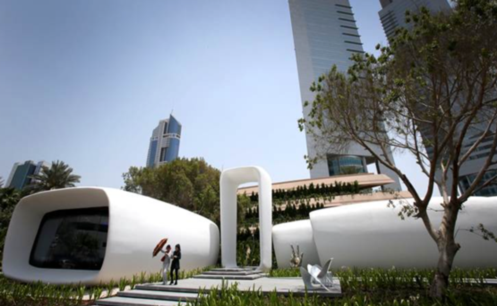
Implementation examples of 3d printing for construction

  1. Dubai Future Foundation (DFF)
DFF Building Dubai
Dubai Future Foundation (DFF) Building in Dubai

     2. Reinforced concrete printed bridge at Gemert

     3. Yin gChuang, the Chinese company

Conclusion

  • Using this technology is cost, time and quality efficient, through analyzing many theoretical and practical examples of 3D printed structures.
  • According to the literature survey that was conducted, using 3D printing can save up to 80% of manufacturing costs and 40% in materials costs.
  • For future work and application, the detailed economic analysis must be conducted to show the reduction potential of 3D printing, and its impact on the full-scale economy of the country, by applying any of the methods previously mentioned companies use in their work.

Real experiments must be conducted to prove the material, labor and energy reduction. And, you will amaze at the beauty of 3d printing building.

Photo credits: https://www.spentys.com/

Don’t forget to share your views on the innovation in comments.

Happy learning!

Cracks in a Building |3 Types of Cracks in Building Walls Full Guide

Cracks in a building affect the building’s artistic look and it destroys the wall integrity, affects the safety of the structure and even reduces the durability of the structure.

In this blog, I will show you the important types of cracks in building and example of these cracks to understand them better.

Cracks occur when stress in the components increases beyond its strength.

Stress in the building components could be caused by externally applied forces like,

  • Dead load
  • Live load
  • Wind load
  • Seismic loads
  • Foundation settlement

It could be induced by internally due to temperature variations, moisture changes and chemical actions.

Let’s find out the types of cracks in building now.

Types of cracks in a building

Cracks are classified into three types

  • Structural cracks
  • Non-structural cracks
  • Cracks based on width

Structural cracks

Structural cracks arise due to different reasons such as incorrect design and overloading of the structural components. Structural cracks are a threat to the stability of the building and are difficult to correct.

This type of cracks can’t be corrected. But needs special retrofitting techniques to prevent the structure from collapsing. We will discuss more that in another blog.

For now, see the cracks in different structural members below.

BEAMSCOLUMNSSLABS
Flexural CracksHorizontal CracksFlexure Cracks
Shear CracksDiagonal CracksShrinkage Cracks
Torsional cracksCorrosion cracksCorrosion cracks
Corrosion cracks
Combination of above cracks
Cracks in a building at different structural members

Next let’s know about the structural cracks on beams and columns. An example is always good to understand a concept better.

Cracks on beams and columns

Cracks on beams and columns
  • Cracks in beams and columns occur when a material is strained under stress.
  • When two materials of varying elastic properties is joined together under the effect of force, then different shear stresses in these materials create cracks at the junction.
  • Dead and live loads are the main reasons for elastic deformation in any structural components of a building

Preventive Measures

  • To prevent this, you can build slip joints under the support of concrete slab on walls
  • Slip joints are mounted in the brickwork and concrete junctions to allow low friction movement between different materials due to expansion and contraction. And, thereby, prevent the bricks or mortar from cracking.
  • Provide horizontal movement joints between the top of the brick panel and reinforced cement concrete- beam/slab

Now, we will find out the details on non- structural cracks.

Non-structural cracks in a building (hair cracks)

Non-structural cracks are formed because of internal forces in the structure.

Materials due to moisture variation, temperature changes and suitable remedial measures can be carefully handled to put a curb on the crack. Cracks differ in width largely.

There, she is. The last member. Let’s meet last member in types of cracks in a building.

Cracks based on width

Depending upon the crack width, the cracks can be further divided as,

  • Thin Crack -less than 1 mm in width
  • Medium Crack -1 to 2 mm in width.
  • Wide Crack -more than 2 mm in width.

That’s it about the types of cracks in building.

We have sailed through the important aspects of cracks in building. We missed out the causes of cracks which will be explained in a blog in future.

Stay tuned!

4 Types of Pavement |Difference between Flexible and Rigid Pavement

Types of pavements play a crucial role in road construction. They determine the performance, durability, and maintenance requirements of highways and streets. There are four primary pavement types: flexible pavements, rigid pavements, composite pavements, and semi-rigid pavements. Each of these serves specific purposes depending on the load-bearing capacity, climatic conditions, and construction needs. It is essential to understand the difference between flexible and rigid pavements. These two major categories vary in material composition, load distribution, and overall performance. Flexible and rigid pavements offer distinct advantages. Flexible pavements are more adaptable to underlying soil conditions. Rigid pavements, made of concrete, provide higher structural strength.

This article covers the four types of pavements and the difference between flexible and rigid pavements

Before we begin, let’s look into what a pavement is.

  1. What is pavement?
  2. Types of Pavements
  3. Flexible pavement
    1. Examples of flexible pavements
    2. Advantages of flexible pavement
    3. Disadvantages of flexible pavements
  4. Rigid pavement
    1. Advantages of rigid pavement
    2. Disadvantages of rigid pavement
  5. Comparison between flexible and rigid pavements
  6. Semi rigid/ composite pavements
  7. Interlocking Concrete Block Pavement (ICBP)

What is pavement?

The pavement is a hard surface that’s built with concrete or asphalt, like a road or a driveway.

Pavement refers to the hard, durable surface layer of roads, walkways, and other transportation paths. These surfaces are designed to withstand the wear and load of traffic. It provides a smooth, stable platform for vehicles and pedestrians, while ensuring safety and comfort. Pavements are engineered for strength, weather resistance, and longevity, typically made from materials like asphalt or concrete. Properly constructed pavements reduce road maintenance and improve traffic efficiency, contributing significantly to infrastructure durability and performance.

Types of Pavements

Pavements are essential for providing a stable and smooth surface for roads and infrastructure. The main types of pavements differ in their structural composition and load-bearing capacities. The top four types of pavements include flexible pavements, rigid pavements, composite pavements, and semi-rigid pavements. Each type serves specific purposes depending on traffic load, climatic conditions, and construction requirements.Based on the structural behavior, road pavements are classified as

  • Flexible pavement
  • Rigid pavement
  • Semi-rigid pavements
  • Composite pavements
  • Interlocking cement concrete block pavement (ICBP)

Without any due, let’s jump onto the first type of pavement.

Flexible pavement

Flexible pavement - Type of pavement
Flexible type of pavement

Flexible pavement is the pavement which possess negligible flexural strength. And,

  • The flexible pavement layer can exhibit non-recoverable deformations of the lower layer. It may also show recoverable deformations. These deformations include the subgrade on the upper layers and possibly affect the pavement surface.
  • The vertical compressive stress is maximum on the pavement surface directly under the wheel load and is equal to the contact pressure under the wheel
  • The lower layers of pavement have to withstand lesser magnitudes of stresses. There is no direct wearing action due to traffic loads. They also do not experience weathering action due to environmental factors. Therefore inferior materials with lower cost can be used in the lower layers.
  • In flexible pavement layers, the top layer has to be the strongest. This layer must sustain the highest compressive stresses. It also endures wear and tear due to moving traffic and varying weather factors.

Examples of flexible pavements

  1. Asphalt Pavements – Commonly used for highways, streets, and driveways.
  2. Bituminous Surface Treatment (BST) – Used for lower-traffic roads and rural areas.
  3. Gravel Roads with Asphalt Coating – Often found in rural areas or less populated regions.
  4. Full-Depth Asphalt Pavements – Used in areas with high traffic and heavy loads.
  5. Cold Mix Asphalt – Used in maintenance and patching.

Each of these examples offers flexibility, enabling them to adjust to changes in the subgrade beneath.

Also read: Electronic Toll Collection-4 subsystems of ETC Full details

Next, let’s peep into advantages and disadvantages of flexible pavements.

Advantages of flexible pavement

Flexible pavement is a common choice in road construction. It is designed to distribute loads over a wide area. This allows for movement and adaptation to underlying conditions. This adaptability makes flexible pavements particularly beneficial in various applications.

Types of Road pavements - Flexible pavement
Types of Road pavements – Flexible pavement
  • Initial cost can be reduced by constructing thin bituminous surface layer
  • Standard design load in terms of CSA (Cumulative Standard Axles)
  • Functional deterioration
  • Strengthening by overlay
  • High salvage value
  • Can be open to traffic after 24 hours

Disadvantages of flexible pavements

  • Deterioration under stagnant water
  • Periodic maintenance
  • Patching of pot holes is expensive
  • Thickness is very high
  • Night visibility is very low

That’s it about flexible pavement. Let’s move onto the next type of pavement.

Also read: Classification of roads- 5 types of roads full details

Rigid pavement

Rigid pavements are those which possess noteworthy flexural strength of flexural strength or flexural rigidity.

See more details below.

  • Rigid pavements are generally made of Portland cement concrete hence known as ‘cc pavement’
  • Construction of rigid pavement using high quality plane cement concrete known as ‘pavement quality concrete (PQC)
  • The CC pavement made of PQC are generally expected to sustain up to 45kg/cm2 of flexural stresses
  • In rigid pavements, the stresses are not transferred from grain to grain to the lower layers as in the case of flexible pavement layers.
  • Slab action is capable of  transmitting the wheel load cases through a much wide area below pavement slab

Having the details in back pack, ready to know the advantages and disadvantages of rigid pavements?

Advantages of rigid pavement

  • No deterioration under stagnant water
  • Thickness is less
  • Service life 30 years
  • Life cycle cost is very less
  • Night visibility is high

Disadvantages of rigid pavement

  • Axle load study is required
  • Design should be for 30 years
  • Possible to restore the pavements under crack
  • Surface may become smooth or slippery
  • Long period of 28 days is required to open traffic

Let’s conclude the section with a comparison.

Comparison between flexible and rigid pavements

Flexible pavementRigid pavement
Bitumen is mostly used for construction Otherwise called concrete pavements
Bitumen becomes soft due to low temperature and bleeds leading to failure of pavementHave longer life and is practically maintenance- free
When water enters the pavement during raining, resulting in potholes Can withstand extreme weather conditions
Due to low temperature in winter season, bitumen becomes brittle leading to cracking of pavementInitial cost higher comparatively, but economical in long term
Comparison between flexible and rigid pavements

Now, you know about flexible and rigid pavement. Time to meet some not-so-famous type of pavement.

Also read: Gauges in railway- All Details About Broad, Metre and Narrow Gauges

Semi rigid/ composite pavements

Semi-rigid pavements are an intermediate state between the Flexible and the Rigid pavement. The flexural strength of the pavement is less than a concrete slab. Nevertheless, it finds support by the lateral distribution of loads through the pavement depth as in flexible pavement.

When the intermediate class of semi-rigid materials like soil cement, lean cement concrete are used in the sub-base or base course of layers of pavements, they are called semi-rigid pavement.

Pavement consisting of both flexible pavement layers and one or more semi rigid pavement layers are called composite pavements.

The last member is ICBP or Interlocking concrete block pavement.

Interlocking Concrete Block Pavement (ICBP)

interlocking concrete block pavement
Interlocking Concrete Block Pavement (ICBP)

Interlocking Concrete Block Pavement (ICBP) has been extensively used in a number of countries for quite sometime as a specialized problem-solving technique for providing pavement in areas where conventional types of construction are less durable due to many operational and environmental constraints

That was the trip through the types of pavement. Have any doubts regarding this? Just drop it in comments.

See you there. Happy learning!

Controlled Flooding- 6 Types| Free Flooding| Basin Flooding

Types of flooding is an important topic in irrigation engineering, but they are usually classified based on the irrigation method rather than flooding itself. It’s mainly divided into three. Surface irrigation where water flows directly over the soil including basin flooding, furrow and border techniques.In subsurface irrigation water is delivered below the soil surface via tubes, minimizing evaporation. In case of sprinkler irrigation pipes and sprinklers are used to distribute water like rainfall.

In this blog, we will delve deep into the different types of controlled flooding in irrigation, exploring methods such as Free flooding, basin flooding, flooding by contour laterals, zigzag method of flooding, border strip flooding and check flooding are the 6 types of controlled flooding which is a subcategory of surface irrigation.

We will examine how these techniques manage water efficiently, their advantages, and their impact on agriculture and the environment.

What is Controlled Flooding Method of Irrigation

In controlled flooding, water is spread or flooded on a rather smooth flat land, without much control or prior preparation. This method is generally used in the inundation irrigation system in which water is forced to spread over vast tracts during the season of high streamflow.

It is a wasteful use of water and is practised largely where irrigation water is abundant and inexpensive.

Controlled flooding techniques in irrigation, including the flooding method of irrigation, optimize water use and minimize damage. Unlike traditional flooding irrigation, which can lead to inefficient water use, controlled flooding carefully manages water levels to enhance efficiency. Techniques such as free flooding, where water spreads broadly, and wild flooding, which lacks control, are contrasted with more precise methods like the check basin method. The check basin method uses barriers to contain and direct water, reducing runoff and erosion. Controlled flooding not only improves water distribution but also conserves resources and enhances crop yields. By managing water flow more effectively, these techniques address the challenges of traditional flooding, ensuring better agricultural outcomes and environmental sustainability.

Types of Controlled Flooding Irrigation


Controlled flooding irrigation includes several methods to manage water levels efficiently. These techniques aim to improve water distribution and reduce waste. let’s peep into the hierarchy of methods of controlled irrigation.

  • Free Flooding irrigation/wild flooding irrigation
  • Contour Lateral Flooding
  • Border Strips Flooding irrigation
  • Checks basin Flooding
  • Basin Flooding
  • Zigzag Method of Flooding

Free flooding or flooding from field channels

Free Flooding

Free flooding method consists of dividing the entire land to be irrigated into small strips by a number of field channels known as laterals.

  • These laterals may be either at right angles to the sides of the field, or at right angles to the contour lines as shown in figures.
  • When the laterals are aligned at right angles to the sides of the lateral, irrigation is possible only to one side of the lateral. However, when the laterals are aligned at right angles to the contours, irrigation is done to both the sides of the lateral.
  • The field channels receive water from the supply channel and discharge excess water in the waste channel.
  • Water is applied to the strip of a land through feeding points provided at some interval along the laterals.
  • This method of water application can be used both for flat lands as well as for relatively steep lands. The alignment and spacing of the laterals depends upon the type of soil and topography of land.
  • If the slopes are steeper, the closer spacing of laterals is required. Similarly, closer spacing is required for relatively more permeable soils.
  • For flat land and for relatively less pervious soils, the spacing of the laterals may be increased. Normally the spacing of the laterals may vary from 10 to 50 metres.
  • However, the method is more suited for irrigation fields containing medium type soil and having slopes ranging from 1 in 100 to 1 in 300.

Let’s find out about the next method of controlled flooding.

Flooding by contour laterals

Flooding by Contour Laterals

This is a special case of free flooding in which the field channels or laterals are aligned approximately along the contour lines.

This method is applicable to steeper terrain.

The field is cut by a relatively dense network of small contour laterals, the spacing of which depends upon the prominent grade of field between two adjacent ditches or laterals, the uniformity of slope and the soil type.

I have explained the details of border strip flooding and checks basin flooding in previous blogs. So, let’s move on to the next member.

ALSO READ: Rainwater Harvesting Methods: Everything You Need To Know

Border Strips Flooding irrigation

The border strip method, also known as border strip flooding irrigation, involves dividing a field into strips, typically 10 to 20 meters wide and 100 to 300 meters long, separated by low levees or borders. Water is directed from a supply ditch to the head of each strip, flowing down the slope in a controlled sheet, guided by the borders. The surface between the borders is kept level to ensure uniform coverage. Slopes vary from 0.2% to 0.8% along the strip, with cross slopes minimized to prevent uneven irrigation. This method is efficient for forage crops and requires minimal investment and labor. The length of each strip is adjusted based on soil type, infiltration rate, and irrigation stream size. For example, sandy soils typically use shorter strips, while clay soils may use longer ones.

Basin Flooding

Basin Flooding
Basin Flooding

The ring basin flooding is a special form of check basin flooding adapted to orchards.

  • Ring basins are formed for each tree; in some cases, one ring basin may be formed for two or more trees.
  • Water is supplied to these basins through a supply ditch. In some cases, a number of ring basins are interconnected.
  • Portable pipes or large hoses may also be used in place of ditches.

Last, but not the least let me explain about final method of controlled flooding.

Zigzag method of controlled flooding

Zig Zag Method of Flooding

It is special method of flooding where water takes circuitous route before reaching the dead end of each plot.

  • The whole area is divided into a number of square or rectangular plots; each plot is then subdivided with the help of low bunds or levees.
  • This method is suitable for relatively level plots. It is, however, highly unsuitable for farming operations with modern farm machinery.

That’s it about the methods of controlled flooding.

MUST-READ: Concept of green building- 4 comprehensive concepts easy read!

I hope you got a fair idea about free flooding, basin flooding, flooding by contour laterals and zigzag method of flooding.

Happy learning!