Category Archives: quality tests on concrete

Vee Bee Consistometer test – Workability of concrete

Vee Bee Consistometer Test is a reliable laboratory method used to evaluate the workability of concrete, especially for stiff and low-workability mixes where slump test results are not accurate. The Vee Bee Consistometer test for workability of concrete measures the time required for concrete to remould under vibration, providing a clear indication of consistency. In the workability of concrete Vee Bee test, vibration energy replaces gravity-based flow, making it suitable for dry mixes. Understanding the Vee Bee test procedure helps engineers achieve consistent and repeatable results. The Vee Bee Consistency test of concrete is widely used in laboratories and quality control setups and is considered one of the most dependable tests for workability of concrete for controlled assessment of stiff concrete mixes.

This article explains the Vee Bee Consistometer test, its principle, procedure, applications, and importance in accurately assessing the workability of stiff concrete mixes.

Significance of Quality tests on concrete

Quality tests on concrete are essential for ensuring strength, durability, and performance in construction. These tests help engineers assess the workability of fresh concrete and the quality of hardened concrete. Common quality tests on concrete include checks during the production stage (on fresh concrete before placing), tests on hardened concrete specimens, and evaluations performed directly on finished structures. Including tests like the flow table test for concrete ensures reliable results and consistent quality throughout a project.

A construction worker in a safety vest and hard hat examines concrete samples next to a compression testing machine in a lab setting.
A civil engineer in a safety helmet and reflective vest analyzing concrete test specimens in a lab, showcasing the importance of quality control in concrete workability tests.

Quality tests performed on concrete are classified into

  • Production stage quality tests ( On fresh concrete before placing)
  • Hardened stage quality tests ( hardened concrete specimens)
  • Non Destructive tests On structures ( tests done on the structures )

Also read : Aggregate Crushing test – Strength of aggregate

Also read : 9 lab tests of Bitumen for flexible pavements

Production stage quality tests on fresh concrete

Production stage quality tests on fresh concrete are crucial for ensuring the right workability and consistency before placement. These tests help engineers select the best mix for construction and maintain quality control. Key tests include the slump test, compaction factor test, Vee-Bee test, Kelly ball test, and the flow table test for concrete.

This article focuses on the Vee Bee Consistometer test, explaining its procedure, importance, and how it compares with other workability tests like the slump test and compaction factor test.

Vee Bee Consistometer test for workability of concrete

The Vee Bee Consistometer Test is a laboratory test used to determine the workability of concrete, particularly stiff and low-workability mixes. It measures the time required for fresh concrete to remould from a conical shape into a cylindrical shape under controlled vibration. This time, known as the Vee Bee time, indicates concrete consistency. Unlike the slump test, the Vee Bee Consistometer test for workability of concrete is suitable for dry mixes that do not flow easily. Commonly used in quality control, this test helps engineers compare mix designs and ensure uniform concrete performance.
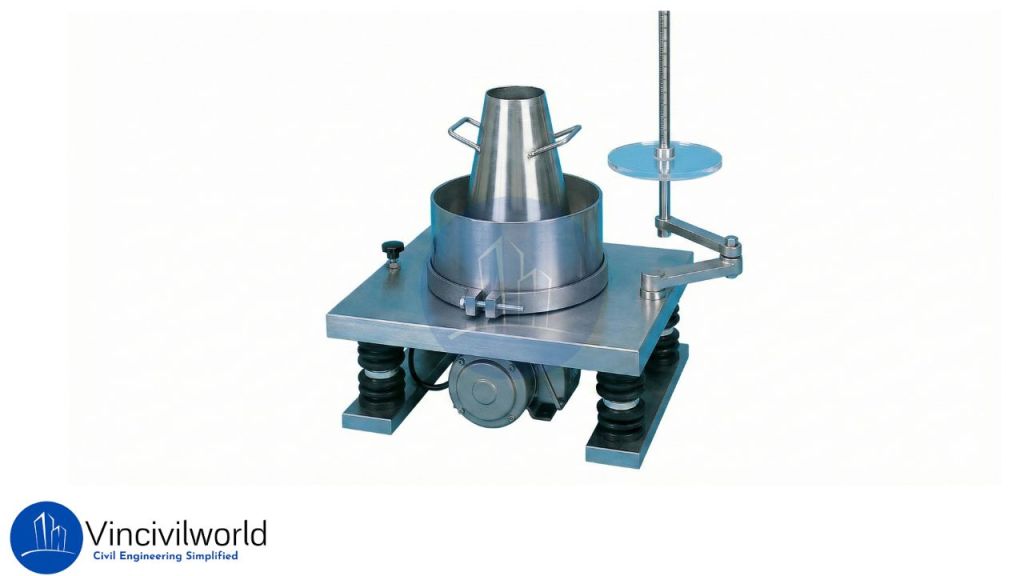
A steel laboratory apparatus used for material testing, featuring a cone-shaped container and a mechanical device for precise measurements.
Vee Bee Consistometer apparatus used for evaluating the workability of concrete in laboratory settings.

Relevant Codes and Standards for Vee Bee Consistometer Test

  • IS 1199 (Part 2): 2018Methods of Sampling and Analysis of Concrete – Workability
    Issued by Bureau of Indian Standards.
    This standard covers the Vee Bee Consistometer test, along with slump and compaction factor tests.
  • BS EN 12350-3Testing Fresh Concrete – Vebe Test
    Issued by British Standards Institution.
    Widely used in the UK and Europe for stiff concrete workability assessment.
  • DIN 1048 (Part 1)Testing Concrete – Fresh Concrete Tests
    Issued by DIN.
    Includes the Vebe test for consistency measurement.

Note: These standards ensure uniform testing procedures, repeatable results, and reliable evaluation of low-workability concrete mixes.Relevant IS code

Apparatus used for Vee Bee Consistometer

A blue industrial machine with a funnel and a black container at the center, designed for processing materials.
Vee Bee Consistometer apparatus used to assess the workability of concrete.

The Vee – Bee Consistometer includes of 

  • A vibrator table resting upon elastic supports
  • A metal pot
  • A sheet metal cone, open at both ends
  • A standard iron rod

The dimension of the vibrating table is 380 mm in length, 260 mm in width and height of 305 mm. Also, supporting the table there is a rubber shock absorber. Under the table, there is a vibrator that vibrates electrically.  The dimension of the metal slump cone is 300mm height, 200 mm top diameter and 100 mm bottom diameter. 
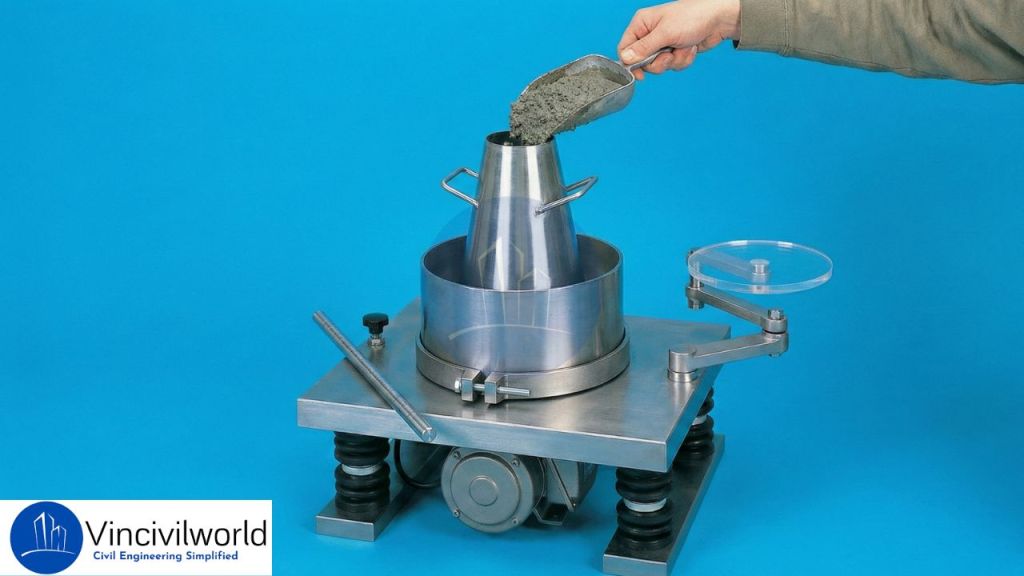
A person pouring a scoop of material into a metallic measuring cone on a balance scale, with a blue background.
The Vee Bee Consistometer, essential for evaluating the workability of concrete, particularly in stiff and low-workability mixes.

Test procedure

  • Initially fill the slump cone with four layers of concrete. Each layer should have a height of one – fourth of the cone. 
  • After that tamp each layer 25 times using a standard tamping rod and strike uniformly.
  • Then after placing the final layer, remove the excess concrete on the top of the concrete.
  • Move and place the swivel arm attached to the glass disc on the top of the cone.
  • Now remove the cylindrical cone gradually in the vertical direction and note down the slump.
  • Then switch on the electrical vibrator and allow the concrete to spread. 
  • The time taken by the concrete to spread uniformly is noted using the stop clock.
  • This time is expressed in vee bee seconds.

The time for the concrete to remould is the Vee-Bee seconds. The Vee Bee consistometer is an indirect measure of concrete workability. This method is suitable for concrete whose slump value cannot be determined. ie, for dry mixes. We can get direct result through this method.

Also Read : Soundness test on aggregate

Key Takeaways

  1. The Vee Bee Consistometer Test is designed to assess the workability of stiff concrete mixes.
  2. It measures the time required for concrete to remould under vibration.
  3. Longer Vee Bee time indicates lower workability of concrete.
  4. The test provides more reliable results than slump test for dry mixes.
  5. It is commonly used in laboratory-controlled environments.
  6. The method helps compare different concrete mix designs.
  7. Proper vibration is essential for accurate results.
  8. The test minimizes subjective judgment during workability assessment.
  9. It is standardized under Indian and international codes.
  10. The test is an important part of quality control procedures.
  11. It complements other tests for workability of concrete.
  12. It ensures consistency during concrete production.

Conclusion

The Vee Bee Consistometer Test plays a crucial role in evaluating the workability of concrete, especially for mixes with low water content. By measuring the remoulding time under vibration, the test provides a clear and quantitative indication of concrete consistency. Unlike the slump test, it performs well for stiff mixes where flow is minimal. When conducted according to standard procedures, the test helps engineers maintain uniformity in concrete production and placement. It also supports effective quality control by enabling comparison of different mix proportions. As one of the reliable laboratory-based tests for workability of concrete, the Vee Bee Consistometer Test remains essential for achieving durable and well-performing concrete structures.

Kelly Ball Test – Workability of Concrete

Kelly Ball Test is a simple and reliable method used to assess the workability of concrete directly at construction sites. Among the various tests for workability of concrete, this method stands out for its speed. It is also easy to execute on fresh concrete surfaces. The Kelly Ball Test concrete assessment works by measuring penetration depth. This makes it a practical Kelly Ball penetration test for large pours and ready-mix applications. To ensure accurate results, you must follow the standard Kelly Ball Test procedure. This procedure correlates penetration values with concrete consistency. The Kelly Ball Test is simple. It is also suitable for the field. Therefore, it continues to be an effective tool for monitoring concrete quality during placement.

  1. Significance of Quality tests on concrete
  2. Production stage quality tests on fresh concrete
  3. What is Kelly ball test ?
    1. Standard Guidelines
      1. Codes and Standards
    2. Kelly ball test Apparatus as per ASTM C360/C360 M 92
    3. Test Procedure
    4. Results
  4. Advantages – Kelly ball test
  5. Disadvantages of Kelly Ball Test
  6. Key Takeaways
  7. Conclusion

Significance of Quality tests on concrete

Quality tests on concrete are essential for ensuring strength, durability, and performance in construction. These tests help engineers assess the workability of fresh concrete and the quality of hardened concrete. Common quality tests on concrete include checks during the production stage (on fresh concrete before placing), tests on hardened concrete specimens, and evaluations performed directly on finished structures. Including tests like the flow table test for concrete ensures reliable results and consistent quality throughout a project.

Quality tests performed on concrete are classified into

Also read : Bitumen tests – 9 lab tests for bitumen

Production stage quality tests on fresh concrete

This article covers the kelly ball test ,apparatus details, procedure, merits and demerits etc.

A Kelly ball test apparatus placed on a construction site, with blurred machinery and materials in the background.
The Kelly Ball Test apparatus used for assessing the workability of concrete at construction sites.

What is Kelly ball test ?

This simple field method assesses the workability of freshly mixed concrete. In the test, a standard steel ball penetrates the concrete under its own weight, and the penetration depth indicates concrete consistency. Engineers mainly use this test at construction sites to make quick decisions during concrete placement. The Kelly Ball Test helps verify whether the concrete is too stiff or too workable for proper compaction and finishing. Its significance lies in its speed, ease of use, and ability to provide a direct indication of concrete workability without complex equipment.

Standard Guidelines

Standard codes for the Kelly Ball penetration test provide guidance on equipment, testing procedure, and result interpretation. This ensures reliable assessment of concrete workability, especially during on-site quality control.

Codes and Standards

ASTM C360 / C360M 92– Standard Test Method for Ball Penetration in Freshly Mixed Concrete
Issued by ASTM International.
Note: This standard has been withdrawn but is still referenced in technical literature.

AASHTO T 183 – Ball Penetration Test
Issued by AASHTO.
Note: This standard is discontinued and mainly used for historical reference.

Indian Standards (IS Codes)
There is no specific IS code . Workability testing in India is generally covered under IS 1199, issued by Bureau of Indian Standards

Kelly ball test Apparatus as per ASTM C360/C360 M 92

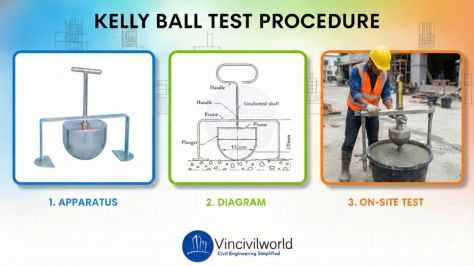
The kelly ball apparatus for measuring the workability of concrete consist of..

  • Meta hemisphere (Ball)
  • Graduated scale
  • Frame
  • Handle

The workability of concrete is decided by the depth of the penetration of metal hemisphere (ball) which will descend under its own weight into the fresh concrete. The Metal hemisphere or ball has 152 mm diameter and 13.6 kg weight. J. W. Kelly (Professor, University of California) had devised the plan of the Kelly ball test afessor, University of California) had devised the plan of the Kelly ball test apparatus. Hence, later on it also came to be known as a ball penetration test. On the top of the apparatus, there is a handle. The graduated scale measures the penetration reading. 

A three-part image illustrating the Kelly Ball Test procedure. The left panel shows the apparatus used for the test, the middle panel features a diagram explaining the components, and the right panel displays a person conducting the on-site test with concrete.
Visual representation of the Kelly Ball Test procedure, showcasing the apparatus, diagram, and on-site testing process for assessing concrete workability.

Test Procedure

  • Place freshly mixed concrete on a level, rigid surface immediately after mixing.
  • Ensure the concrete surface is smooth and free from vibration.
  • Clean the Kelly ball and check that it moves freely along the guide rod.
  • Position the apparatus so the steel ball just touches the concrete surface.
  • Release the ball gently without applying any force.
  • Allow the ball to penetrate under its own weight.
  • Wait until the penetration stabilizes.
  • Read and record the depth of penetration from the graduated scale.
  • Repeat the test at different locations on the concrete surface.
  • Take the average penetration value as the final result.
  • Note: Greater penetration indicates higher workability, while lower penetration indicates stiffer concrete.

Results

The workability of the concrete is the average value of the readings from the penetration.

Advantages – Kelly ball test

Some advantages of this test are

  • Compared to other workability tests kelly ball test is very fast
  • Precise and Accurate results

Disadvantages of Kelly Ball Test

The disadvantages of this test include

  • This test requires a large amount of fresh concrete.
  • The result should not be precise if the size of the aggregate is large.
  • The concrete should be levelled before starting the test.

Key Takeaways

  • This is a simple field method for assessing fresh concrete consistency.
  • It directly measures penetration depth, reflecting the workability of concrete.
  • The test is faster and less operator-dependent than many laboratory methods.
  • Kelly Ball Test concrete assessment is suitable for large pours and flat surfaces.
  • The Kelly Ball penetration test works under the self-weight of the steel ball.
  • Proper surface preparation is essential for reliable results.
  • The procedure must be followed carefully to avoid errors.
  • It is mainly used as a supplementary field check.
  • Results help engineers make quick placement decisions.
  • It complements other tests for workability of concrete used in quality control.

Conclusion

The Kelly Ball Test remains a practical and efficient method for evaluating the workability of concrete under site conditions. By measuring penetration depth, the Kelly Ball penetration test provides a direct indication of concrete consistency during placement. Although not as widely standardized as slump testing, Kelly Ball Test concrete assessment is valuable for large slabs and mass concreting works. When carried out correctly using the recommended Kelly Ball Test procedure, it helps engineers maintain uniform quality and avoid placement issues. Among various tests for workability of concrete, the Kelly Ball Test stands out for its simplicity, speed, and field applicability. Used alongside standard methods, it supports better decision-making and effective on-site concrete quality control.

Rebound hammer test on Concrete structures

ebound Hammer Test for Concrete is one of the most widely used non-destructive tests to evaluate in-place concrete strength. Also known as the Schmidt Hammer Test, it helps engineers quickly assess concrete surface hardness without damaging the structure. This test measures the rebound number when a spring-controlled hammer impacts the concrete surface, providing valuable insight into its compressive strength. The Rebound Hammer Test procedure is simple, fast, and highly suitable for quality control at construction sites. It is commonly used in buildings, bridges, and existing structures where core extraction is difficult or not recommended. Along with evaluating strength, the method helps identify weaker concrete zones and ensures uniformity. Due to its practical benefits, many professionals prefer this technique while comparing concrete hardness test methods. Understanding the advantages of Rebound Hammer Test ensures accurate decision-making in structural assessment and maintenance.

Rebound hammer test is one of the most popular and simple non-destructive concrete tests. The Non-destructive test is the process of detection of defects in concrete without its destruction. The determination of concrete quality is necessary for both fresh concrete and hardened concrete. The rebound hammer test is the common test for determining quality for existing structures.

  1. Rebound/Schmidt hammer test definition and significance
    1. Significance
    2. Relevant Codes 
  2. Objectives of Rebound hammer test
  3. Rebound hammer test procedure – Standard method
    1. Procedure – Step-by-Step
  4. Correlation between compressive strength of concrete and rebound index.
  5. Result Calculation of Rebound Hammer tests
  6. Concrete quality and rebound test values
  7. Advantages of rebound hammer test
  8. Conclusion

Rebound/Schmidt hammer test definition and significance

The Rebound Hammer Test for Concrete is a widely used non-destructive test for concrete strength. It evaluates surface hardness and provides an estimate of compressive strength. This is done without damaging the structure. In this Schmidt Hammer Test, a spring-controlled hammer impacts the concrete surface, and the rebound value indicates the concrete’s hardness. This concrete hardness test method is quick, simple, and ideal for assessing uniformity and quality in existing structures. The rebound hammer test procedure helps identify weak zones, monitor deterioration, and ensure proper maintenance. The advantages of rebound hammer test make it essential for preliminary and on-site concrete assessment.

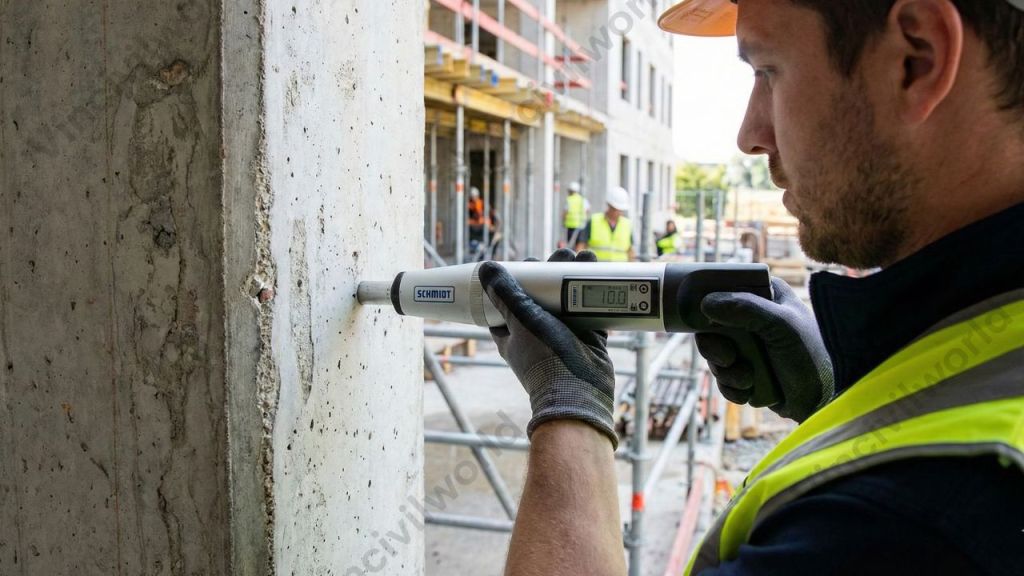
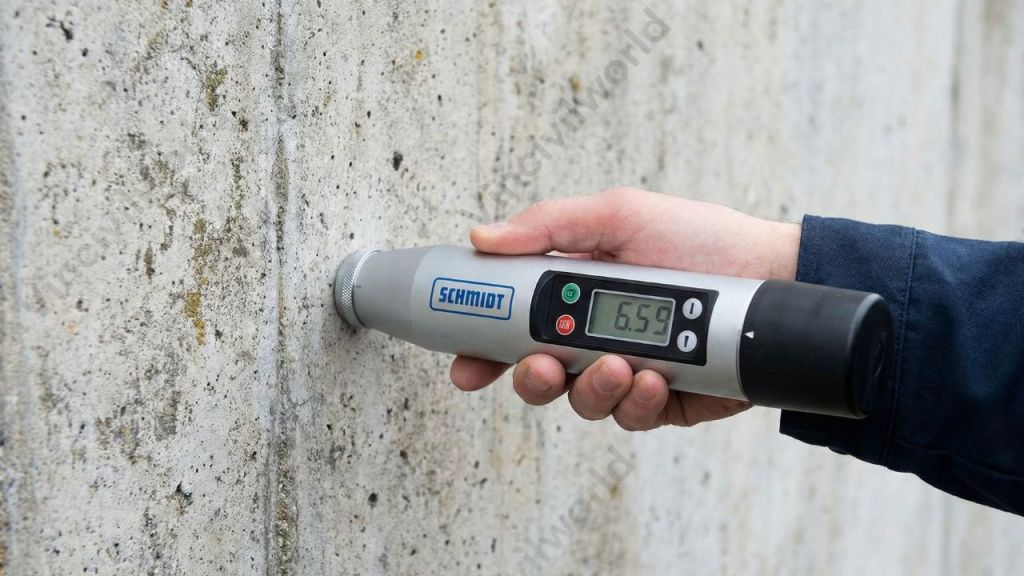
A person conducting a Schmidt Hammer Test on a concrete surface, showing the rebound measurement displayed on the device.
A Schmidt hammer being used to perform a Rebound Hammer Test on concrete, measuring surface hardness to estimate compressive strength.

Significance

  • Estimates in-place compressive strength of concrete
  • Checks surface hardness and material uniformity
  • Identifies weak zones or deteriorated areas
  • Helps compare different structural members
  • Quick, cost-effective, and non-destructive field evaluation

Relevant Codes 

Country / RegionStandard CodeTitle / Description
India 🇮🇳IS 13311 (Part 2): 1992Non-destructive testing of concrete – Rebound Hammer
USA 🇺🇸ASTM C805 / C805MStandard Test Method for Rebound Number of Hardened Concrete
Europe 🇪🇺EN 12504-2: 2021Testing concrete in structures – Part 2: Non-destructive testing – Rebound Hammer
International 🌍BS 1881: Part 202: 1986Testing Concrete – Recommendations for Rebound Hammer Test
International 🌍ACI 228.1RIn-place Methods to Estimate Concrete Strength (includes rebound hammer guidance)

Objectives of Rebound hammer test

The main objectives of the Rebound hammer test include

  • This determines the compressive strength of the concrete in terms of the rebound index.
  • Also finds the uniformity of concrete.
  • evaluates the concrete quality with standard requirements.

Rebound hammer test procedure – Standard method

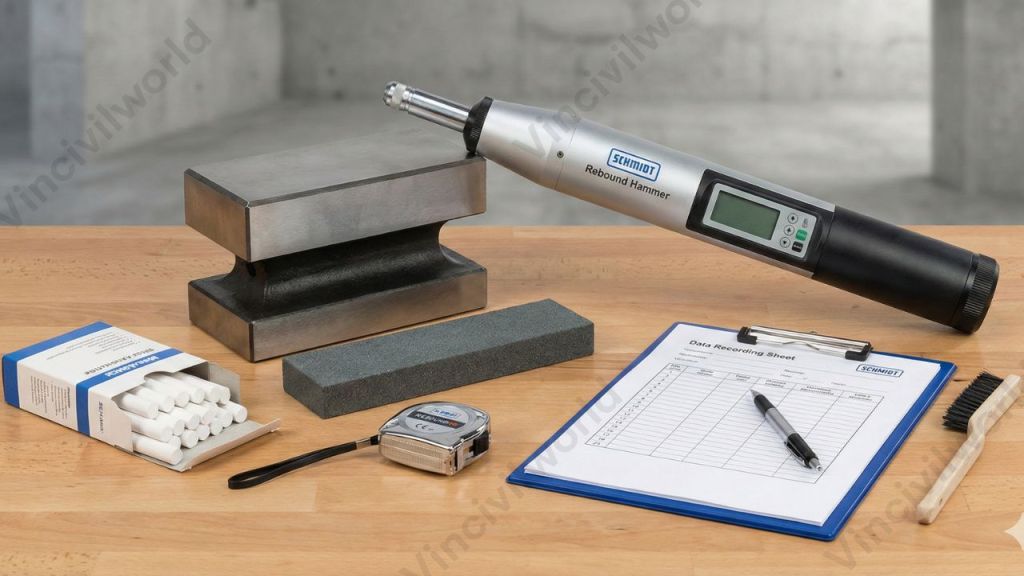
A Schmidt rebound hammer positioned near a concrete block, surrounded by a data recording sheet, measuring tape, and a set of reference materials for conducting the rebound hammer test for concrete strength.
The Schmidt Rebound Hammer, an essential tool for assessing concrete strength through non-destructive testing, displayed alongside testing materials.

The Rebound Hammer Test for Concrete is a widely used non-destructive test for concrete strength. It measures the surface hardness of hardened concrete to quickly estimate compressive strength using a Schmidt hammer. This test is simple, cost-effective, and provides immediate results on-site. It is an essential method in quality control to check concrete uniformity, detect weak zones, and evaluate structures without causing damage. While the rebound hammer test procedure ensures quick assessment, results must be correlated with laboratory-tested samples for accuracy.

Procedure – Step-by-Step

  • Select the test area – Smooth, clean, and free from loose particles or surface defects.
  • Hold the rebound hammer firmly and position it perpendicular to the test surface.
  • Press the plunger against the concrete until the hammer triggers a rebound.
  • Record the rebound number displayed on the scale.
  • Perform at least 10 readings on one point and discard abnormal outliers.
  • Take the average rebound number for that test location.
  • Apply correction factors (surface condition, carbonation, direction of testing).
  • Use a correlation chart to estimate compressive strength of concrete.

The correlation between the concrete strength and the rebound hammer shown in a graph is called the rebound hammer graph. 

According to IS 13311 (Part 2): 1992, the rebound hammer test requires specific calibration, correction factors, and surface conditions. These elements are necessary to ensure accurate results in Indian construction environments. IS also recommends correlating rebound numbers with compressive strength. The correlation should consider concrete grade, age, and surface hardness. This approach helps minimize interpretation errors.

Correlation between compressive strength of concrete and rebound index.

It is essential to calibrate the rebound hammer before testing. For this, we test a specimen of 150mm * 150mm * 150mm size using a compression testing machine (CTM). Fix the load rate at 7N/mm2, when the hammer result is 2.2 Nm. Test the vertical surface of the specimen using a rebound hammer. The results from the CMT and the rebound hammer should not have a major difference.

Result Calculation of Rebound Hammer tests

The Rebound Hammer Test for Concrete measures surface hardness and estimates compressive strength without damaging the structure. The rebound number directly reflects the elasticity of concrete—higher numbers indicate harder and stronger concrete. To calculate results accurately, we take several rebound readings on a smooth, clean surface, remove extreme values, and determine an average. This average rebound number is then compared with calibration charts. The charts are provided by the hammer manufacturer or relevant standards (IS 13311 Part 2:1992). This helps to determine the estimated compressive strength of concrete at the test location.

The rebound number assess the strength of the structure. As the rebound number increases, the strength also increases. This depends on the 

  • Cement type
  • Aggregate type
  • Surface condition
  • Age of concrete
  • Moisture content, etc.
A construction worker using a Schmidt hammer to perform a rebound test on a concrete surface, displaying the rebound number on the device.
A construction professional using a Schmidt hammer to conduct a Rebound Hammer Test on concrete, assessing its surface hardness and strength.

The quality of concrete concerning the rebound concrete is as follows.

Concrete quality and rebound test values

Thus the rebound number predicts the quality of concrete. The rebound hammer apparatus is very easy to use. Also, it determines the uniformity of the concrete surface. Thus it can be used for the rehabilitation of old monuments. It produces a convenient indication of compressive strength

Rebound Number RangeEstimated Concrete QualityInterpretation Notes
≤ 20Poor / Very Weak ConcretePossible deterioration, low strength; further testing required
20 – 30Fair / Medium Quality ConcreteAcceptable for non-structural sections; verify structural safety using core tests
30 – 40Good Quality ConcreteSuitable for reinforced concrete structural elements
> 40Very Good / Hard ConcreteHigh strength concrete; ensure carbonation effects are considered

Advantages of rebound hammer test

The Rebound Hammer Test is one of the simplest and fastest non destructive tests for concrete strength. It allows engineers to quickly assess the surface hardness and uniformity of concrete without damaging the structure.

Key Advantages of Rebound/Schmidt Hammer Test

  • Quick and easy testing with instant results
  • Completely non-destructive, keeping the structure intact
  • Portable and ideal for on-site assessment
  • Helps identify weak or deteriorated concrete areas
  • Cost-effective compared to laboratory strength tests
  • Useful for quality control and comparative analysis
  • Can be used on both old and new concrete structures
  • Requires only a single operator and minimal training
  • Helps decide if further detailed testing (e.g., core cutting or UPV) is needed
  • Provides data for concrete hardness evaluation and uniformity checks

Key Takeaways

  • The Rebound hammer test for concrete is a widely used non-destructive method to assess concrete strength and surface hardness.
  • It involves a spring-controlled hammer that impacts the concrete, measuring the rebound number to estimate compressive strength.
  • This test is quick, cost-effective, and essential for quality control, helping identify weak zones and ensuring uniformity in structures.
  • Professionals appreciate the test for its practical advantages, including its portability and immediate results on-site.
  • Applicable codes include IS 13311 (Part 2) in India and ASTM C805 in the USA, ensuring standard practices across regions.

Conclusion

The Rebound Hammer Test for concrete is a widely used non destructive test for concrete strength. It helps engineers quickly check surface hardness and uniformity without damaging the structure. As one of the simplest concrete hardness test methods, it supports quality control. It is also used for preliminary assessment and condition monitoring of existing buildings. Rebound values alone do not determine exact compressive strength. They provide valuable onsite insights when combined with other techniques such as UPV or core strength tests. By following the correct rebound hammer test procedure and calibration guidelines, engineers can improve reliability and decision-making. The Schmidt Hammer Test offers a fast, economical, and practical way to evaluate concrete. It enhances durability, safety, and maintenance planning in modern construction projects.

Non Destructive test (NDT)- Hardened Concrete

Non destructive testing of hardened concrete plays a vital role in assessing the condition of concrete structures. It evaluates performance without causing damage. Engineers use non destructive test for concrete structures to evaluate strength, durability, and uniformity while the structure remains fully functional. These NDT methods for concrete evaluation help detect cracks, voids, honeycombs, and other hidden defects that may affect long-term performance. Professionals can estimate compressive strength by using advanced hardened concrete testing techniques. They can identify deterioration and also monitor the health of aging infrastructure. Modern tools like rebound hammer and ultrasonic pulse velocity make concrete strength testing faster. They support the process without causing damage and are more cost-efficient. The key advantages of NDT in concrete testing include safety, accuracy, rapid inspections, and extended service life of structures. Overall, NDT ensures reliable decision-making for repairs, rehabilitation, and quality control in construction.

Non-destructive test (NDT) and destructive tests (DT) are the the tests done one hardened concrete. Concrete is the oldest and most important construction material in the world. Testing of the concrete plays and important role to know about the strength, durability and condition of the structure. This article is about the types of Destructive and non destructive tests done on concrete.

  1. Types and significance of Concrete Tests
    1. Destructive Tests
    2. Non Destructive Tests (NDT)
  2. Non- Destructive testing techniques on hardened concrete
  3. Objectives/advantages of Non destructive testing (NDT)
  4. Classification of Non-Destructive test
    1. Penetration Resistance Test / Windsor Probe Test
    2. Rebound Hammer Test
    3. Ultrasonic Pulse Velocity Test
    4. Half-Cell Potential Test – Detecting Corrosion
    5. Covermeter / Rebar Locator Test – Locating Reinforcement Without Damage
    6. Impact Echo Test – Evaluating Internal Defects in Concrete
  5. Conclusion

Types and significance of Concrete Tests

Concrete testing plays a vital role in determining the strength, durability, and performance of concrete structures. Engineers conduct different tests to verify that the concrete mix meets design requirements and performs safely throughout its service life. These types of concrete tests help assess important properties such as workability, compressive strength, density, and internal defects. The tests are categorized into destructive tests and non destructive tests, depending on whether the specimen is damaged during inspection. Both testing methods are essential for ensuring quality control, structural integrity, and long-term durability of concrete in construction projects. By using the right concrete testing techniques, engineers can make reliable decisions in design, repair, and maintenance works.

Concrete tests are classified into two types

  • Destructive tests (DT)
  • Non – Destructive tests (NDT)

Destructive Tests

  • Compressive Strength Test
  • Flexural Strength Test
  • Split Tensile Strength Test
  • Pull-out Test
  • Core Cutting and Testing

Non Destructive Tests (NDT)

  • Impact Echo / Pulse Echo Test
  • Rebound Hammer Test
  • Ultrasonic Pulse Velocity (UPV) Test
  • Half-Cell Potential Method
  • Ground Penetrating Radar (GPR)
  • Cover Meter Survey
  • Schmidt Hammer Test

In this article we describes about the Non destructive testing techniques conducted on hardened concrete.

Non- Destructive testing techniques on hardened concrete

The standard method of non destructive testing of hardened concrete is carried out by testing concrete specimens. These specimens are cast simultaneously with structural concrete. These destructive tests on concrete can determine the compressive, flexural, and tensile strengths. The major disadvantage of these destructive concrete testing methods is the non availability of immediate results. Moreover, the properties of the concrete specimen differ from what it is in the actual structure. This difference is due to pouring conditions, curing factor, compaction and concrete density, etc. These tests come under the category of destructive tests (DT). Destructive testing of concrete destroys or changes the part. Even if it passes the test, the part is no longer fit for service.

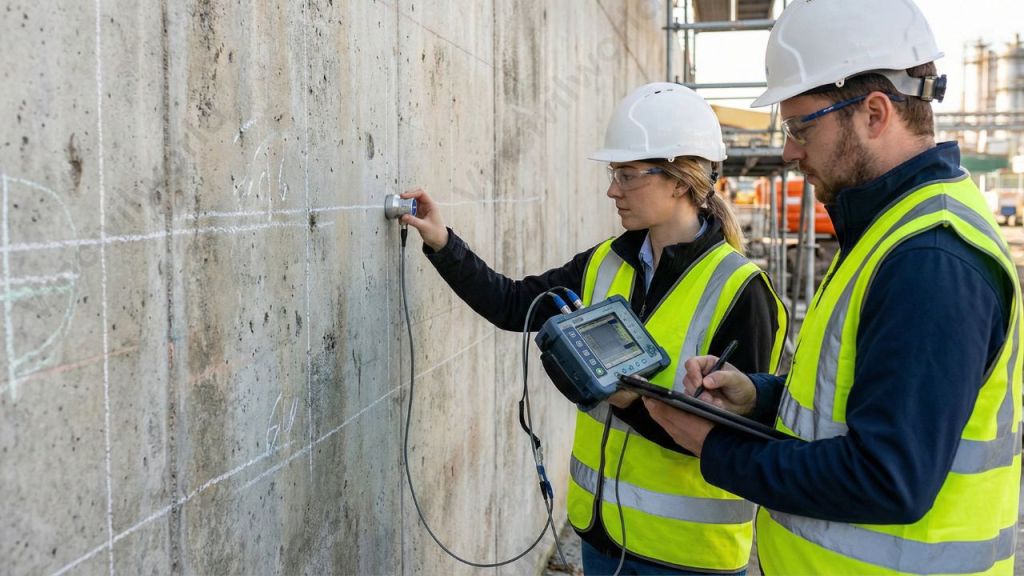
Two engineers conducting non-destructive testing on a concrete wall using specialized equipment.
Engineers conducting non-destructive testing on hardened concrete to assess its strength and durability.

Non Destructive Test (NDT) is for determining compressive strength and other properties of concrete from existing structures or buildings. NDT testing of concrete does not destroy the part. It does not change the part so that it is still fit for service if it passes the test. The non-destructive test determines the properties of concrete or structures without their destruction. Moreover, we can study its changes over time, The measurements are repeated many times and validate in detail, and gets immediate results. These NDT concrete testing methods help assess quality, strength, and durability in a quick and reliable way.

Objectives/advantages of Non destructive testing (NDT)

Non-destructive testing (NDT) helps evaluate hardened concrete structures without causing damage. It allows engineers to assess concrete strength and durability. They can also evaluate reinforcement condition, cracks, and internal defects. All of these are assessed while the structure remains fit for service. The advantages of NDT include quick results, safety, cost-effectiveness, and the ability to monitor structures throughout their life cycle. These advantages of NDT make it widely preferred for quality assurance and structural health monitoring.

  • Quality check of the existing structure.
  • For determining the homogeneity, internal and external characteristics of the concrete. 
  • To detect the cracks and voids of the concrete structures. 
  • Assess the quality of concrete with the standard requirement. 
  • To study the ageing of concrete. 
  • For finding the compressive strength of structures.
  • Evaluation of elastic modulus

Classification of Non-Destructive test

Hardened Concrete testing techniques/ Non Destructive testing are as follows

  • Windsor Probe Test
  • Rebound Hammer Test
  • Ultrasonic Pulse Velocity (UPV)
  • Half-Cell Potential Test
  • Covermeter / Rebar Locator Test
  • Impact Echo Test

Penetration Resistance Test / Windsor Probe Test

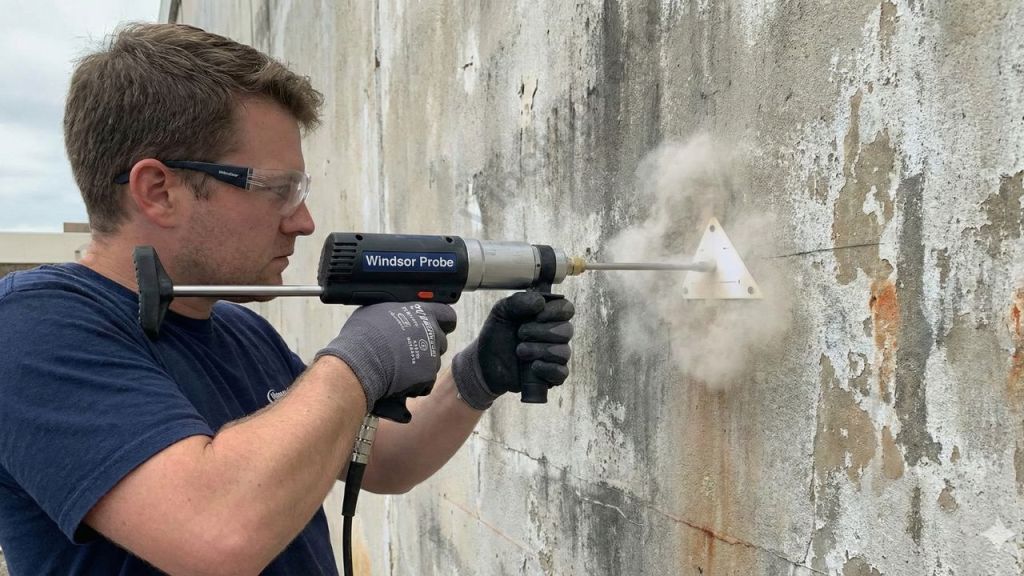
The penetration resistance test is an NDT that determines the relative strength of the concrete structures. The Windsor probe is the equipment for conducting this test. This equipment includes of powder-actuates driver or gun, probes, loaded cartridges and a gauge that measures the penetration.

The penetration depth indicates the compressive strength of the concrete. However, this depends on the aggregate type and size. This test evaluates the poor quality and deterioration of concrete

A professional using a Windsor Probe device to conduct non-destructive testing on a concrete wall, assessing its strength and quality without causing damage.
An engineer using a Windsor Probe for penetration resistance testing on hardened concrete.

The major disadvantage of this test is getting variable results. Several probes are often shot to achieve a solid average depth for arriving a final conclusion. So we cannot determine the exact strength. But it is a quick method to evaluate the quality and maturity of concrete. Care should be taken to calibrate the instrument before taking readings.

Rebound Hammer Test

The rebound hammer is also known as Schmidt’s Hammer test. It determines the strength of concrete based on the hardness of the concrete surface. It is a surface hardness tester. The equipment consists of a spring-controlled plunger, a hammer that weighs 1.8 kg, and a graduated scale. By pressing the hammer on the concrete surface, the graduate scale measures the rebound number. A low rebound number means the concrete has low compressive strength and stiffness.

A person using a rebound hammer test device on a concrete wall to measure its surface hardness and estimate compressive strength.
A technician conducting the Rebound Hammer Test on concrete to assess compressive strength without causing damage.

An accuracy of 15 to 20% is possible through this test. It is a simple and quick method. Also, the result relies on the surface smoothness, water content, type and size of aggregate and carbonation of the surface.

Ultrasonic Pulse Velocity Test

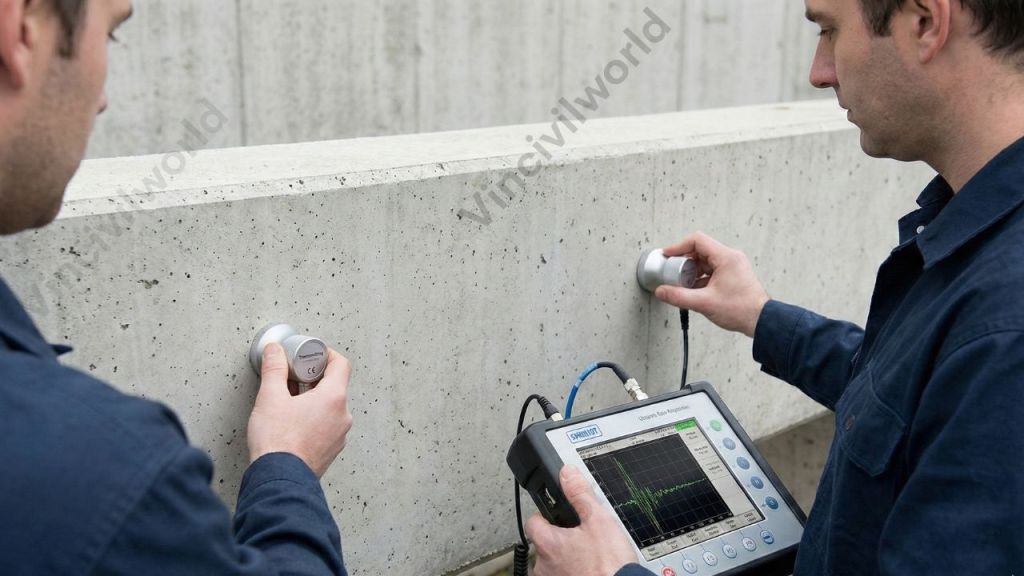
Ultrasonic pulse velocity test is another type of Non-destructive test. This test measures the time of travel of ultrasonic pulse waves for evaluating the concrete quality. The UPV test units consists of a pulse generator and pulse receiver. The frequency of the wave is 50-55 kHz. The pulse generator produces the pulses and is allowed to pass through the concrete. Then we calculate the velocity, by measuring the traversing distance and the time. Higher velocity means the concrete has a higher elastic modulus and density. It also determines the cracks and flaws in the structure. Large differences in pulse velocity values indicates a defective and deteriorated concrete.

Two engineers conducting non-destructive testing on a concrete structure using specialized equipment.
Engineers conducting an Ultrasonic Pulse Velocity test on concrete to assess its quality and detect any hidden defects.

For more details : Ultrasonic pulse velocity test || UPV Test – Methods and procedure

Half-Cell Potential Test – Detecting Corrosion

The Half-Cell Potential Test is a widely used non-destructive testing (NDT) method. It evaluates corrosion activity in steel reinforcement within hardened concrete. It measures the electrical potential difference between embedded rebars and a reference electrode. This reference electrode is typically a copper / copper sulfate (Cu/CuSO₄) cell. The test helps determine whether the reinforcement is actively corroding, passive, or at risk. An electrical connection directly connects to the rebar. Surface readings are recorded in a grid on moist concrete to ensure good conductivity. These readings are compared with standard probability charts provided in ASTM C876. The results allow engineers to locate corroded zones, plan preventive repairs, and avoid unnecessary concrete removal. Overall, it is a quick, reliable, and cost-effective tool for structural health assessment and durability maintenance of concrete structures.

A construction professional conducting non-destructive testing on a concrete structure using a measuring device, with a sponge for conductivity, to assess the integrity of the material.
An engineer conducting a non-destructive test on concrete using a specialized equipment to assess structural integrity.

Covermeter / Rebar Locator Test – Locating Reinforcement Without Damage

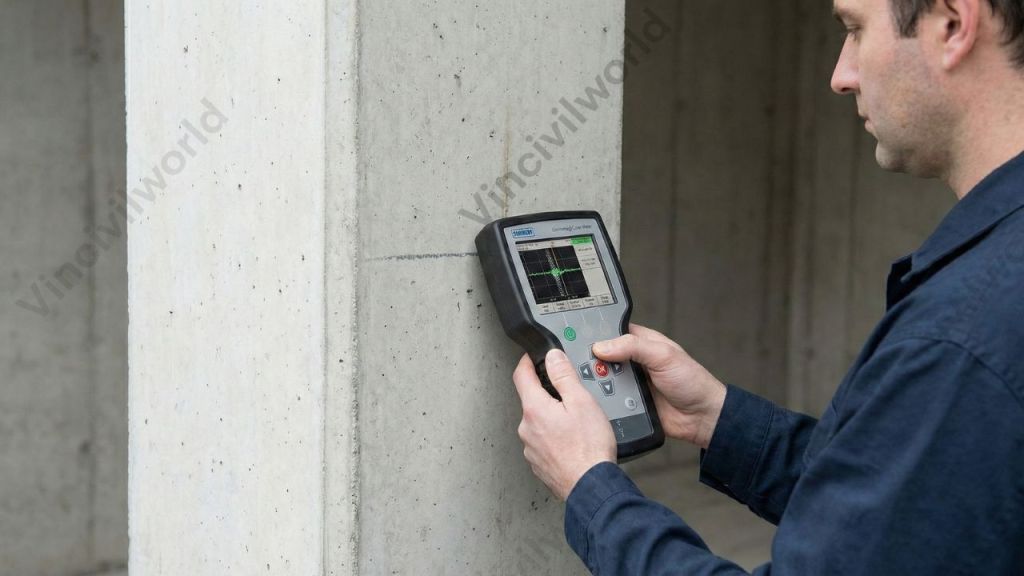
The Covermeter Test is also known as the Rebar Locator Test. It is a widely used non-destructive testing (NDT) method. This method is for detecting the position, depth, and spacing of steel reinforcement in hardened concrete. It works by measuring the magnetic field disturbance created by embedded steel when scanned with an electromagnetic probe. The test accurately determines the cover thickness. This is the distance from the concrete surface to the reinforcement. This measurement is critical for durability, fire safety, and code compliance. Modern Covermeter can also estimate bar diameter and identify congestion or missing rebars. This method adheres to standards such as BS 1881-204. It assists engineers in repair planning, drilling, and anchoring. It also helps in retrofitting without damaging the structure. Overall, the rebar locator test is fast, clean, and essential for structural assessment and quality control of reinforced concrete.

A technician using a handheld ultrasonic testing device on a concrete surface to assess the material's properties without causing damage.
A technician performing a non-destructive test on a concrete structure using specialized equipment to assess its condition.

Impact Echo Test – Evaluating Internal Defects in Concrete

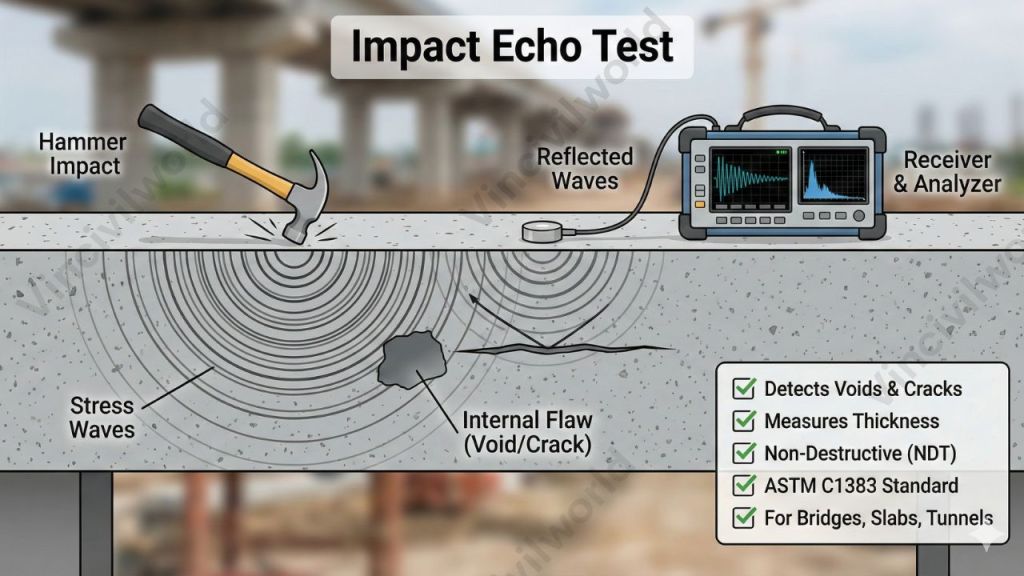
The Impact Echo Test is a reliable non-destructive testing (NDT) method. It is used to detect internal flaws such as voids, cracks, and delamination in hardened concrete. It also identifies thickness variations. It works by applying a short mechanical impact on the surface using a small hammer or impactor. This impact generates stress waves that travel through the concrete and reflect back from internal boundaries. A sensitive receiver records the returning signals and analyzes the wave frequencies to identify abnormalities. The method is guided by standards like ASTM C1383, making it suitable for bridges, slabs, tunnels, and precast elements. Engineers use this test to assess structural integrity, locate hidden defects, verify grouting, and ensure long-term durability—without drilling, cutting, or damaging the structure. Overall, the Impact Echo Test offers a fast and effective solution for concrete condition evaluation and maintenance planning.

Illustration of the Impact Echo Test showing a hammer impacting concrete, generating stress waves. The diagram includes labels for 'Hammer Impact', 'Stress Waves', and 'Internal Flaw (Void/Crack)', as well as a receiver/analyzer that detects reflected waves. The image highlights the test's ability to identify voids and cracks non-destructively, following ASTM C1383 standards.
Illustration of the Impact Echo Test used in non-destructive testing of concrete, showing hammer impact, stress waves, and internal flaw detection.

Key Takeaways

  • Non-destructive testing (NDT) evaluates hardened concrete’s strength and durability without causing damage, helping to detect hidden defects.
  • Engineers use both non-destructive and destructive tests to ensure quality control and structural integrity during concrete assessments.
  • Key advantages of NDT include quick results, safety, and cost-effectiveness, making it ideal for monitoring concrete structures over time.
  • Various NDT techniques include the Rebound Hammer Test, Ultrasonic Pulse Velocity Test, and Impact Echo Test.
  • These methods provide crucial insights into concrete quality, allowing for reliable repairs and maintenance planning.

Conclusion

Non Destructive testing of concrete plays a vital role in maintaining the long-term performance and safety of structures. NDT for hardened concrete enables engineers to assess strength, durability, reinforcement conditions, and internal defects without damaging the structure. With modern concrete NDT methods such as Rebound Hammer, Ultrasonic Pulse Velocity, and Covermeter testing, engineers receive quick data. Tests like Half-Cell Potential and Impact Echo provide reliable insights into structural integrity. One of the major advantages of NDT is the ability to monitor existing buildings. It helps identify deterioration early. Engineers can plan effective maintenance. By using advanced NDT techniques, the industry ensures cost efficiency, improved safety, and accurate decision-making throughout a structure’s life. Therefore, the advantages of NDT strongly support sustainable, safe, and high-quality construction management.

Penetration Resistance Test – Significance and Procedure

enetration Resistance Test is an important method used to assess in-situ concrete strength without causing damage, making it a key part of modern evaluation practices. When engineers ask ,What is Penetration Resistance Test. They refer to a non-destructive technique. This method measures surface hardness by driving a probe into concrete. It correlates penetration depth with strength. This approach fits within Non-destructive test penetration resistance concrete applications, especially where core extraction is impractical.

In today’s construction environment, accuracy and structural reliability are essential. The significance of the Penetration Resistance Test in concrete continues to increase. Engineers often use it alongside the Windsor Probe Test concrete strength assessment system, which provides standardized and repeatable results. As part of evolving field assessments, the method aids in faster decision-making. It complements laboratory testing. The method remains practical, economical, and relevant in modern engineering practice.

This blog covers what the Penetration Resistance Test is, its significance, procedure, equipment, influencing factors, advantages, limitations, and practical applications for assessing concrete strength on site.

  1. What is Penetration Resistance Test?
  2. Significance of Penetration Resistance Test
    1. Destructive testing vs Non destructive testing
    2. Why Penetration test is Considered NDT ?
  3. Types of Non Destructive tests
  4. Penetration Resistance Test Procedure
    1. Relevant Codes
  5. Windsor Probe Penetration Resistance Test
  6. Apparatus – Windsor Probe Penetration resistance test
    1. Equipment List
  7. Test Procedure for Penetration Resistance Test
    1. Factors Affecting Penetration Resistance Test Results
    2. Advantages and Limitations of Penetration Resistance Test
    3. Applications of Penetration Resistance Test in Concrete Structures
  8. Conclusion

What is Penetration Resistance Test?

Engineers use the Penetration Resistance Test as a non-destructive method to estimate in-place compressive strength by measuring the penetration depth of a driven probe. The working concept is simple, the harder and stronger the concrete, the lower the penetration depth. A specially designed driver propels a hardened probe into the concrete surface. The depth of penetration is then measured. This reading is compared with calibrated charts. The comparison gives the estimated concrete strength. The test reacts directly to how resistant the surface is to penetration. This means it has a clear link to concrete surface hardness.

An engineer conducting a Penetration Resistance Test on a concrete wall using a gunpowder-actuated driver and probe.
An engineer conducting the Penetration Resistance Test on a concrete surface using a Windsor Probe to measure in-situ concrete strength.

The method is useful for testing concrete already in a structure. It works well on slabs, pavements, overlays, bridges, and repair areas and does not require removing samples. This method does not cause structural damage. It allows strength assessment safely and quickly on site.

Significance of Penetration Resistance Test

Engineers evaluate concrete strength using two main categories of tests:

  • Destructive Testing (DT)
  • Non-Destructive Testing (NDT).

Understanding the difference aids us in comprehending the widespread use of the Penetration Resistance Test. This test is commonly employed in modern concrete evaluation and field testing.

Destructive testing vs Non destructive testing

Destructive Testing involves casting concrete specimens at the same time as the structural concrete. Later, these specimens are tested for compressive, tensile, or flexural strength. These tests take time, and the results are not immediate. Also, the concrete specimen may not represent the real concrete in the structure because pouring conditions, curing method, compaction, and density can vary. DT also damages or destroys the sample, so it cannot be reused and does not allow repeated testing.
Non-Destructive Testing, however, measures concrete strength directly from existing structures without causing damage. NDT keeps the structure in service, allows results to be obtained immediately, and makes it possible to check strength development and deterioration over time. This makes NDT useful for bridges, slabs, pavements, repairs, and old structures.

Why Penetration test is Considered NDT ?

The Penetration Resistance Test qualifies as a non-destructive testing method. It measures surface hardness and in-situ strength. It does this by checking probe penetration depth without reducing the structural capacity. Engineers often use it with the Windsor Probe system. They rely on it to perform safe, simple, and reliable concrete assessment on site.

Types of Non Destructive tests

Penetration resistance test is a concrete non-destructive test. Nowadays Non-destructive test is conducted to determine the relative strength of the concrete. The non-destructive test is the method of evaluating the strength and durability of concrete without loading the specimen.

The main Non Destructive test are

  • Penetration Resistance Test
  • Rebound Hammer Test
  • Ultrasonic Pulse Velocity Test
  • Pullout Test and Pull-off Test
  • Concrete Core Testing or Compressive strength test

Penetration Resistance Test Procedure

The Penetration Resistance Test Procedure outlines how to assess in-situ concrete strength using a driven probe. It follows standard codes and defines equipment requirements. It provides systematic steps for accurate surface hardness evaluation.

Relevant Codes

  • ASTM C803 / C803M – Standard Test Method for Penetration Resistance of Hardened Concrete
  • ACI 228.1R – In-Place Methods to Estimate Concrete Strength
  • BS 1881 – Methods of Testing Concrete (NDT Guidance Reference)

Windsor Probe Penetration Resistance Test

The Windsor probe test is used to determine the following

  • To determine the concrete strength.
  • For evaluating the uniformity of concrete.
  • To identify deterioration in concrete. 
  • To evaluate the in-place strength.
  • For investigating the presence of cracks and flaws.

Apparatus – Windsor Probe Penetration resistance test

The equipment used for this test is called the Windsor Probe System. To begin with, it is designed to estimate in-situ concrete strength. In this method, it works by measuring the penetration depth of a hardened probe. Furthermore, the setup includes a gunpowder-actuated driver. This driver then propels the probe into the concrete surface with controlled energy.

The probe is a hardened alloy rod with a blunt conical nose. Different probes are chosen based on aggregate hardness. This ensures accurate readings and prevents corrosion. A depth gauge is used to measure the penetration length. The reading is then converted into estimated compressive strength using calibration charts.

Spacing rules must be followed during testing. There should be at least 100 mm between probes. The test point must also be 200 mm away from edges. These requirements prevent interference and ensure reliable results.

Equipment List

A collection of Penetration Resistance Test equipment, including a gunpowder-actuated driver, depth gauge, calibration chart, and various probes, arranged on a blue background.
A comprehensive equipment set for the Penetration Resistance Test, essential for assessing in-situ concrete strength.
  • Calibration chart
  • Gunpowder-actuated driver
  • Loaded cartridge
  • Hardened alloy probe
  • Depth gauge
  • Alignment and positioning guide
Penetration-resistance-test

Test Procedure for Penetration Resistance Test

  • Select the Test Area – Choose a clean, smooth concrete surface free from cracks, honeycombing, coatings, or loose material.
  • Check Edge Distance – Ensure the test point is at least 200 mm away from edges and corners to avoid weakened zones.
  • Confirm Probe Spacing – Maintain a minimum spacing of 100 mm and a maximum of 175 mm between test points to prevent overlapping influence.
  • Position the Guide Device – Place the alignment guide firmly against the surface to ensure the probe is driven perpendicular for accurate penetration.
  • Load the Cartridge – Insert the correct cartridge into the gunpowder-actuated driver according to manufacturer specifications and safety guidelines.
  • Insert the Probe – Place the hardened alloy probe into the driver barrel, ensuring proper seating.
  • Discharge the Driver – Trigger the device to drive the probe into the concrete with controlled force.
  • Measure Penetration Depth – Use the depth gauge to record penetration length precisely.
  • Repeat Readings – Take at least three penetrations in the same area and average the results.
  • Interpret Results – Compare the averaged penetration depth with the calibration chart to estimate in-situ concrete strength.

Correlate the depth of penetration with the compressive strength. If the depth of penetration is low, then the strength of concrete is high and vice versa. 

Factors Affecting Penetration Resistance Test Results

The Penetration Resistance Test results can vary due to several factors. Concrete hardness, moisture, and carbonation effects can all play a role. Incorrect probe angle or positioning also influences penetration depth and strength interpretation.

  • Material hardness
  • Moisture and carbonation
  • Test angle and positioning

Advantages and Limitations of Penetration Resistance Test

The Penetration Resistance Test offers advantages over the rebound hammer and UPV. It provides a more direct indication of concrete strength. This is related to surface hardness and penetration depth. It delivers quick on-site results and is useful for comparative evaluation. Engineers avoid using the test on weak or highly porous concrete. They also refrain from using it on lightweight or freshly cast concrete. Surfaces where aggregate hardness, carbonation, or nearby reinforcement can distort readings and reduce accuracy are also avoided.

Applications of Penetration Resistance Test in Concrete Structures

The Penetration Resistance Test is widely used for assessing concrete strength in bridges, pavements, slabs, and structural repair zones where sampling is difficult. It supports quality control checks, renovation planning, surface wear evaluation, and strength verification in existing structures. The test helps engineers identify weak spots, confirm uniformity, and monitor ageing concrete without damaging the member, making it practical for field investigation and ongoing structural performance assessment test has some limitations, this method is apt for the on-site estimation of concrete strength

Key Takeaways

  • The Penetration Resistance Test is a non-destructive method that evaluates in-situ concrete strength by measuring probe penetration depth.
  • This test is crucial in modern construction, as it provides immediate results without damaging structures, unlike destructive testing.
  • Engineers can use the Penetration Resistance Test alongside methods like the Windsor Probe Test to determine concrete strength accurately.
  • Factors such as material hardness and moisture can affect the test results, emphasising the need for careful procedure adherence.
  • Overall, the Penetration Resistance Test is practical for assessing concrete in various structures like bridges and slabs without extraction.

Conclusion

The Penetration Resistance Test is a valuable concrete strength test. It helps engineers assess in-situ strength without damaging structures. This makes it an essential part of non-destructive testing practices. Understanding what the Penetration Resistance Test is and how it relates to concrete surface hardness enables more accurate evaluation. This method is better compared to traditional destructive testing. Destructive testing requires specimens and delays results.

The Significance of Penetration Resistance Test in concrete is evident in bridges, pavements, and slabs. It is also crucial for overlays and repair assessment. Quick decisions are necessary in these areas. When performed according to the Penetration Resistance Test Procedure, the method supports reliability. It ensures quality control and aids in condition monitoring using the Windsor Probe. Despite influences like moisture, carbonation, and positioning, it remains a practical tool for field evaluation, structural performance checks, and long-term concrete assessment.

Flow Table Test: Key Method for Concrete Workability

Flow table test of concrete is a common method to measure the workability of fresh concrete. It is especially useful for mixes that are too fluid for the slump test. This test helps check how easily concrete flows, which is important for quality construction. In the flow table test for concrete, a flow table apparatus spreads the concrete, and the flow diameter is measured. Compared to the slump test, the flow table test procedure for concrete works better with high workability and self-compacting mixes. Knowing the difference between flow table test vs slump test helps engineers choose the right method. By following standards like ASTM C124 or EN 12350-5 and IS1199, the flow table test apparatus for concrete gives reliable results. This makes it a key test for concrete workability in construction projects.

In this article, we will explain the purpose and importance of the flow table test for concrete, especially in measuring workability and consistency for high-fluidity mixes like Self compacting Concrete (SCC) . You will learn about the standard codes (including IS 1199:1959, IS 5512:1983, ASTM C124, and EN 12350-5), the apparatus required, and the step-by-step procedure for conducting the test. We will also discuss the advantages, limitations, and practical applications of the flow table test in civil engineering projects. By the end, you’ll understand when and why to use the flow table test for concrete, and how it helps ensure quality and performance in construction

  1. Significance of Quality tests on concrete
  2. Production stage quality tests on fresh concrete
  3. Flow table test for Concrete
  4. Standards for flow table test of concrete
    1. Flow table test of concrete as per IS 1199 (Part 6): 2018
      1. Flow table test apparatus Used as per IS 1199
    2. Flow table Test procedure
    3. Calculation for Flow table test
  5. Key Takeaways
  6. Conclusion

Significance of Quality tests on concrete

Quality tests on concrete are essential for ensuring strength, durability, and performance in construction. These tests help engineers assess the workability of fresh concrete and the quality of hardened concrete. Common quality tests on concrete include checks during the production stage (on fresh concrete before placing), tests on hardened concrete specimens, and evaluations performed directly on finished structures. Including tests like the flow table test for concrete ensures reliable results and consistent quality throughout a project.

A laboratory setting for concrete testing, featuring a man in a safety vest and hard hat, observing a concrete compression testing machine alongside molds and tools.
A construction engineer analyzing concrete samples in a laboratory, highlighting the importance of quality tests for concrete workability.

Quality tests performed on concrete are classified into

  • Production stage quality tests ( On fresh concrete before placing)
  • Hardened stage quality tests ( hardened concrete specimens)
  • Non Destructive tests On structures ( tests done on the structures )

Also read : Bitumen tests – 9 lab tests for bitumen

Production stage quality tests on fresh concrete

Production stage quality tests on fresh concrete are crucial for ensuring the right workability and consistency before placement. These tests help engineers select the best mix for construction and maintain quality control. Key tests include the slump test, compaction factor test, Vee-Bee test, Kelly ball test, and the flow table test for concrete.

This article focuses on the flow test of concrete, explaining its procedure, importance, and how it compares with other workability tests like the slump test and compaction factor test.

Flow table test for Concrete

The flow table test for concrete is a simple laboratory method used to measure the workability and flowability of fresh concrete, especially for highly workable mixes where the slump test is not suitable. In this test, the workability of concrete is determined by observing how much the concrete spreads on a flow table after being jolted. This spreading, or flow, directly indicates the concrete’s consistency and fluidity, which are essential for quality control in construction.

The flow table test is particularly useful for high or very high workability concrete that would otherwise collapse in a standard slump test. It provides insights into the consistency and cohesiveness of the mix, helping engineers ensure that the concrete can be easily placed and compacted without segregation. This method is best suited for concrete with a nominal maximum aggregate size less than 38 mm.

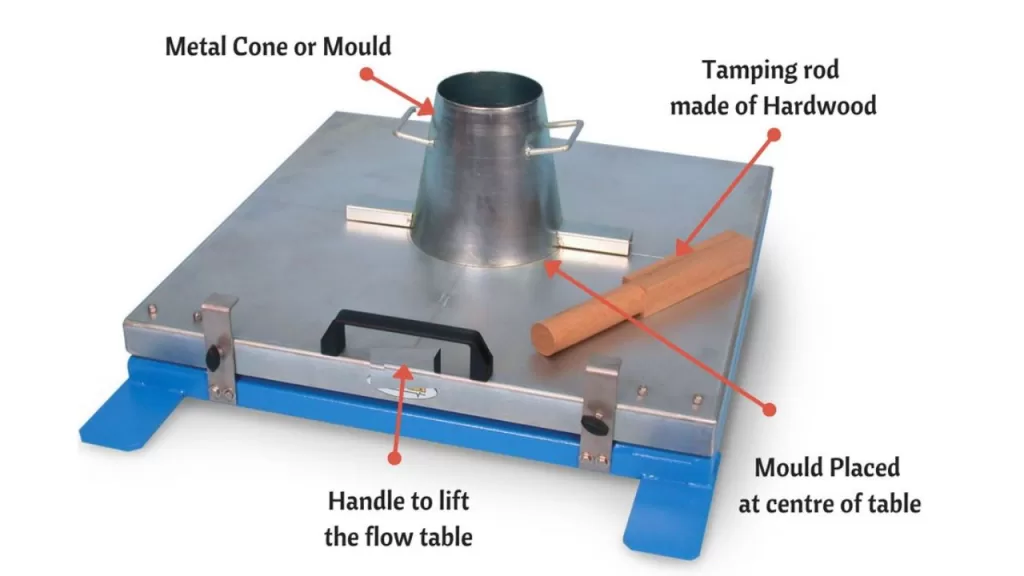
Flow table apparatus for conducting the flow table test on concrete, featuring a metal cone mold, tamping rod, and handle for easy lifting.
Flow table test apparatus showcasing the metal cone mold, tamping rod, and handling features, essential for measuring the workability of concrete.

Standards for flow table test of concrete

  • IS 1199 (Part 6): 2018
  • ASTM C 124 – 39 (Re-approved 1966)
  • BS 1881 :105: 1984

Flow table test of concrete as per IS 1199 (Part 6): 2018

The flow table test as per IS 1199 (Part 6): 2018 is a standardized method to determine the workability and flowability of fresh concrete, especially for self-compacting concrete. It measures the spread of concrete after the flow table is repeatedly dropped, indicating the concrete’s consistency and ability to flow without segregation.

Flow table test apparatus Used as per IS 1199

The following apparatus are used to perform the flow table test:

  • Flow table
  • Mould
  • Scale
  • Hand scoop
  • Trowel
  • Tamping rod

Flow Table: A metal table with a flat surface and a hinged base, dropped to measure the concrete’s spread, indicating its workability.

Scale: A measuring device used to accurately measure the diameter of the concrete spread on the flow table, ensuring precise results.

Hand Scoop: A tool used to transfer concrete into the mold, ensuring an even and consistent sample for testing.

Trowel: A flat, metal tool used for smoothing and leveling the concrete surface within the mold, ensuring uniformity.

Flow table test apparatus for measuring concrete workability, featuring a metal cone, tamping rod, and a handle for lifting.
Flow table test apparatus for measuring the workability of fresh concrete, featuring a metal cone mould and tamping rod.

Tamping Rod: A rod used to compact the concrete inside the mold, removing air pockets and ensuring consistency in the sample.

Mould: A metal conical mold used to shape the concrete sample before spreading, essential for standardized measurements in the flow test. The shape of the mould for the flow table test is a cone frustum. The base diameter of the mould is 25 cm and the upper diameter is 17 cm. It has a height of 12 cm. A handle is also present on the sides of the mould. 

Flow table Test procedure

  • Before starting the test, wet and clean the tabletop and the mould from gritty materials.
  • Keep the mould firmly at the centre of the table. 
  • Now fill two-layer, each layer should be one half of the volume of the mould.
  • Tamp each layer 25 times using a tamping rod uniformly. 
  • After tamping the top layer, struck off the excess concrete using the trowel.
  • Also, clean the area of the table outside the mould. 
  • Then remove the mould immediately by steady upward pull. 
  • Raise the table and drop at 12.5 mm, 15 times in 15 seconds. 
  • Measure the diameter of the concrete spread about its 6 direction and compute its mean value. 

Calculation for Flow table test

The percentage increase in the average diameter of the spreading concrete over the base diameter of the mould is called the flow of concrete.

Flow% = (Spread diameter in cm – 25) / 25 * 100

The value of flow test varies from 0 to 150%.

According to ‘A.M. Neville, honorary member of the American Concrete Institute’, this flow table test is appropriate for concrete mixes having a flow of 340 to 600 mm.

Key Takeaways

The flow table test is an essential method for assessing the workability and flowability of fresh concrete, especially for high-fluidity and self-compacting mixes where the slump test is inadequate. By following standards like IS 1199 (Part 6): 2018, this test provides reliable, repeatable results crucial for quality control in construction projects. The apparatus is simple, and the procedure is straightforward, making it widely accessible in laboratories. The test helps engineers ensure the mix can be easily placed and compacted without segregation. This directly impacts the durability and performance of the finished structure. Understanding the differences between the flow table and slump tests is important. It helps in selecting the appropriate method for each concrete type. This ensures optimal construction quality.

Conclusion

In conclusion, the flow table test, as outlined in IS 1199 (Part 6): 2018, is a vital tool for evaluating the workability of fresh concrete, particularly for mixes with high workability or self-compacting properties. Its ability to measure the spread of concrete after jolting provides valuable insights into the mix’s consistency and cohesiveness. This ensures that the concrete will perform well during placement and compaction, reducing the risk of defects and enhancing structural integrity. By integrating the flow table test into routine quality control, engineers and builders can achieve better consistency, durability, and performance in concrete structures, ultimately contributing to safer and longer-lasting construction projects.