Tag Archives: manufacturing

Radiography Test: Key Techniques and Benefits Explained

Radiography test is a non-destructive testing (NDT) method. It uses X-rays or gamma rays to examine the internal structure of materials. This technique is essential for detecting hidden flaws without causing damage, ensuring the integrity and safety of components. Radiography test is widely applied in industries such as manufacturing, construction, and aerospace to inspect welding, castings, and structural components. The process involves placing the test object between a radiation source and a detector. An image is captured that reveals internal features. It highlights potential defects. Advancements in digital radiography have enhanced the efficiency and accuracy of these inspections. This process has solidified Radiographic testing as a cornerstone in quality assurance and safety protocols across various sectors.

​In this article, we will delve into the principles, techniques, and applications of Radiography test. We’ll explore its significance in non-destructive evaluation, the equipment utilized, and the step-by-step process involved. Additionally, we’ll emphasis on the advantages, limitations, safety considerations, and recent advancements in the field. This comprehensive guide aims to offer a thorough understanding of radiography test and its pivotal role across various industries.

  1. Principles of Radiography test
  2. Types of Radiography Tests
    1. Film Radiography test
    2. Digital Radiography test
    3. Computed Radiography
    4. Real-Time Radiography test (RTR)
    5. Computed Tomography (CT)
  3. Equipment Used in Radiography Test
  4. Applications of Radiography test
    1. Radiography test for welding
    2. Casting Inspection​
    3. Aerospace Industry
    4. Automotive Sector
    5. Petrochemical Industry
    6. Manufacturing
    7. Power Generation
    8. Construction
  5. Advantages of Radiography test
    1. High accuracy
    2. Versatility
    3. Minimal Material Limitations
    4. Volumetric Examination
    5. Permanent Inspection Records
    6. Sensitivity to Thickness and Density Variations
  6. Limitations and Safety Considerations of Radiography test
    1. Safety Concerns
    2. High Operational Costs
    3. Accessibility Requirements
    4. Detection Limitations
    5. Health Risks
    6. Environmental Impact
    7. Regulatory Compliance
  7. Recent Advances in Radiography Test
  8. Conclusion
  9. Key takeaways

Principles of Radiography test

​Radiography test is a non-destructive testing (NDT) method. It utilizes X-rays or gamma rays to examine the internal structure of materials. The fundamental principle involves directing radiation through a test object. The radiation is projected onto a detector, like photographic film or a digital sensor. Variations in material density and thickness affect the absorption of radiation. Denser areas absorb more, resulting in lighter regions on the radiography. Meanwhile, less dense areas are darker. This contrast enables the detection of internal flaws like cracks, voids, or inclusions. Radiography test is widely applied across industries. These include aerospace, construction, and manufacturing. This ensures the integrity and reliability of critical components.

Radiography test
RT

In radiography tests, X-rays and gamma rays interact with materials primarily through three mechanisms:​

  1. Photoelectric Absorption: Low-energy photons are absorbed by tightly bound electrons, ejecting them from atoms. This effect is more pronounced in materials with higher atomic numbers. ​
  2. Compton Scattering: Moderate-energy photons collide with loosely bound electrons, resulting in photon deflection and energy loss. This process contributes to image contrast but can also cause image blurring. ​
  3. Pair Production: High-energy photons (above 1.022 MeV) can transform into an electron-positron pair near a nucleus. This phenomenon becomes significant at higher photon energies. ​

These interactions cause attenuation of the radiation beam. The degree of attenuation depends on the material’s thickness, density, and atomic number. By analyzing the transmitted radiation, Radiographic testing reveals internal structures and potential defects within the material.

Types of Radiography Tests

Radiography test (RT) is a non-destructive testing method. It employs X-rays or gamma rays to inspect the internal structure of materials. This ensures the integrity and reliability of components across various industries. ​

  • Film Radiography
  • Digital Radiography (DR)
  • Computed Radiography (CR)
  • Real-Time Radiography (RTR)
  • Computed Tomography (CT)

Each of these radiography testing techniques offers unique advantages. The choice among them depends on specific inspection requirements. It also relies on material types and desired image clarity.

Film Radiography test

​Film radiography is a traditional non-destructive testing (NDT) method. It effectively utilizes X-rays or gamma rays. These rays inspect the internal integrity of materials and components. In this process, a Radiographic film is placed behind the test object, and radiation is directed through the material. As a result, variations in material density and thickness affect the radiation’s absorption, creating a latent image on the film. Once the chemical processing is complete, this film reveals an image highlighting internal features and potential defects like cracks, voids, or inclusions. Due to its precision, film radiography is renowned for its high-resolution imaging capabilities, making it a reliable choice for detecting even the smallest irregularities. This makes it a preferred choice in industries like aerospace, construction, and manufacturing. Despite advancements in digital radiography, film radiography remains valued for its ability to produce detailed images essential for critical inspections.

Radiography test
Radiography test

Digital Radiography test

Digital Radiography (DR) is an advanced non-destructive testing (NDT) method. It employs digital detectors to capture X-ray or gamma-ray images of a material’s internal structure. Unlike traditional film radiography, DR offers immediate image acquisition and processing, enhancing inspection efficiency and reducing exposure times. This technique provides high-resolution images, facilitating the detection of defects like cracks, voids, and inclusions. Digital Radiography systems also enable easy storage, retrieval, and sharing of digital images, improving workflow and collaboration among inspection teams. Additionally, the Digital Radiography test reduces the need for hazardous chemicals used in film processing. This ultimately promotes a safer and more environmentally friendly work environment. Moreover, its versatility and rapid results have made Digital Radiography testing a preferred choice in various industries, including aerospace, automotive, and oil and gas. In these fields, ensuring the integrity and reliability of critical components is absolutely essential.

Computed Radiography

​Computed Radiography (CR) is a modern digital imaging technology that effectively replaces traditional film-based radiography by utilizing photostimulable phosphor (PSP) plates. These advanced plates capture X-ray images efficiently. In this process, the PSP plate is first exposed to X-rays, then stores the image as a latent energy pattern, ensuring accurate and detailed imaging. Subsequently, a laser scanner reads the plate. It releases the stored energy as light. This light is then converted into a digital image for analysis. Computed Radiography offers several advantages over conventional film radiography. These advantages include reduced exposure to radiation and elimination of chemical processing. CR also provides the ability to enhance and digitally archive images. This technology is widely used in medical diagnostics and industrial non-destructive testing, providing a cost-effective and efficient solution for capturing high-quality radiographic images.

Real-Time Radiography test (RTR)

​Real-Time Radiography test (RTR) is a non-destructive testing (NDT) technique that enables immediate visualization of an object’s internal structure. X-rays or gamma rays are directed through the test object. They then reach a real-time detector, like a fluorescent screen or digital panel. RTR produces live images and allows for the dynamic observation of components. This immediacy facilitates the detection of defects like cracks, voids, or inclusions during ongoing operations. ​Real-Time Radiography test (RTR) is widely employed across industries including automotive, aerospace, and electronics. Real-time feedback is crucial in these fields to guarantee part integrity and safety.

Computed Tomography (CT)

Computed Tomography (CT) is an advanced imaging technique that effectively utilizes X-rays to generate detailed three-dimensional representations of an object’s internal and external structures. Unlike traditional methods, the Computed Tomography test captures multiple two-dimensional Radiographic images from various angles. Subsequently, this process reconstructs a comprehensive 3D model, which allows for a thorough examination without causing any damage to the specimen. 

Due to its precision and reliability, this non-destructive testing (NDT) method is invaluable across various industries. It is used in aerospace, automotive, and manufacturing and enables precise detection of internal defects. This also allows measurement of complex geometries and verification of material integrity. 

Visualizing internal features in high resolution enhances quality control processes. This capability also aids the development of safer and more reliable products. As technology advances, CT continues to evolve. It offers faster scanning times. It also provides improved image clarity. This further solidifies its role as a critical tool in modern NDT practices.

Equipment Used in Radiography Test

Radiographic testing (RT) employs various specialized equipment to inspect the internal structure of materials non-destructively. Essential equipment includes X-ray and gamma-ray sources, detectors, and imaging systems.

Key Equipment Used in Radiographic Testing

  1. Radiation Sources:
    • X-ray Machines: Generate X-rays using X-ray tubes, commonly employed in medical and industrial applications. ​
    • Gamma-ray Sources: Utilize radioactive isotopes like Iridium-192 or Cobalt-60 for material penetration, especially in industrial settings.
  2. Detectors:
    • Film Radiography: Traditional method using photographic film to capture images after exposure to radiation.​
    • Digital Detectors: Include Computed Radiography (CR) systems with phosphor imaging plates and Digital Radiography (DR) systems with flat-panel detectors for immediate digital imaging.
  3. Image Processing Systems:
    • Computed Tomography (CT) Scanners: Acquire multiple radiographic images from different angles to create detailed cross-sectional views.​
  4. Ancillary Equipment:
    • Radiation Shielding: Protective barriers and enclosures to safeguard operators from exposure.​
    • Film Processors: Develop exposed films in traditional radiography.​
    • Viewing Stations: Lightboxes or digital monitors for analyzing radiographic images.​

The selection of equipment depends on the specific application, material type, and required inspection standards.

Applications of Radiography test

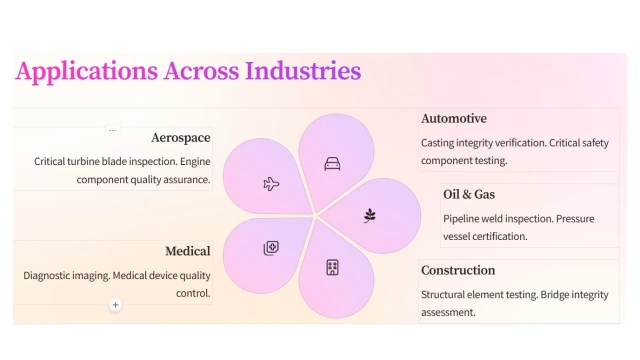
Radiography Testing (RT) is a crucial non-destructive testing (NDT) method widely used across various industries. Specifically, its main purpose is to assess the internal integrity of materials and components. By utilizing X-rays or gamma rays, RT provides detailed images that effectively reveal internal defects. As a result, this method ensures the safety and reliability of critical structures.

Radiography test for welding

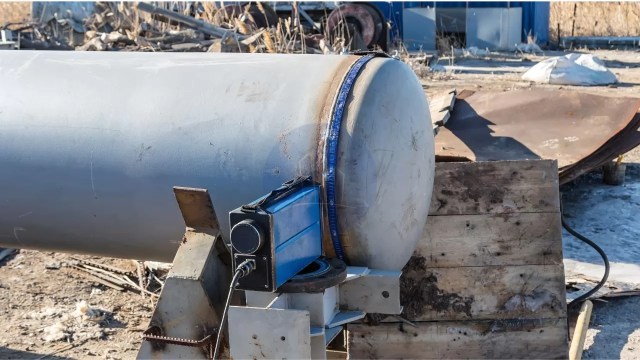
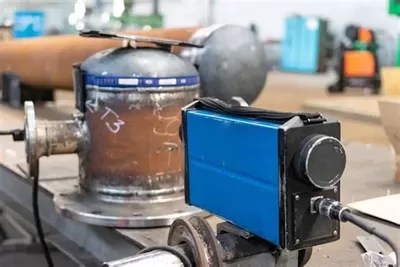
Radiography Test is extensively used to evaluate weld quality in pipelines, pressure vessels, and structural components. It detects defects such as cracks, porosity, and incomplete fusion. Radiography test for welding confirms the weld quality.

Applications of radiography test

Casting Inspection​

RT is employed to detect internal defects in metal castings. These defects include shrinkage cavities, gas porosity, and inclusions. This process ensures the structural integrity of cast components.

Aerospace Industry

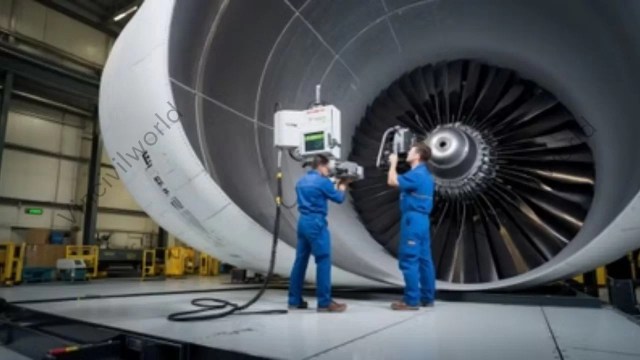
It ensures the integrity of aircraft components, such as turbine blades and structural elements. It does this by identifying internal flaws that compromise safety.

Automotive Sector

Inspects welds, castings, and assemblies to detect defects affecting vehicle performance and safety.

Petrochemical Industry

Examines pipelines, storage tanks, and pressure vessels for corrosion, cracks, and other defects, preventing potential failures. ​

Manufacturing

Assesses castings, forgings, and other fabricated components to ensure they meet quality standards by detecting internal discontinuities. ​

Power Generation

Evaluates critical components in nuclear and conventional power plants. This includes reactor vessels and steam generators. These evaluations ensure structural integrity. ​

Radiography test
Radiography test

Construction

Checks  concrete structures and welds in buildings and bridges for internal defects, ensuring structural safety and compliance with regulations. ​

Radiographic Testing provides a non-invasive means to detect internal flaws. It plays an essential role in maintaining the quality and safety of products. This ensures infrastructure safety across these sectors.

Advantages of Radiography test

Radiographic Testing (RT) is a non-destructive evaluation method. It uses X-rays or gamma rays. These rays inspect the internal structure of materials and components. This technique offers several notable advantages

High accuracy

RT provides precise detection of internal defects. These include cracks, voids, and inclusions. This precision ensures the integrity of critical components. The radiation source size significantly affects Radiographic testing accuracy. A larger source provides more uniform exposure, creating clearer and more accurate images.

Versatility

RT inspects a wide range of materials, including metals, plastics, and composites. Various industries, such as aerospace, manufacturing, and construction, utilize it.

Minimal Material Limitations

RT can be applied to most types of materials. This makes it a versatile choice for inspecting diverse components. ​

Volumetric Examination

Considered a universal approach to volumetric inspection, RT examines the internal integrity of objects, providing a comprehensive assessment of their condition. ​

Permanent Inspection Records

RT produces lasting records of inspections, which can be reviewed and referenced for future evaluations, aiding in quality control and compliance documentation.

Sensitivity to Thickness and Density Variations

RT can detect small changes in thickness and density, down to about 1%, along the path of the X-ray beam, allowing for precise identification of defects.

By providing detailed insights into the internal condition of materials without causing damage, Radiographic Testing plays a crucial role in ensuring the safety, reliability, and quality of products and structures across multiple sectors.

Limitations and Safety Considerations of Radiography test

​Radiographic Testing (RT) is a valuable non-destructive testing method, but it has several limitations and safety considerations:​

Safety Concerns

The use of ionizing radiation poses potential health hazards to personnel. Strict safety measures, including shielding and monitoring, are essential to minimize risks. ​

High Operational Costs

RT is relatively expensive. This is due to the cost of equipment and materials. It also requires highly trained operators.

Accessibility Requirements

Both sides of the object must be accessible for effective inspection, which can be challenging for certain components. ​

Complex Geometry Challenges

Specimens with complex shapes may be difficult to inspect accurately using RT.

Detection Limitations

Small, isolated defects less than 2% of the total thickness may not be detected, and defects not aligned with the radiation beam can be challenging to identify.

Health Risks

Exposure to ionizing radiation can lead to severe health issues, including radiation burns and increased cancer risk.

Environmental Impact

Improper handling and disposal of radioactive materials can adversely affect the environment. ​

Regulatory Compliance

Strict adherence to radiation safety regulations and guidelines is necessary to protect workers and the public. ​

Addressing these limitations and safety considerations is crucial for the effective and safe application of Radiographic Testing.

Recent Advances in Radiography Test

​Radiographic Testing (RT) has experienced significant advancements, enhancing its accuracy, efficiency, and applicability across various industries. Key developments include:​

1. Artificial Intelligence (AI) Integration: AI-powered imaging has revolutionized defect detection and analysis in RT. Advanced algorithms, like 3D Generative Adversarial Networks (GANs), synthesize volumetric computed tomography (CT) data. They help multi-angle defect training. This enables real-time augmentation and improves accuracy.

2. Digital Radiography (DR): The transition from traditional film-based systems to DR has led to faster image acquisition. It has also enhanced image quality and reduced radiation exposure. High-resolution flat-panel detectors and direct conversion sensors further improve diagnostic precision.

3. In-Line Computed Tomography (CT): Integrating CT systems directly into production lines allows for real-time inspection and quality control. AI-driven reductions in scan duration make it easier to detect minute defects. These include 30 µm voids in additive-manufactured parts or cracks in turbine blades. ​

4. Flexible X-Ray Detectors: Innovations like bendable materials capable of wrapping around complex structures have emerged. These flexible detectors enhance inspections in confined or awkward spaces. They are particularly useful in industries like aeronautics. They offer a versatile option to rigid, flat scanners.​

5. Enhanced Software Platforms: Modern software developments provide intuitive touch interfaces. For example, the Rhythm RT platform simplifies operation and increases efficiency. These platforms require minimal operator training and maximize the capabilities of portable Radiographic imaging systems.

6. High-Brightness Photon Sources: High-brightness MeV-photon sources are developed based on laser-wake-field accelerators. This development has opened new possibilities for high-resolution radiography of dense, thick objects. Spatial resolutions better than 2.5 line pairs per millimeter at energies in the MeV range have been demonstrated. ​

These advancements collectively contribute to more precise, efficient, and versatile radiographic testing, ensuring higher quality standards across various applications.​

Conclusion

Radiographic Testing (RT) is a cornerstone of non-destructive testing, as it employs X-rays and gamma rays to effectively reveal internal structures. Moreover, this method detects flaws in materials without causing any damage. Due to its reliability, its applications span various industries, including aerospace, automotive, construction, and manufacturing. Ultimately, this ensures the integrity and safety of critical components and structures.

Recent advancements have significantly enhanced RT’s capabilities. The integration of Artificial Intelligence (AI) has revolutionized image analysis, enabling faster and more accurate defect detection. Digital Radiography (DR) has replaced traditional film, offering immediate results and improved image quality. In-line Computed Tomography (CT) systems now facilitate real-time inspections within production lines, boosting efficiency and precision. ​

Looking ahead, the future of RT is poised for further innovation. The development of portable neutron sources and flexible X-ray detectors promises greater versatility in inspecting complex structures. Enhanced software platforms are streamlining operations, reducing the need for extensive operator training. Additionally, the emergence of high-brightness photon sources is enabling high-resolution imaging of dense objects. ​

As these technologies evolve, RT will continue to play a pivotal role in quality assurance and safety across industries. Embracing these emerging trends is crucial. Professionals must maintain high standards. They need to adapt to the dynamic landscape of non-destructive testing.

Key takeaways

Radiography Test (RT) is a pivotal non-destructive evaluation method that effectively utilizes X-rays or gamma rays to inspect the internal structure of materials. By doing so, this process ensures the integrity of components across various industries. Some key takeaways include:

  • Detection of Internal Defects: RT effectively identifies hidden flaws such as cracks, voids, and inclusions, which are not visible on the surface, thereby preventing potential failures. ​Radiography test for welding can find out weld quality.
  • Versatile Applications: This technique is widely employed in sectors like aerospace, construction, and manufacturing to assess welds, castings, and structural components.
  • Permanent Inspection Records: RT provides lasting documentation of inspections, facilitating future reference and quality assurance.
  • Safety Considerations: The use of ionizing radiation necessitates stringent safety protocols to protect personnel and the environment. ​
  • Technological Advancements: Innovations such as digital radiography and computed tomography have enhanced image quality, reduced exposure times, and improved defect detection capabilities.

By understanding these aspects, industries can effectively leverage Radiographic Testing to maintain high-quality standards and ensure operational safety.

Computed Radiography: An Eco-Friendly Inspection Solution

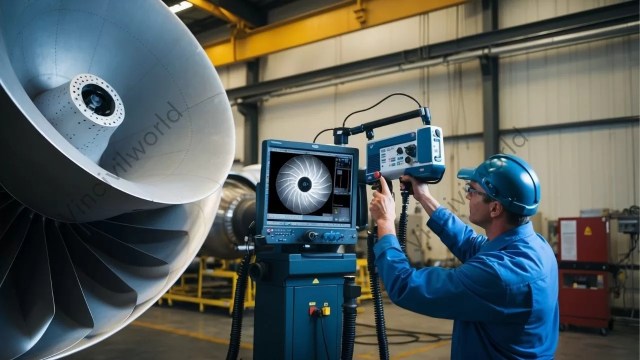
Computed Radiography (CR) is a modern non-destructive testing (NDT) technique that replaces film radiography with a digital imaging process. Computed radiography (CR) does not use traditional X-ray films. Instead, it relies on imaging plates (IPs) to capture high-resolution images. These images are then processed digitally. Consequently, this approach enhances inspection speed, defect detection, and overall image quality. Furthermore, the digital processing ability provides more efficient data storage and analysis.

Computed radiography is widely used in NDT inspections for welds, pipelines, castings, and aerospace components. It eliminates the need for chemical film processing, making it a cost-effective, Eco-friendly, and efficient choice. Additionally, computer radiography allows for faster image analysis, easy digital storage, and seamless sharing for better decision-making.

The transition from film radiography to computerized radiography occurs due to its superior accuracy. This shift also results from reduced operational costs and improved safety standards. This article explains what Computed Radiography means and how it works. It highlights its benefits in NDT inspections. These insights help industries adopt advanced digital testing solutions for better reliability and performance.

  1. Understanding Computed Radiography
  2. Role of Computed Radiography in NDT
    1. Detection of Defects in Welds, Castings, and Pipelines
    2. Inspection of Aerospace, Automotive, and Structural Components
    3. Evaluation of Corrosion and Material Degradation
    4. Advantages in Real-Time and Remote Inspections
  3. Benefits of Computed Radiography in Inspection Services
    1. Defect Detection
    2. Faster Inspections
    3. Eco-Friendly Process
    4. Enhanced Image Quality
    5. Easy Storage & Sharing
  4. Challenges and Limitations of Computed Radiography
    1. Starting Investment Costs for Computed Radiography
    2. Training Requirements for Operators
    3. Sensitivity Differences Compared to Digital Radiography (DR)
    4. Potential for Equipment Damage
    5. Workflow Considerations
  5. Future Trends and Innovations in Computed Radiography
    1. Advancements in Imaging Plate Technology in Computed Radiography
    2. Integration with AI for Automated Defect Detection
    3. Enhanced Resolution and Faster Scanning Techniques
  6. Key Takeaways
  7. Conclusion

Understanding Computed Radiography

Computed Radiography (CR) is an advanced non-destructive testing (NDT) technique that replaces film radiography with a digital imaging system. It uses imaging plates (IPs) instead of traditional X-ray films to capture Radiographic images. Unlike conventional techniques, these plates contain photostimulable phosphors, which store X-ray energy and release it as digital signals during scanning. Moreover, Computerized radiography offers high-resolution images, faster processing, and improved defect detection. As a result, it has become widely used in industries like aerospace, oil and gas, and manufacturing.

Computed Radiography Process

The Computed Radiography process involves three key steps:

  1. Imaging Plates (IPs): These reusable plates store X-ray exposure data when exposed to radiation.
  2. Scanning Process: A laser scanner reads the plate, converting the stored X-ray energy into a digital signal.
  3. Digital Image Processing: The signal is transformed into a high-quality digital image that can be analyzed, enhanced, and stored electronically.

Computer radiography is superior to film radiography. It eliminates the need for chemical processing. This makes it a faster, cost-effective, and environmentally friendly solution. CR images can be digitally enhanced, stored, and shared easily, reducing human errors and improving inspection efficiency.

Role of Computed Radiography in NDT

Computed Radiography (CR) plays a vital role in Non-destructive Testing (NDT) by providing high-quality digital imaging for industrial inspections. Moreover, it enhances defect detection, enables real-time assessments, and improves workflow efficiency. As a result, CR has become an essential tool in industries like aerospace, automotive, and infrastructure maintenance. Furthermore, its digital capabilities contribute to better data management and streamlined inspection processes.

Detection of Defects in Welds, Castings, and Pipelines

Computerized Radiography allows for precise identification of cracks, porosity, voids, and inclusions in welds, castings, and pipelines. The high-resolution digital images enhance flaw visibility, ensuring correct defect evaluation. Advanced contrast adjustments and zooming features improve detection capabilities, reducing the risk of structural failures in industrial applications.

Inspection of Aerospace, Automotive, and Structural Components

Computed Radiography Process in Aerospace

Computerized Radiography is widely used in aerospace, automotive, and infrastructure industries to inspect critical components without damaging them. It helps assess engine parts, structural frames, and composite materials, ensuring compliance with safety regulations and industry standards. The ability to digitally enhance and analyse images increases inspection reliability.

Evaluation of Corrosion and Material Degradation

Computed radiography is effective in assessing corrosion, thinning, and material degradation in metal structures, pipelines, and storage tanks. The digital imaging process provides detailed insights into material conditions, helping engineers decide maintenance requirements and prevent costly failures. This improves the longevity and reliability of industrial assets.

Advantages in Real-Time and Remote Inspections

Computed Radiography technology enables real-time analysis of scanned images, reducing downtime in critical operations. The ability to store and send images digitally allows for remote assessments, expert consultations, and faster decision-making. This is particularly useful in offshore, hazardous, or hard-to-access locations, improving overall inspection efficiency.

Benefits of Computed Radiography in Inspection Services

Computed Radiography (CR) revolutionizes Non destructive Testing (NDT) by offering high-resolution digital imaging for defect detection in industrial components. It enhances inspection speed, reduces environmental impact, improves image quality, and enables easy digital storage and sharing. CR provides a cost-effective, efficient, and reliable choice to traditional film radiography.

Defect Detection

Computed Radiography (CR) enhances defect detection by providing high-resolution digital images of welds, castings, and pipelines. It helps find cracks, voids, porosity, corrosion, and inclusions with greater accuracy compared to traditional film radiography. Digital image processing also allows for contrast adjustments and zooming, improving defect visibility for precise evaluation.

Computerized Radiography
Computerised Radiography

Faster Inspections

CR radiography eliminates time-consuming film development by using digital imaging plates (IPs) that are scanned for instant results. This significantly reduces inspection time. It allows for quick decision-making in critical applications. These include pipeline integrity assessments, aerospace inspections, and manufacturing quality control. Faster processing improves workflow efficiency and minimizes downtime in industrial operations.

Eco-Friendly Process

Unlike traditional film radiography, which requires chemical processing and hazardous waste disposal, CR radiography is an eco-friendly solution. It eliminates the use of toxic chemicals, reduces material waste, and lowers environmental impact. The reusable imaging plates (IPs) further contribute to sustainability, making CR an environmentally responsible choice for NDT inspections.

Enhanced Image Quality

Digital CR radiography produces high-contrast, noise-free images with greater dynamic range than traditional film. Advanced image processing tools allow for edge enhancement, contrast adjustments, and noise reduction, improving flaw detection. Inspectors can analyse fine details more effectively. This ensures precise defect evaluation. It also reduces the chances of false positives or missed defects.

Easy Storage & Sharing

CR images are stored in digital formats, eliminating the need for physical film storage. Inspectors can easily retrieve, archive, and share images electronically, allowing for remote analysis and collaboration. Digital storage also enables better documentation, traceability, and compliance with industry standards, improving overall inspection efficiency and record management.

Challenges and Limitations of Computed Radiography

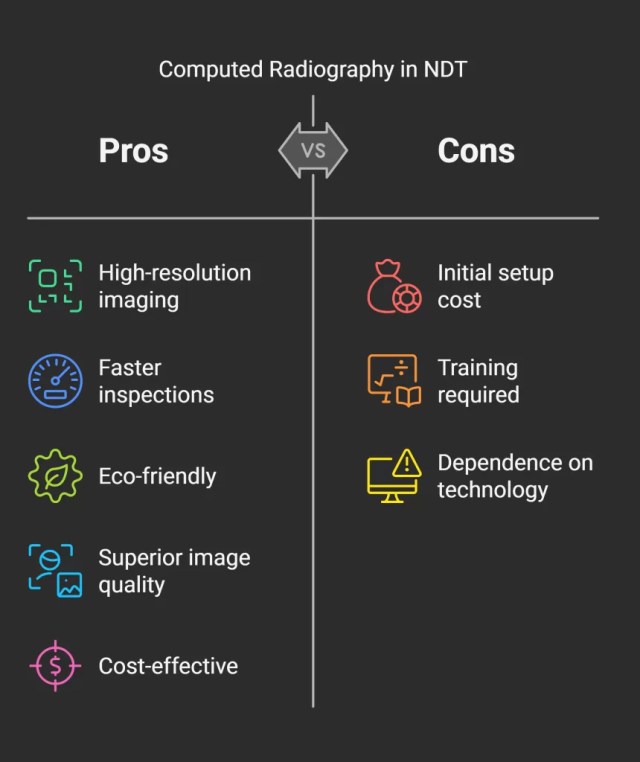
While Computed Radiography (CR) offers many advantages in Non-destructive Testing (NDT), it also presents certain challenges and limitations. These challenges include starting investment costs. Training requirements for operators are also significant. There are sensitivity differences compared to Digital Radiography (DR). Additionally, there is potential for equipment damage and workflow considerations.

Starting Investment Costs for Computed Radiography

Implementing CR systems involves significant initial expenses, encompassing imaging plates, scanners, software, and digital storage solutions. CR reduces ongoing costs linked to film and chemical processing. However, the upfront investment can be substantial. This is particularly true for small and medium-sized enterprises.

Training Requirements for Operators

Transitioning from traditional film-based radiography to CR necessitates specialized training for operators. Skill in digital image acquisition, processing, and interpretation is essential to fully leverage CR’s capabilities. Without adequate training, there is a risk of misinterpreting images or mishandling equipment, compromising inspection quality.

Computed Radiography - Pros and cons
Computed Radiography – Pros and cons

Sensitivity Differences Compared to Digital Radiography (DR)

Computed Radiography systems show lower spatial resolution and sensitivity compared to Digital Radiography systems. This difference can impact the detection of fine defects, making DR more suitable for applications requiring higher precision. Thus, industries with stringent quality standards prefer DR over CR for critical inspections.

DR
Digital Radiography

Potential for Equipment Damage

CR cassettes and imaging plates are susceptible to damage from mishandling or environmental factors. Scratches, exposure to intense light, or physical impacts can degrade image quality or render the plates unusable. Regular maintenance and careful handling are imperative to preserve equipment longevity and guarantee consistent performance.

Workflow Considerations

CR streamlines certain aspects of the imaging process. Nevertheless, it still requires intermediate steps. These include scanning the imaging plates to digitize images. This process can be more time-consuming compared to DR, which offers immediate image acquisition and viewing. In fast-paced environments where time is critical, the extra processing time linked to CR is a limiting factor.

Understanding these challenges is crucial for organizations. It helps them make informed decisions when selecting appropriate Radiographic techniques. This is essential for their specific NDT applications.

The field of Computed Radiography (CR) is experiencing significant advancements. These advancements are driven by technological innovations and the integration of artificial intelligence (AI). These developments aim to enhance image quality, streamline workflows, and expand the applications of CR in various industries.

Advancements in Imaging Plate Technology in Computed Radiography

Recent progress in imaging plate (IP) technology focuses on improving detector materials and designs to achieve higher resolution and sensitivity. Innovations include the development of direct conversion detectors. These detectors convert X-rays directly into electrical signals. This process reduces noise and enhances image clarity. These advancements allow more precise defect detection in critical applications like aerospace and automotive industries. Additionally, the use of lightweight, portable detectors enhances the flexibility of CR systems. This portability also improves accessibility, facilitating inspections in remote or confined spaces.

Integration with AI for Automated Defect Detection

The integration of AI into CR systems is revolutionizing defect detection by automating image analysis and interpretation. Machine learning algorithms can be trained to identify patterns in Radiographic images. They can also detect anomalies. This improves diagnostic accuracy and reduces the potential for human error. AI-driven tools, such as Generative Adversarial Networks (GANs) and federated learning, enhance defect detection accuracy. They enable secure, collaborative model training across industries. This integration not only accelerates the inspection process. It also facilitates real-time decision-making. This is crucial in industries where safety and reliability are paramount.

Enhanced Resolution and Faster Scanning Techniques

Efforts to enhance resolution have led to the adoption of advanced imaging techniques. Notably, these efforts also aim to speed up scanning processes. For instance, techniques like phase-contrast radiography and hybrid computed tomography (CT) have been developed. As a result, these methods achieve sub-micron resolution and multi-material analysis, allowing for detailed inspections of complex components. Furthermore, the development of portable systems and autonomous robots equipped with AI and quantum X-ray technology is revolutionizing on-site efficiency. As a result, this advancement paves the way for sub-millisecond defect detection by 2025. Moreover, these innovations are particularly beneficial in infrastructure maintenance. They also aid the manufacturing sector, where rapid and precise inspections are essential.

Imaging Plate technology

In summary, the future of Computed Radiography is being shaped by continuous improvements in imaging plate technology. AI integration is also contributing by automating analysis. Additionally, there is a focus on developing high-resolution, fast-scanning techniques. These advancements aim to enhance the efficacy of non-destructive testing. They ensure higher safety standards. This leads to improved operational efficiency across various industries.

Key Takeaways

  • Enhanced Defect Detection: Computed Radiography (CR) provides high-resolution digital images. This enables precise identification of internal defects. These include cracks, corrosion, and voids in materials and components.
  • Operational Efficiency: The digital nature of CR streamlines the inspection process. It eliminates the need for chemical film development. This change reduces inspection times and increases throughput.
  • Environmental Benefits: By removing the need for chemical processing, CR is more environmentally friendly. Disposable films are also eliminated, offering an alternative to traditional Radiographic methods.
  • Digital Integration: CR facilitates easy storage, retrieval, and sharing of inspection data, enhancing collaboration and record-keeping within inspection services.
  • Technological Advancements: Ongoing innovations in imaging plate technology are continually improving the capabilities of CR. Artificial intelligence is also enhancing the applications of CR in nondestructive testing (NDT).

Conclusion

Computed Radiography has significantly transformed non-destructive testing and inspection services. It offers a digital, efficient, and environmentally conscious choice to traditional film-based radiography. Its ability to deliver high-quality images expedites defect detection and analysis. This process enhances the reliability and safety of critical components across various industries. The shift towards digital solutions not only streamlines workflows but also aligns with modern environmental standards by reducing chemical waste. As technology progresses, CR will continue to improve. Advancements in imaging plate design and artificial intelligence integration will play a key role. They will offer even greater accuracy and efficiency. Embracing these digital innovations is essential for industries. They need to maintain rigorous quality control and safety standards. This is crucial in an increasingly competitive and environmentally conscious market.

Magnetic Particle Test: Techniques and Principles Explained

Magnetic Particle Test (MPT) is a widely used non-destructive testing (NDT) method. It detects surface and near-surface discontinuities in ferromagnetic materials, such as iron, nickel, cobalt, and their alloys. This technique is renowned for its speed, cost-effectiveness, and relative ease of application, making it a preferred choice across various industries, including aerospace, automotive, marine, power generation, and oil and gas sectors

Magnetic Particle Testing (MPT) operates by magnetizing the component under inspection. If defects are present, they disrupt the magnetic field, causing leakage fields. When fine ferromagnetic particles are applied to the surface, these particles cluster at the leakage sites. This clustering forms visible indications of discontinuities. This method enables quick and reliable detection of flaws that compromise the integrity of critical components.

This article explores the history of Magnetic Particle Testing (MPT), covering its magnetization methods, principles, and equipment. It explains the procedure, detectable discontinuities, advantages, and applications. Additionally, it highlights safety measures and recent advancements. It emphasizes MPT’s role as a reliable non-destructive testing technique for ensuring material integrity.

  1. Historical Background of Magnetic Particle Test (MPT)
  2. Magnetic Particle Testing Principle
  3. Types of Magnetization Methods in Magnetic Particle Testing
    1. Direct Magnetization
    2. Indirect Magnetization
    3. Comparison of Magnetization Techniques
  4. Equipment and Materials Used in Magnetic Particle Test
    1. Magnetizing Equipment
    2. Types of Magnetic Particles
    3. Suspension Mediums and Their Applications
  5. Step-by-Step Magnetic Particle Testing Procedure
    1. Surface Preparation
    2. Application of Magnetic Field
    3. Application of Magnetic Particles
    4. Inspection Under Appropriate Lighting Conditions
    5. Demagnetization Process
    6. Post-Inspection Cleaning
  6. Types of Discontinuities Detected by MPT
    1. Surface Cracks
    2. Subsurface Flaws
    3. Inclusions and Seams
  7. Advantages of Magnetic Particle Testing
  8. Limitations of Magnetic Particle Test
  9. Comparison with Other NDT Methods
  10. Applications of Magnetic Particle Testing
    1. Industries Utilizing MPT
    2. Specific Use Cases and Examples of Magnetic Particle Test
  11. Role of Magnetic Particle Testing in Quality Assurance and Inspection Works
    1. Detecting Hidden Defects
    2. Ensuring Safety in Critical Components
    3. Fast and Efficient Testing
    4. Compliance with Industry Standards
    5. Preventing Costly Failures
  12. Recent Advances and Future Trends in Magnetic Particle Testing
    1. Technological Innovations
    2. Future Prospects and Research Directions
  13. Key takeaways from Magnetic Particle Testing (MPT):
  14. Conclusion

    Historical Background of Magnetic Particle Test (MPT)

    Magnetic Particle Testing (MPT) has played a crucial role in non-destructive testing (NDT) for over a century. It all began in 1868. Inspectors magnetized cannon barrels and used a magnetic compass. They detected defects by watching needle deviations. As technology advanced, MPT techniques improved significantly.

    By the early 1900s, industries started refining the process. By the 1930s, railroads widely adopted MPT. They used it to inspect metal components and enhance safety. Over the years, there have been further advancements in magnetization techniques. Fluorescent magnetic particles and portable equipment have increased the accuracy and convenience of the technique. Today, MPT continues to be an essential tool across various industries, ensuring the reliability and safety of critical components.

    magnetic particle test
    Magnetic Particle Test (MPT)

    Magnetic Particle Testing Principle

    Ferromagnetic materials, such as iron, nickel, and cobalt, strongly attract magnetic fields. Their unique atomic structure allows groups of atoms to align in the same direction, forming magnetic domains. In an unmagnetized state, these domains are randomly arranged, resulting in no net magnetization. However, when exposed to an external magnetic field, the domains shift and align with the field. This alignment creates a strong overall magnetic effect, making ferromagnetic materials highly responsive to magnetization.

    Magnetic Particle Test (MPT)
    Magnetic Particle Testing (MPT)

    Magnetic Particle Testing (MPT) detects surface and near-surface flaws in ferromagnetic materials. The process starts by magnetizing the part, either locally or entirely. If a flaw like a crack is present, it distorts the magnetic field, creating flux leakage. Fine ferromagnetic particles are applied to the surface. These particles gather at the leakage points, forming visible indications. This buildup reveals the flaw’s location, size, and shape. MPT is a reliable method for identifying defects in critical components.

    The effectiveness of MPT depends on factors such as the type of current used for magnetization. Alternating current (AC) is typically used for detecting surface flaws. Direct current (DC) is more effective for subsurface flaw detection.

    Types of Magnetization Methods in Magnetic Particle Testing

    Magnetic Particle Testing (MPT) employs two primary magnetization techniques: direct and indirect magnetization.

    Direct Magnetization

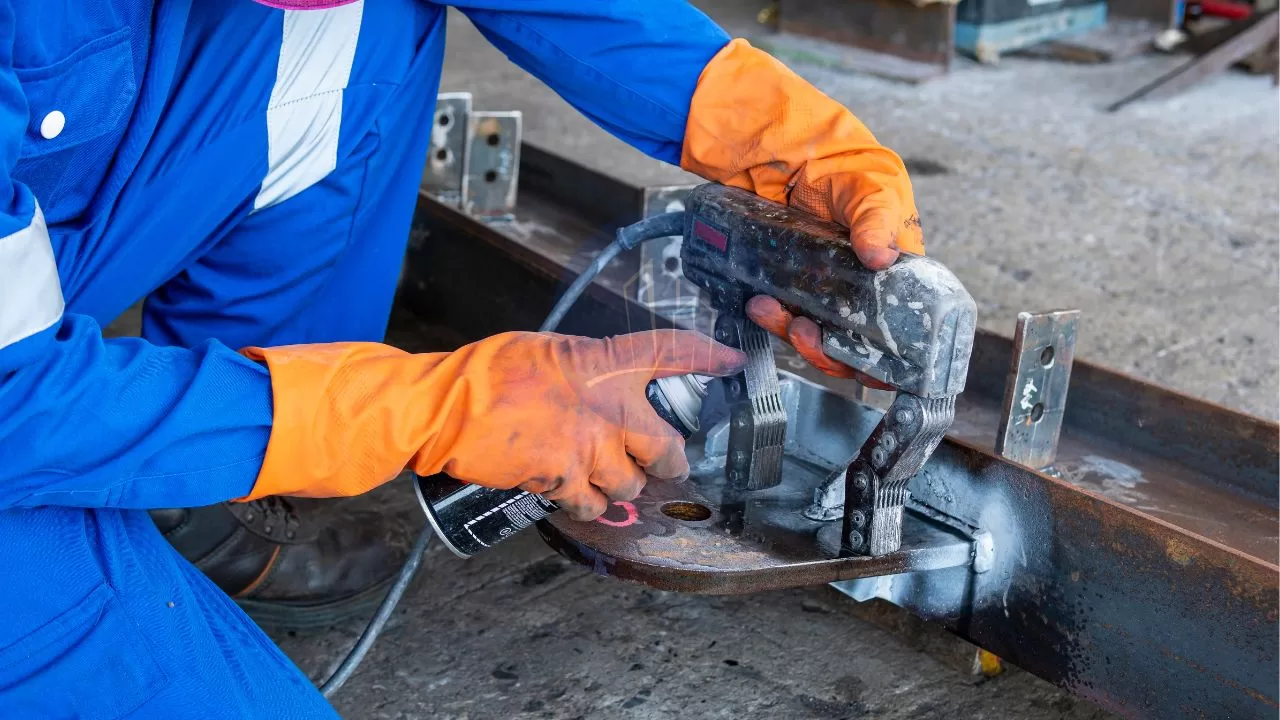
    In direct magnetization, an electric current flows through the test object, generating a magnetic field within the material. This method is highly effective for finding out surface and near-surface flaws. Inspectors typically use two common approaches: clamping the component between contact heads or applying current through prods. As the current passes through, it creates a circular magnetic field around its path. If a defect exists, it disrupts the magnetic flux, causing magnetic particles to gather and reveal the flaw. To ensure accuracy, proper contact is essential. This prevents arcing. Additionally, current levels must be carefully controlled to avoid overheating or damage. Due to its simplicity and reliability, direct magnetization remains widely used in industrial applications for flaw detection.

    Magnetic Particle Testing (MPT) - Direct Magnetization
    image courtesy : slv

    Indirect Magnetization

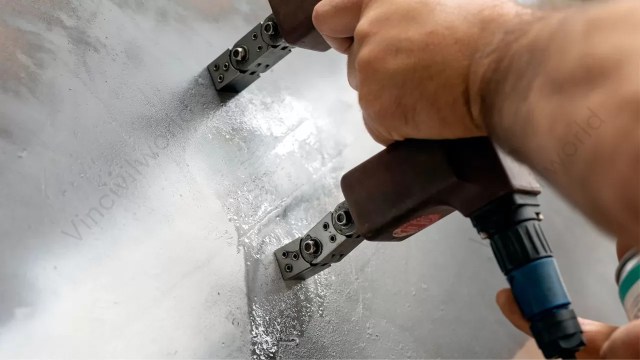
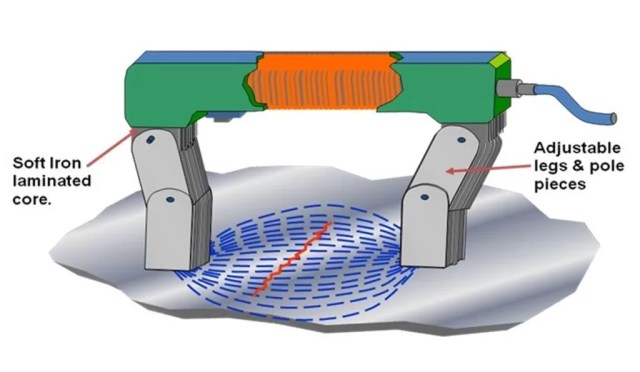
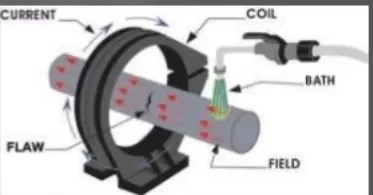
    Indirect magnetization, also known as magnetization by induction, creates a magnetic field in the test object without direct electrical contact. This method involves placing the component inside a current-carrying coil or using a yoke to generate an external magnetic field. As a result, the material becomes magnetized, allowing defects to be detected. This technique is useful because it does not require direct current application. It is especially beneficial for inspecting components where direct magnetization is impractical. Additionally, it ensures even magnetization across complex shapes, improving the accuracy and efficiency of Magnetic Particle Testing (MPT).It is ideal for components with complex shapes or when testing specific areas. However, the field’s strength and orientation must be carefully controlled to ensure accurate and sensitive flaw detection.

    Magnetic Particle Testing (MPT) - In direct Magnetization
    Magnetic Particle Testing (MPT) – In direct Magnetization

    Comparison of Magnetization Techniques

    FactorDirect MagnetizationIndirect Magnetization
    Magnetization MethodElectric current passes directly through the test object.External magnetic field induces magnetization.
    Field StrengthProduces a strong magnetic field.May generate a weaker magnetic field.
    SuitabilityBest for simple-shaped components.Ideal for complex-shaped components.
    Electrical ContactRequires direct contact, which may not be feasible for all parts.No direct electrical contact, reducing arcing risk.
    ApplicationEffective for detecting surface and near-surface flaws.Suitable for localized inspections and components sensitive to direct currents.
    LimitationsRisk of overheating and arcing if not properly controlled.Field strength and orientation must be carefully managed for accuracy.

    Equipment and Materials Used in Magnetic Particle Test

    Magnetic Particle Testing (MPT) uses different tools and materials to find surface and near-surface flaws in ferromagnetic materials. It requires magnetizing equipment, magnetic particles, and suspension mediums for accurate defect detection.

    Magnetizing Equipment

    • Yokes are Portable devices that create a magnetic field between two poles. They help inspect specific areas and are popular for their flexibility and ease of use.
    • Electromagnetic coils generate a longitudinal magnetic field when current flows through them. Placing a test object inside the coil induces magnetization, making it ideal for simple-shaped components.
    • Prods are Handheld electrodes send current directly into the test object, forming a localized magnetic field. They work well for inspecting welds and targeted areas but need careful handling to prevent surface damage.

    Types of Magnetic Particles

    • Dry Particles are Finely milled ferromagnetic powders applied directly to the test surface. They are ideal for detecting discontinuities on rough or uneven surfaces and in high-temperature environments.
    • Wet Particles are Magnetic particles suspended in a liquid carrier, such as water or oil. This method enhances particle mobility, increasing sensitivity to fine defects. Wet suspensions are particularly useful for smooth surfaces and can be applied using spray systems.
    MPT - Dry particle and Wet Particle
    MPT – Dry particle and Wet Particle

    Suspension Mediums and Their Applications

    • Water-Based Suspensions utilize water as the carrier fluid, often with added wetting agents to improve particle dispersion and surface coverage. They are environmentally friendly and suitable for a wide range of applications.
    • Oil-Based Suspensions employ light petroleum distillates as carriers, offering superior corrosion protection and suitability for components prone to rust. They are preferred in situations where water adversely affect the test material.

    Selecting the appropriate combination of equipment and materials is crucial for effective Magnetic Particle Testing, ensuring accurate detection of flaws and maintaining the integrity of the components under inspection

    Step-by-Step Magnetic Particle Testing Procedure

    Magnetic Particle Testing (MPT) is a non-destructive method that finds surface and near-surface flaws in ferromagnetic materials. The process follows key steps to ensure accurate and reliable results.

    Surface Preparation

    Thoroughly clean the test surface to remove contaminants such as oil, grease, dirt, and rust, which could interfere with the inspection process. Generally, a clean surface ensures proper particle adherence and accurate defect detection.

    Application of Magnetic Field

    Apply a magnetic field to the component using yokes, coils, or prods. The method depends on the part’s shape and inspection needs. Yokes create a field between two poles for localized testing. Coils generate a longitudinal field for cylindrical or simple-shaped parts. Prods introduce current directly, producing a strong, localized field. When magnetized, any flaw in the material distorts the field, causing flux leakage. This leakage attracts magnetic particles, making defects visible. Proper magnetization is crucial for accurate results. Inspectors must choose the right technique to ensure full coverage and reliable detection of surface and near-surface discontinuities.

    Application of Magnetic Particles

    Apply magnetic particles to the magnetized surface using dry powder or a liquid suspension. These particles spread across the surface and gather where magnetic flux leaks due to flaws like cracks. Dry particles work well for field inspections, while wet suspensions offer better sensitivity for fine defects. The inspector ensures even coverage to detect all possible flaws. Under proper lighting or UV light for fluorescent particles, defect indications become visible. This step is crucial for identifying the exact location and size of discontinuities. Correct application improves detection accuracy and ensures reliable inspection results in Magnetic Particle Testing (MPT).

    Inspection Under Appropriate Lighting Conditions

    Carefully inspect the surface for particle build-up, as this often indicates defects. To enhance visibility, use proper lighting techniques. For non-fluorescent particles, rely on bright white light, ensuring even illumination. For fluorescent particles, use ultraviolet (UV-A) light. Do this in a dark environment to make defects stand out more clearly. Additionally, adjust the light source as needed to achieve full coverage and eliminate any shadows. Proper lighting plays a crucial role in accurate detection. Following these steps ensures reliable Magnetic Particle Testing (MPT) results. This ultimately improves safety and quality in inspections.

    Demagnetization Process

    After inspection, demagnetize the component to eliminate any residual magnetism, which could affect its performance or interfere with future inspections. This step is crucial for maintaining the material’s integrity.

    Post-Inspection Cleaning

    Clean the component to remove any remaining magnetic particles and inspection residues. This ensures the part is free from contaminants and ready for service or further processing.

    Adhering to these steps in the MPT process ensures the accurate detection of defects. This contributes to the safety and reliability of critical components.

    Types of Discontinuities Detected by MPT

    Magnetic Particle Testing (MPT) is a non-destructive testing method used to identify surface and near-surface discontinuities in ferromagnetic materials. It is particularly effective in finding out various types of flaws that can compromise the integrity of components.

    Surface Cracks

    Surface cracks on the material’s exterior is due to fatigue, stress, or mechanical damage. In Magnetic Particle Testing (MPT), these cracks disrupt the magnetic field, causing flux leakage. Consequently, magnetic particles gather at these leakage points, making the cracks clearly visible. This method effectively detects cracks early, thereby preventing potential failures. Moreover, regular inspection enhances safety and extends the durability of critical components across various industries. As a result, industries can minimize risks, reduce maintenance costs, and ensure reliable operations.

    Subsurface Flaws

    Subsurface flaws, like voids or inclusions, lie just beneath the surface and are not visible. In Magnetic Particle Testing (MPT), these flaws disrupt the magnetic field if they are close enough. This disruption creates flux leakage, which in turn attracts magnetic particles to the flaw’s location. As a result, the gathered particles form visible patterns, making it easier for inspectors to detect hidden defects. By identifying these flaws early, industries can prevent costly failures and enhance material reliability. Moreover, regular inspections improve overall safety and extend the lifespan of critical components, ensuring smooth and efficient operations.

    Inclusions and Seams

    Inclusions are non-metallic materials trapped in metal during manufacturing. Seams are long, narrow defects caused by structural imperfections. Both disrupt the magnetic field in MPT, creating flux leakage. Magnetic particles gather at these spots, making the flaws visible.

    Detecting these defects helps prevent failures and ensures the reliability of ferromagnetic components. MPT is essential for maintaining safety and quality in industries like aerospace, automotive, and construction.

    Advantages of Magnetic Particle Testing

    Magnetic Particle Testing (MPT) is a non-destructive testing method used to detect surface and near-surface flaws in ferromagnetic materials. It is widely utilized across various industries due to its effectiveness and efficiency.

    Magnetic Particle Test
    Magnetic Particle Test
    • High Sensitivity – MPT effectively detects surface and near-surface defects, including cracks, seams, and laps.
    • Quick and Efficient – The testing process is fast, providing immediate results for quick decision-making.
    • Cost-Effective – MPT is an economical method compared to other NDT techniques, requiring minimal equipment.
    • Portable Equipment – Handheld yokes and compact units allow inspections in various locations, including field applications.
    • Detects Fine Defects – Fluorescent particles enhance defect visibility, improving detection accuracy.
    • Works on Coated Surfaces – MPT can be performed on thinly coated surfaces, reducing the need for surface preparation.
    • Minimal Training Required – Operators can learn MPT quickly compared to more complex NDT methods.
    • Versatile Application – Used in automotive, aerospace, railways, and manufacturing industries for safety and quality assurance.
    • Reliable Results – Consistently identifies defects that could lead to material failure.

    Limitations of Magnetic Particle Test

    Magnetic Particle Testing (MPT) is a widely used non-destructive testing method, but it has several limitations:

    • Material Restriction: MPT is limited to ferromagnetic materials. This includes materials such as iron and steel. It cannot be used on non-ferromagnetic materials like austenitic stainless steel.
    • Surface Condition: The accuracy of MPT can be affected by surface conditions. Rough or dirty surfaces hinder defect detection. Proper cleaning is necessary before inspection.
    • Depth Limitation: MPT is effective for detecting surface and near-surface defects but may not identify deeper flaws within the material.
    • Demagnetization Requirement: After testing, components may retain residual magnetism, requiring demagnetization to prevent interference with their intended function.
    • Coating Thickness: Thick paint or coatings can impede the detection of defects. MPT is less effective on heavily coated surfaces.
    • Orientation Sensitivity: Defects not aligned perpendicularly to the magnetic field may go undetected. Inspections from multiple directions are necessary to ensure comprehensive evaluation.
    • Electrical Power Dependence: Most MPT methods require a consistent electricity supply, limiting their applicability in remote or power-scarce environments.
    • Interpretation Challenges: Non-relevant indications can occur. This makes the interpretation of results challenging. Skilled personnel are required to distinguish between true defects and false indications.

    Understanding these limitations is crucial for selecting the appropriate non-destructive testing method for specific applications.

    Comparison with Other NDT Methods

    MPT is quicker and more affordable than UT but only works on ferromagnetic materials and detects surface or near-surface flaws. UT can find internal defects in various materials, including non-ferromagnetic ones. However, it needs advanced equipment and skilled operators.

    MPT is cleaner and gives instant results without waiting for development. However, LPT works on non-ferromagnetic materials and can detect finer surface defects across more materials.

    The selection of an appropriate NDT method depends on several factors. These include material type, defect nature, inspection environment, and required sensitivity.

    Here’s a comparison of Magnetic Particle Testing (MPT) with other common Non-Destructive Testing (NDT) methods

    AspectMagnetic Particle Testing (MPT)Ultrasonic Testing (UT)Liquid Penetrant Testing (LPT)
    Material SuitabilityEffective only on ferromagnetic materials (e.g., iron, nickel, cobalt, and their alloys).Applicable to a wide range of materials, including metals, plastics, and composites.Suitable for non-porous materials, both ferrous and non-ferrous.
    Defect DetectionDetects surface and near-surface discontinuities.Capable of identifying internal and surface defects.Primarily identifies surface-breaking defects.
    PortabilityEquipment is generally portable, allowing for on-site inspections.Equipment can be portable but often requires coupling medium and skilled operators.Highly portable with minimal equipment needed.
    CostRelatively low-cost method.Typically more expensive due to advanced equipment requirements.Generally cost-effective with low equipment costs.
    Surface PreparationRequires clean surfaces; contaminants can hinder accuracy.Surface condition can affect accuracy; requires good contact.Requires thorough cleaning to remove contaminants before application.
    SpeedProvides immediate results, facilitating quick decision-making.Results require analysis; not always immediate.Quick application and inspection process.
    LimitationsNot suitable for non-ferromagnetic materials; depth of detection is limited.Requires skilled operators; surface roughness and geometry can affect results.Only detects surface defects; not suitable for porous materials.

    Applications of Magnetic Particle Testing

    Magnetic Particle Testing (MPT) is a non-destructive testing method widely used to detect surface and near-surface discontinuities in ferromagnetic materials. Moreover, its versatility makes it invaluable across various industries, ensuring the integrity and safety of critical components. By identifying defects early, MPT helps prevent failures, reduce maintenance costs, and enhance overall reliability. As a result, industries like aerospace, automotive, and construction rely on MPT to keep high safety and quality standards.

    Magnetic Particle Test
    Magnetic Particle Test

    Industries Utilizing MPT

    Construction: MPT assesses the structural integrity of buildings, bridges, and infrastructure by detecting surface and near-surface flaws in steel structures.

    Specific Use Cases and Examples of Magnetic Particle Test

    Railway Industry: Regular MPT of rails and wheels detects fatigue cracks, preventing derailments and ensuring safe train operations.

    Role of Magnetic Particle Testing in Quality Assurance and Inspection Works

    Magnetic Particle Testing (MPT) is a vital non-destructive testing method widely used in quality assurance and inspection. Not only does it detect surface and near-surface defects in ferromagnetic materials, but it also ensures safety, reliability, and compliance across various industries. Furthermore, by identifying flaws early, MPT helps prevent failures, reduces maintenance costs, and enhances overall operational efficiency. Consequently, industries rely on this method to uphold high standards and improve equipment performance.

    Detecting Hidden Defects

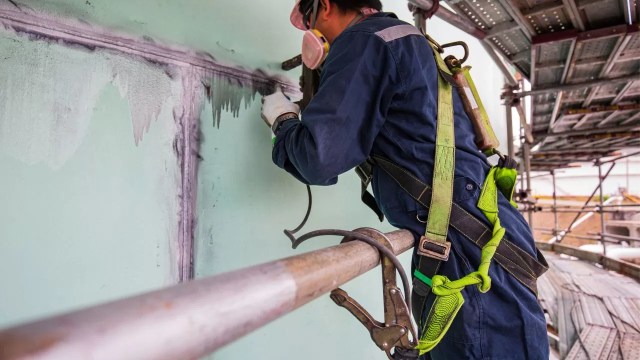
    Magnetic Particle Testing (MPT) helps identify surface and near-surface defects such as cracks, seams, and inclusions in ferromagnetic materials. These flaws are not be visible to the naked eye but can compromise structural integrity. The magnetic field highlights defect areas, allowing particles to accumulate and make them visible. This technique ensures that critical flaws are detected early, preventing unexpected failures in industrial components.

    Ensuring Safety in Critical Components

    Safety is a major concern in industries such as aerospace, automotive, and construction. MPT helps inspect critical components like welds, castings, and machined parts, ensuring they meet quality standards. Faulty components can cause severe accidents, but regular MPT inspections help maintain operational safety. By detecting defects early, MPT prevents equipment malfunctions, reducing risks to workers and the environment.
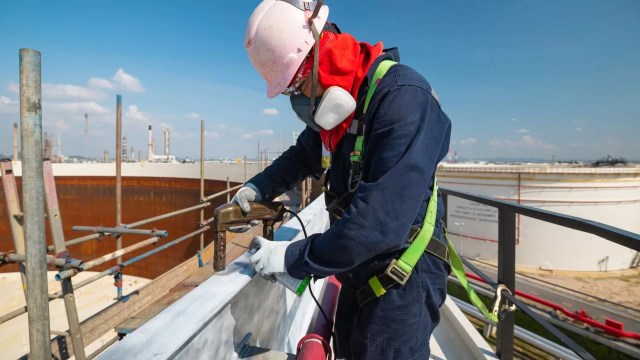
    Fast and Efficient Testing

    One of the key advantages of MPT is its speed and efficiency. Unlike other non-destructive testing (NDT) methods, MPT provides immediate results. Inspectors can analyze defects in real-time without needing extensive post-processing. This makes it ideal for high-volume inspections, such as during routine maintenance or production line checks. Its ability to deliver quick results helps industries minimize downtime and maintain productivity.

    Compliance with Industry Standards

    Many industries follow strict quality control and safety regulations. MPT ensures that components meet required industry standards before they are used. Organizations such as ASME and ASTM set guidelines for proper inspection techniques. Regular MPT inspections help companies comply with these standards, preventing legal and operational issues. Adhering to quality assurance protocols also enhances a company’s reputation for reliability.

    Preventing Costly Failures

    Undetected defects can result in costly repairs, operational delays, or even catastrophic failures. However, MPT helps detect issues early, significantly reducing maintenance costs and extending the lifespan of critical components. Moreover, by investing in regular inspections, companies can prevent expensive replacements and improve equipment performance. Ultimately, prevention through MPT ensures safer, more reliable, and cost-effective operations, allowing industries to maintain efficiency while minimizing risks.

    Magnetic Particle Testing plays a crucial role in inspection work. It ensures safety, reliability, and compliance while providing fast and accurate defect detection. Regular inspections help industries prevent failures, reduce costs, and maintain high-quality standards.

    Magnetic Particle Testing (MPT) has seen significant advancements, enhancing its efficiency and accuracy.

    Technological Innovations

    Recent developments in MPT include the adoption of automated systems and robotics, which minimize human error and provide consistent results. High-resolution sensors and energy-efficient electromagnets have improved defect detection capabilities, allowing for the identification of smaller imperfections even under challenging conditions. Additionally, innovations in fluorescent magnetic particles have increased the visibility of defects, facilitating more precise inspections.

    The integration of digital technologies into MPT has revolutionized data analysis and record-keeping. Advanced automation and augmented reality (AR) tools enhance defect visualization, enabling inspectors to assess flaws more effectively. Real-time data analysis systems provide immediate feedback, streamlining the inspection process and improving decision-making. These digital enhancements contribute to more reliable and efficient testing procedures.

    Future Prospects and Research Directions

    The future of MPT will bring exciting innovations, focusing on AI and machine learning to predict defects and optimize inspection settings. Researchers are also developing eco-friendly testing materials to reduce environmental impact. As industries focus on safety and quality, MPT will continue evolving with advanced technology. It will adopt sustainable practices. This will guarantee more efficient and reliable inspections.

    Key takeaways from Magnetic Particle Testing (MPT):

    • Non-Destructive Testing Method: MPT detects surface and near-surface defects in ferromagnetic materials without causing damage.
    • Material Suitability: Effective only on ferromagnetic materials like iron, nickel, cobalt, and their alloys.
    • Advantages: Simple, fast, and cost-effective method for detecting surface and slightly subsurface discontinuities.
    • Limitations: Not suitable for non-ferromagnetic materials; may not detect very fine or deeply embedded defects.
    • Recent Advancements: Incorporation of automation, high-resolution sensors, and digital technologies has enhanced accuracy and efficiency.
    • Safety and Compliance: Proper handling, health precautions, and adherence to regulatory standards are essential for effective and safe MPT operations.

    Conclusion

    NDT Magnetic Particle Testing (MPT) is a vital non-destructive testing method for identifying surface and near-surface defects in ferromagnetic materials. Its cost-effectiveness and efficiency make it indispensable across industries such as aerospace, automotive, and construction, ensuring the safety and reliability of critical components. Recent technological advancements, including automation and digital integration, have enhanced MPT’s accuracy and applicability. Adherence to proper handling procedures, health precautions, and regulatory standards is essential for effective and safe MPT operations. As industries continue to prioritize quality assurance, MPT’s role remains crucial in maintaining structural integrity and preventing failures. Ongoing research and technological integration promise to further advance MPT’s capabilities, solidifying its importance in modern industry.