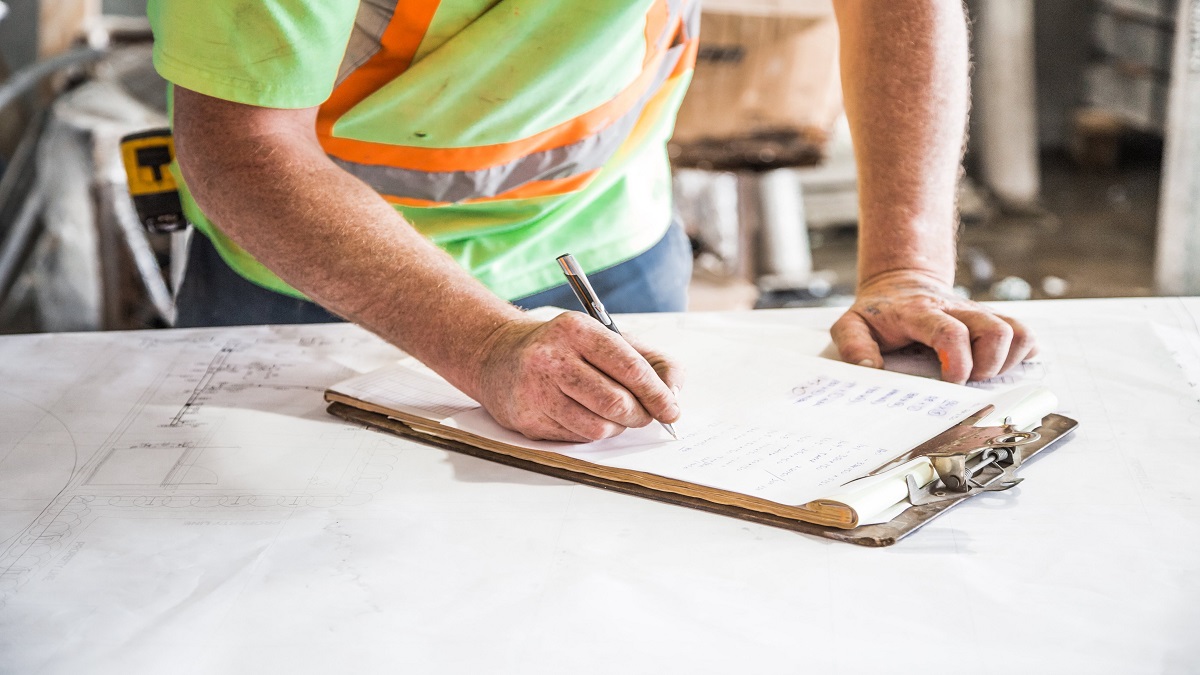
Aggregate crushing test is done to find out the strength of aggregate which is the fundamental and essential components of concrete, flexible pavements, etc. More than 70 to 80 per cent of the volume of concrete is aggregate. Aggregates are a very important component of concrete, so the quality really matters when it comes to aggregates. Furthermore, their uses include flexible pavements, railway ballast, etc.
Different tests are to be performed to ensure the quality requirements of aggregates for the specific uses.
Tests on aggregates
Different types of tests are done to determine their properties like
Following are the types of aggregate tests conducted to ascertain the suitability of aggregates.
Aggregate Crushing test
Abrasion test
Impact test
Water absorption test
Flakiness index test
Elongation index test
Bulk specific gravity test
Polishing test
Aggregate Crushing test (IS 2386(Part 4):1963 & BS 812–110:1990)
Aggregate crushing test values indicates the strength of aggregate and hence it is very significant. Similarly we can say crushing value is the relative measure of resistance of an aggregate under gradually applied compressive loads. Higher crushing strength means lower crushing value and vice versa. If the aggregate crushing value is less than 10, means an exceptionally strong aggregate, Whereas crushing value of 35 and above means a weak aggregate.
Relevant codes for aggregate crushing test
IS 2386(Part 4):1963
BS 812–110:1990
Apparatus required
Compressive Testing Machine
Crushing Mould: A steel cylinder 15 cm diameter with plunger and base plate.
Weighing machine,
Sieve: Size of 12.5 mm, 10 mm and 2.36 mm
Aggregate crushing value test apparatus
Aggregate crushing Test procedure
Oven dry the aggregates
Firstly, sieve the aggregate using Indian standard sieves.
Then collect the specimen passed through 12.5 mm and retained on a 10mm sieve.
Thus is the test sample of aggregate.
Then put the cylinder on the base plate and weight it (W).
The aggregate sample should be filled in 3 layers , each layer is subjected to 25 strokes using tamping rod.
After that weigh the materials with cylinder and record as (W1)
Weight of aggregate will be (W1-W). ie : (Weight of cylinder with aggregates – Weight of cylinder)
Level the aggregate surface carefully before inserting the plunger so that it rests horizontally over the surface.
Place the cylinder with plunger below a compression testing machine.
Apply load at a uniform rate so that a total load of 40T is applied in a span of 10 minutes.
Then release the load and remove the material from the cylinder.
Following, sieve again on 2.36mm IS sieve.
Then weigh the material passing through the sieve and record it as W2.
Finally, calculate the specimen crushing value using the formula below.
Aggregate crushing value = (W2 x 100) / (W1-W)
W1-W = weight of dry sample
W2 = Weight of fraction passing through the sieve after application of load.
For a good quality aggregate, the crushing strength value is low.
Recommended crushing values
Flexible pavements
Crushing value
Soling
50
Water bound Macadam
40
Bituminous macadam
40
premix carpet
30
Dense mix carpet
30
Rigid pavements
Other than wearing course
45
Surface or Wearing course
30
The aggregates used in roads and pavement construction must be strong enough to withstand crushing under roller and traffic. If the aggregate crushing value is 30 or higher’ the result may be anomalous and in such cases the ten percent fines value should be determined instead.
Reservoirs are artificial or natural structures used for collecting and storing for further usages. The reservoir is formed by constructing dams across rivers, valleys, and streams. The Reservoir is located on the upstream side of dams and prevents floods by managing the water flow apart from serving as a storage basin.
Reservoirs are broadly classified into three types.
Valley dammed reservoirs
Back-side reservoirs
Service reservoirs
Valley dammed reservoirs
Valley dammed reservoirs are located between mountain valleys where there is an existing water body. A dam is built in the narrowest portion for holding the water.
Bank-side reservoirs
Bank side reservoirs are made by diverting water from rivers and streams to an existing reservoir. These reservoirs can be located in different geographical locations.
Service reservoirs
Service reservoirs are man made reservoirs located above the ground or below the ground. The huge water towers/ water tanks and sumps are service reservoirs.
Service reservoir
Reservoir components and terms
There are some specific terms for defining the water level and storage capacity of a reservoir
Pool level
The water level at a particular point of time is called the pool level. No water can be collected above the maximum pool level. No water can be drained below the minimum pool level.
Useful Storage
The volume of water within the normal pool level and minimum pool level is known as useful storage.
Dead storage
The volume of water underneath the minimum pool level is known as dead storage.
Surcharge Storage
The volume of water within the normal pool level and maximum pool level is known as surcharge storage.
Reservoir yield
The volume of water discharged within a certain interval of time is reservoir yield.
Reservoir Planning
Accurate planning is necessary for locating a reservoir. For planning a reservoir the following points are taken into consideration.
Topography
A Broad natural valley opts as the site of a reservoirs. The valley can be U- shaped or V-shaped. For reservoirs sites, flatland and plains are not considered.
Ground water condition
The groundwater investigation is done by analysing the water table level and reservoir level.Hence it is an ideal situation for the reservoirs site if the water table level and the top reservoir level is the same. No loss or gain is ensured.
Permeability
Permeability is a default nature as the rocks are porous. It is considered when the water table is below the reservoirs level. It is a significant characteristic for investigation.
Hydrological Investigation
This involves the study of runoff pattern. Leakage quantity should be minimum. Storage capacity calculation and maximum discharge rate are also estimated.
Difference between dams and reservoirs
DAMS
RESERVOIR
Structural barriers built across,rivers valleys,streams etc for the purpose of storing and managing water flow.
Reservoir is a large water body formed behind the constructed dam structure across a river,stream,etc
Dams are reinforced concrete structures or structures made of bricks rubble etc erected across water bodies to control the water flow.
The reservoir is the water that accumulates behind the constructed dam.
Create site for hydro electric power generation. This can improve the industrial development and living standards of people living in that region.
Stores water for later usage, water for human consumption and excess water for agricultural and industrial uses.
Dams fluctuates oxygen levels and restricts migration of fishes in the river.
Reservoirs leads to the displacement of people.
Dams are tourist attraction sites
Helps in water transportation
Reservoir Sedimentation
Rivers transport sediments. During heavy rainfall, sediments are carried by the water to the reservoir. Silts are accumulated due to soil erosion. These get collected in the dead storage. Sedimentation depends on Rainfall intensity, Soil nature, Soil type, topography and vegetation. The sediment deposit replaces the water storage. Thus water supply and flood control are affected. The sediments should be removed eventually. Hydraulic flushing, dredging, Explosive mobilization are methods adopted for sedimentation removal.
reservoir
Environmental impacts of Reservoirs.
The construction of the reservoir prompts severe effects on the environment.
Since the water is stored, the rate of transpiration is high. This changes the moisture concentration.The climate of the surrounding area is affected. It causes natural temperature fluctuation. This causes heavy rainfall and deprives the traditional rainfall patterns.
Reservoirs disturb the flow and composition of the rivers. The water from the downstream has high energy, it enhances the water flow by eroding the river bed.
The change in the river composition affects the upstream and downstream habitats. The reservoirs disturb the fish and birds migration.
Studies show that reservoirs emit greenhouse gases. Anaerobic bacterias are seen in the river bed releases carbon dioxide and methane. This occurs in tropical regions.
They also cause troubles for people living near the reservoir site. Old and failing dams lead to disasters.
Reservoir induced seismicity is a phenomenon of provoking earthquake by reservoirs. This happens when water sweeps into the minor cracks under the bed.
Total station in surveying is used for computing slant distances, horizontal and vertical angles, elevations in topographic and geodetic works, tacheometric surveys, etc. The total station is a pre-eminent contribution to modern surveying and hence the equipment is designed for speed, range, and accuracy. They are a combination of Theodolite and Electronic Distance measurement (EDM). This enables computing the vertical, horizontal as well as slope measurements.
They act as a substitute for theodolite, EDM, Data collectors, and Microprocessors. Moreover, they are lightweight and compact machines and perform like transit stadia and plane table alidades.
The integration of microprocessors helps in the data collection and measurement computation process. Further to that, the inbuilt software helps to generate the maps instantly.
Apart from taking the measurements, the total station helps in computing, interpreting, and documenting the data. Here is a list of activities that are computed, interpreted, and analyzed.
The total station consists of a built-in emitter, capable of emitting microwaves and infrared signals. The wavelength of these emitted waves helps in calculating the distance between the points. Distance = velocity * time
Here the distance is calculated by multiplying the time taken to cover a certain distance by the velocity. However, Triangulation and trigonometry methods are adopted for computing the angles and determining the coordinates.
The Equipment is composed of different parts. Below listed are the major components.
Components
Components of total station
Handle
Handle securing screw
Data input/output terminal (Remove handle to view)
Instrument height mark
Battery cover
Operation panel
Tribrach clamp
Baseplate
Levelling foot screw
Circular level adjusting screws
Circular level
Display
Prism and prism pole
Objective lens
Tubular compass slot
The optical plummet focusing ring
Optical plummet reticle cover
Optical plummet eyepiece
Horizontal clamp
A horizontal fine motion screw
Data input/output connector
External power source connector
Plate level
Plate level adjusting screw
Vertical clamp
A vertical fine motion screw
Telescope eyepiece
Telescope focusing ring
Peep sight
Instrument centre mark
A tripod enables one to affix the equipment onto the ground. A handle is available on the top of the equipment for holding it. There are a Data input and output terminal below the handle enabling the data transfer to the computer. The total station comes with inbuilt software, an operation panel, a keyboard, and a screen. The prism and prism poles help in measuring distances.
Total station applications
The total station consists of an EDM, Theodolite, and a Microprocessor combined into one. They got a memory card for data storage and a battery. A fully charged battery works for about 3 to 5 hrs continuously.
Coordination determination
Distance measurement
Angular measurement
Data processing
Coordination Determination
The total station determines the coordinate of an unknown point. The instrument is placed over a known coordinate. The equipment digitally computes the coordinates.
Distance measurement
As mentioned earlier, the total station got an inbuilt miniature emitter. The emitters release microwave signals. The prism reflector or object under survey at the other end reflects the waves. Onboard data interpreters compute the distance by emitting and receiving multiple frequencies.
Angular measurement
The total station uses the distance between the point and the time taken by the waves reflected for deciding angular measurement.
Data processing
The integration of the microprocessor in a total station helps to read and interpret the survey parameters. Subsequently, the data is stored in the memory card of the instrument and later transferred to a computer. They can compute multiple measurements with high precision with compensation for temperature, pressure, and humidity corrections.
Setting up of a total station
The basic steps involved in setting up are tripod setup, levelling, and instrument focusing.
The tripod legs are placed firmly on the ground with equidistant legs with the head position above the survey point.
The total station is placed on the tripod. It is fixed and secured using a centring screw.
The next step is to sharpen the optical plummet towards the survey point. On sharpening, the optical plummet reticle centres the survey point.
The bubble is adjusted to the centre by levelling foot screws
The time taken for levelling the equipment depend on the skill of the operator. However, levelling is the topmost activity to maintain the accuracy of measurements.
Adjust the plate level by loosening the horizontal clamp. The equipment is parallel to levelling foot screw.
Turn the instrument at 90 degrees and level using a 3rd levelling screw.
Subsequently, turn on the instrument.
Select the tilt function from the opening window followed by adjusting the foot level screw and centre the bubble.
Rotate the instrument at 90 degrees. Repeat the process.
Finally, adjust the ring and focus the telescope on the target point.
Total station prism
Advantages of Total station
There are a lot of advantages of total station as mentioned below
High precision and accuracy.
Requires limited manpower
Perform quick fieldwork
Reduction in manual errors.
Correction for temperature, pressure etc and digitally rectified.
Storage and interpretation of data are easy
Time consumed is less.
Inbuilt GIS software helps in instant map creation
Assists in local languages.
Disadvantages of Total station
The cost of the instrument is high.
Need highly skilled surveyor with AutoCAD knowledge and professional training.
Checking errors during the operation is impossible.
Low battery life.
Key Takeaways
Functionality: Total station integrates Theodolite and Electronic Distance Measurement (EDM) for precise surveying.
Components: Includes emitter, microprocessor, prism, and multiple control interfaces.
Applications: Measures horizontal/vertical angles, distances, coordinates, and calculates areas/contours.
Working Principle: Uses microwaves/infrared signals to compute distances via time and velocity; angles through triangulation and trigonometry.
Advantages: High precision, reduced manual errors, quick data processing, minimal manpower, and inbuilt GIS software for instant mapping.
Disadvantages: High cost, requires skilled operators, limited battery life, and no real-time error checking.
Setup Process: Involves tripod positioning, levelling, centring optical plummet, and adjusting levels and focus.
Conclusion
The total station revolutionizes modern surveying with its advanced integration of theodolite, EDM, and microprocessor technology. It enhances efficiency through precise measurements, quick data processing, and inbuilt mapping capabilities. Despite its high cost and need for skilled operation, the total station’s benefits of high accuracy, reduced manpower, and minimized manual errors make it indispensable in topographic, geodetic, and tacheometric surveys. Its ability to handle multiple functions—angle, distance, and coordinate measurements—streamlines surveying tasks, making it a valuable tool for civil engineering and related fields.
Water proofing is a method of applying coatings to a structure to make it waterproof or leak proof. Waterproofing is one of the most critical construction activities meant for enhancing the life and stability of the building/structure. In other words, we can say waterproofing means preventing the entry of water through a structure. This article is about the waterproofing methods suggested for residential, industrial, and commercial applications.
Why waterproofing is required?
Waterproofing is applied for basement or below-ground areas, toilet areas, swimming pools, water storage tanks, water retaining structures, rooftops and podium areas, deep industrial structures, foundations, etc.
Waterproofing is a must for basements below grade/ground level to prevent water seepage and structural damages. Basement waterproofing is unavoidable in areas where the water table is very high, and chances of rainwater flooding around the building and sweeping through the basement walls.
Concrete is a porous material and hence vulnerable to chemical attack. Water will enter and cause structural deterioration to the concrete and corrosion of embedded steel.
Rooftop and podium areas are exposed to rain and water seepage through concrete surfaces and cracks will damage the valuable interiors and embedded steel.
Waterproofing is a much-needed construction activity essential to maintain the life of the building.
Cementitious waterproofing is the most common and economical method of waterproofing used in construction works. The materials are readily available and can be mixed and applied with ease.
The cementitious waterproofing materials are available in various types. Commonly used types are
Polymer modified Cementitious waterproofing
Acrylic polymer modified Cementitious coatings.
Crystalline water proofing
Polymer-modified cementitious waterproofing
Polymer-modified cementitious waterproofing systems are two-part cement-based polymer coatings that are highly flexible and elastic. Polymer-based coatings possess enhanced adhesion and are breathable. No vapor from concrete is entrapped inside. These types of coatings are preferred for waterproofing works in water storage tanks, basements, swimming pools, and pumping stations, and any other structures that are constantly in contact with water. These coatings are not preferred for waterproofing works exposed to sunlight.
cementitious coating
Acrylic polymer-modified cementitious coating
The acrylic polymer-modified cementitious coating is a single component /two-component material mixed with an acrylic polymer and special additives. The acrylic additives provide strong adhesion and a durable coating on any surface like steel, concrete, etc. The ingredients constitute cement-based materials that can easily blend with water or polymer emulsions. The acrylic polymer coatings are solid, durable, elastic, and nonbreakable.
Crystalline water proofing
Crystalline Cementitious Waterproofing systems consist of cement, quartz, or silica treated with and chemicals for the crystallization process. Once combined with water, it creates a crystalline structure that fills the pores, cracks, and capillaries in concrete which disallows water from seeping through them. This method of waterproofing is preferred for internal and external waterproofing of concrete structures.
Cementitious water proofing systems are not preferred for areas where there are structural cracks or any other moments.
Liquid-applied membrane
Liquid-applied membrane (LAM) is a monolithic, fully-bonded, liquid-based coating that cures to form a rubber-like elastomeric waterproof membrane. These are mainly used for roof waterproofing. The coating is capable of stretching and returning to its original shape without damage. They can also be reinforced with materials like glass-reinforced plastic to enhance tensile strength. Liquid waterproofing membranes provide a cost-effective method of making a new or existing roof waterproof. They are durable, flexible, and got excellent life of around 20 years without failure. The application is done using brushes or sprayed over a coat of appropriate primers. The main ingredient responsible for the properties is polymer-modified asphalt.
Polyurethane liquid based elastomeric membrane
Polyurethane waterproofing is a two-component material based on urethane pre-polymers and cures by reaction with atmospheric moisture to form a continuous elastic and rubbery film. Unlike other waterproofing systems like sheet membranes and liquid applied membranes, this polyurethane application requires comparatively less skill and supervision. These membranes got excellent UV-resistant properties and got good adhesion to any surface like concrete, slate, tile, steel, etc. They are mainly used for roof applications.
Bituminous coating
Bituminous coating is a flexible coating used for structural protection and waterproofing of concrete foundations and exposed sides of underground exposed structures. The main ingredient of bituminous coatings is bitumen based material and anti-stripping agents. Bituminous coating is not preferred for works exposed to sunlight. On exposure, they will become brittle and peel off from the surface.
Water proofing – Bituminous coating
Bituminous membrane or APP Membrane
Water proofing – AAP Membrane or torch applied membranes
APP membrane is a bituminous membrane modified with APP polymers. APP stands for Atactic Polypropylene and is manufacture from a plastic called atactic polypropylene and bitumen mix. These membranes are also called torch-applied membranes. During this process, the plastic begins to melt and form a wax-like liquid which is levelled on a surface.
Conclusion
The methods of waterproofing depends on the application areas and location of seepage. The locations, nature, economy, purpose of structure has to be technically studied and analysed before proposing an appropriate treatment method.
Marble is one of the most durable, elegant, and beautiful flooring materials used for centuries. Marble flooring is a superior quality flooring that can match any architecture concept and never get outdated. Apart from presenting luxurious interiors, the marble flooring can enhance the value of the building.
Despite being one of the best flooring options, marble stone got their disadvantages also. This article provides a fair knowledge about the advantages and disadvantages of marble stone flooring.
A sedimentary stone like limestone subjected to enormous heat and pressure for millions of years is transformed into a much harder stone with elegant color, swirls, and veined patterns. This process of transformation is known as metamorphosis and the natural stone developed through this process is known as marble stone. The marble is quarried and cut into slabs and tiles and used for applications like flooring, countertops, wall cladding, floor and wall tiles, antique pillars, etc.
The veins and swirls present in many marble pieces occur when various mineral impurities like clay, silt, sand, iron oxides, etc mixed with the original limestone. On polishing, the marble looks elegant, smooth, reflects light, and feels the interior more spacious.
Marble is a semi- transparent and soft natural stone. They have a tendency to penetrate and reflects lights, They are porous stone with a high water absorption rate, Marble flooring tiles come in varying colors and surface patterns. Here we are listing some of the popular types of marble stone available.
Makarana Marble
Italian Marble
Rajnagar White Marble
Ambaji Green Marble
Kesarayaji Green Marble
Udaipur Pink Marble
Udaipur Green Marble
Jaisalmer Yellow Marble
Abu black Marble
Aandhi Marble
Marble flooring – Finishing
Marble floors/sculptures are finished in different patterns depending on the architecture concept and usage.
Polished marble
Honed finished marble
Polished marble
Polished marble is the most popular finishing option of marble flooring. The marble surface is ground with a stone polishing machine using a variety of stones. Polishing gives a smooth and high gloss look to the marble floor. Polishing exposes the veins and swirls in the marble and provides a classy, superior, and elegant look. Polished marble is less porous and very easy to maintain when compared to other finishes and able to retain the sheen and charm for many years.
Polished marble is very slippery and not preferred in areas where there are chances of any water presence.
b) Honed finish
Honey-finished marble is the lightly polished form of marble finishing done just enough to produce a minor glossiness. These are less slippery but they may not be scratch resistant. Maintenance is also a little bit difficult when compared to polished marble.
Advantages of marble flooring
Marble flooring is one of the most popular options and is available in a wide range of colors, textures, and patterns. They are durable, elegant, and gives a superior feel to the interiors. Despite all these enormous advantages marble got a bit of a disadvantage also. These parameters have to be taken into account while considering the option of flooring with marble stones.
a) Durability
Marble is a natural material and got a reputation for durability over hundreds of years now. Marble is extremely durable,scratch-free, and long-lasting and can withstand any traffic and external pressures, and weight changes. Apart from residential uses, they are suitable for high traffic areas like commercial buildings, hotels, institutions, etc.
b) Versatile Designs and natural elegance
Marble is available in different colors, veins, swirls, patterns, and shades and can match any color scheme of the space and the customer’s needs. No other natural stone is elegant as marble that gives a simple and natural look to any space. The patterns, color, and design vary slightly in each slab/tile resulting in a custom look for each tile/slab.
Marble flooring designs
c) Translucent properties
Marble is a translucent, semi-transparent material that allows some light to pass through it. The shiny translucent marble surface reflects light and thereby enhances the amount of natural light present in the rooms. This makes the rooms brighter, open, and more spacious. Because of the translucent properties, white and light-colored marble is best for flooring works. White cement grouts are more suitable for marble laying instead of grey cement.
d) Ease of cleaning
The marble floor is seamless and smooth and hence can be cleaned easily using mild detergents and water. The maintenance cost of a marble floor is low when compared with tile or any other type of flooring.
e) Ease of cutting and moulding
Marble stones are soft and the exact size as can be cut, moulded and shaped very easily.
f) Eco-friendly material
Marble is an eco-friendly and natural material. No chemical process is involved in the manufacturing of marble. Marble is a completely degradable material.
g) Cool feeling on foot
Marble stone provides a cool feeling in hot climates.
h) Architect favourite
Marble flooring gives an excellent look when mirror polished and provides a significant aesthetic for interiors. Marble flooring can match any color scheme of the space. The light-reflective properties enhance the class of this product and hence preferred by architects and interior designers.
i) Heat conduction
Marble is a good conductor of heat and is an integral part of radiant, in-floor heating system . This can make us feel warm even in the coldest temperatures.
j) Antibacterial and anti allergic properties
Marble eliminates microscopic particles and germs if it is cleaned properly.
Disadvantages of marble flooring
Despite its beauty, elegance, durability, and classic looks marble has some disadvantages. Let us go through the disadvantages of marble flooring.
a) Softer stone
Marble is a softer stone and is susceptible to scratching, chipping, breaking, etc when compared to any other material like granite, tile, etc. The surface is smooth and light in color and tends to show scratches and defects. Any damage may lead to the replacement of the total area with another piece.
b) Vulnerable to acidic substances
Marble is vulnerable to acidic substances like cleaners, lime, wine coffee, sauces, etc. These can permanently stain and decolor the marble surface. Hence marble flooring is not preferred for kitchen counters.
c) Slippery surface
Marble gets its looks from polishing. But polishing can make it slippery when it is wet. Hence marble flooring is avoided for wet areas like bathrooms, kitchen, etc. For overcoming this situation semi-polished or horned marble finishing is to be done. But the horned finish is not as attractive as the mirror finish.
d) Water absorption
Because marble is porous, it’s susceptible to water seeping in and causing damage,stains or discoloration. A penetrating sealer helps keep water from soaking into the flooring.
e) High cost
Marble is one of the high-end stone flooring options. But the durability and life will not be in line with the total cost price of the marble. They may not necessarily last longer than any other flooring options like granite and vitrified tiles. Marble stone is soft and may chip or damage in long run.
f) Weight
Marble stone is very heavy and increases and thereby increases the dead load on a structure. Lifting of marble is difficult when compared to any other flooring material. The building structure has to be strong enough to support the weight of heavy floors.
g) Skilled installation manpower
Marble flooring needs highly skilled and expert manpower for fixing systematically by matching the swirls and grains. Marble stone is a soft material and is prone to cracks. Any mistake in installation may ruin the pattern and also causes huge wastage and financial losses.
h)Maintenance
Acid free mild detergents are to be used for cleaning marble floors. Marble flooring requires annual sealing to restrict the penetration of water and liquids.
Marbles are low heat resistance stone so its floor getting very cold in winter season. So it not suitable for cold regions.
i) Wastage and no availability of matching stone
Marble is a soft stone and tends to crack during loading,transportation and installation and creates a lot of wastage at site.
It is very difficult to change/replace marble flooring once installed. The stone of same colour and design is hard to find after few years. You have to maintain some minimal stock while buying the marble tiles.
Conclusion : Marble is one of the most versatile and luxurious flooring materials that can match any color schemes and themes. The selection of marble as a flooring material depends on the economy, aesthetic requirement, function, and purpose of space.
Empire state building remains one of the most distinctive and prominent buildings in the United States. And it is one of Modernist Art Deco design’s best examples.
I will walk you through the design and other aspects of the building. Let’s start from scratch.
What is Empire state building?
empire state building image
Empire State Building, a 102-story steel-framed skyscraper completed in New York City in 1931 and the world’s tallest building until 1971.
In Midtown Manhattan, on Fifth Avenue at 34th Street, is the Empire State Building.
Empire state building was the first to have more than 100 floors.
In the next section, we will find out the design of Empire state building.
Design
Empire state building night view
The Empire State Building, including its 203-foot (61.9 m) pinnacle, is 1,250 ft (381 m) high to its 102nd floor or 1,453 feet 8 9⁄16 inches (443.092 m) high.
The building has 86 available floors; 2.158 million square feet (200,500 m2) of commercial and office space are on the first through 85th floors, while the 86th floor features an observatory.
The remaining 16 floors are part of the Art Deco spire, which is capped on the 102nd floor by an observatory, which does not have any intermediate floor levels.
The 203 ft (61.9 m) pinnacle is at the top of the 86th storey, most of which is protected by broadcast antennas and surmounted by a lightning rod.
The building and its street floor interior are designated as New York City Landmarks Preservation Commission landmarks, and verified by the Estimate Board of New York City.
In 1986, it was designated as a National Historic Landmark.
It was first on the AIA’s List of Favourite Architecture for America in 2007.
I will show you the construction details in the next section.
Construction
Empire state building view
On January 12, 1930, a structural steel contract was awarded, with the construction of the site starting ten days later on January 22, until the old hotel was completely demolished.
Two twelve-hour shifts, consisting of 300 men each, continuously worked to dig the foundation of 55 feet (17 m).
To house the concrete footings that would protect the steelwork, small pier holes were drilled into the ground.
By early March, excavation was almost complete, and work on the building itself began on March 17, with the builders putting the first steel columns on the completed footings before completing the rest of the footings.
In anticipation of a revision to the city’s building code, the structural steel was pre-ordered and pre-fabricated to enable the structural steel of the Empire State Building to hold 18,000 pounds per square inch (120,000 kPa), up from 16,000 pounds per square inch (110,000 kPa), thereby reducing the amount of steel required for the building.
While the 18,000-psi rule had been safely enforced in other towns, until March 26, 1930, just before the construction was due to begin, Mayor Jimmy Walker did not sign the new codes into law.
The first steel structure was built on April 1, 1930.
Construction from there continued at a rapid pace; the builders erected fourteen floors within one stretch of 10 working days.
This was made possible by precisely organising the planning of the house, as well as by mass manufacturing common materials such as windows and spandrels.
On one occasion, when a supplier was unable to supply dark Hauteville marble in a timely manner, Starrett turned to the use of Rose Famosa marble from a German quarry that was purchased specifically to provide ample marble for the project.
By June 20, the supporting steel frame of the skyscraper had risen to the 26th floor, and half of the steel structure had been completed by July 27. Starrett Bros.
And Eken sought to build one floor a day to speed up construction, a target they almost achieved with their rate of 4 1⁄2 floors a week; prior to this, the fastest rate of construction for a building of similar height (as opposed to the general design, which had been from the roof down).
Some of the levels were still awaiting final approval, with many orders placed within an hour of finalising a design.
As steelwork was nearing completion on September 10, during a ceremony attended by thousands, Smith laid the cornerstone of the structure.
That’s it about Empire state building. Do you want to know anymore? Let me know in comments.